
If you’re looking for a new knitting project that’s both stylish and cozy, look no further than a knit vest pattern. Knit vests are a versatile addition to any wardrobe, providing warmth and comfort while still allowing for movement and flexibility. What’s more, knitting a vest in the round eliminates the need to sew any seams, making the project even more enjoyable and rewarding.
When choosing a knit vest pattern, consider the level of difficulty and the style you prefer. There are patterns available for beginners all the way up to advanced knitters, with options for classic, timeless designs, as well as more modern and trendy styles. No matter your skill level or personal taste, there’s a vest pattern out there that will be perfect for you.
Knitting a vest in the round begins with casting on and joining the stitches to create a seamless tube. From there, you’ll work in the round, knitting the body of the vest and the armholes. The pattern may involve different stitch patterns and techniques, such as ribbing, cables, or lace. Following the pattern instructions carefully will ensure that your vest turns out just right.
Knit Vest Pattern in the Round: Step-by-Step Guide
Knitting a vest in the round is a great project for intermediate knitters looking to expand their skills. This technique allows you to create a seamless garment with minimal finishing work. In this step-by-step guide, we will walk you through the process of knitting a vest in the round, from casting on to binding off.
Materials Needed:
- Yarn: Choose a yarn that is suitable for the vest you want to make. Worsted weight yarn is a popular choice for vests.
- Needles: Use circular needles in the appropriate size for your chosen yarn.
- Stitch markers: These will help you keep track of the beginning of the round and any stitch pattern repeats.
- Tapestry needle: For weaving in ends and seaming if necessary.
Step 1: Cast on
Using the long tail cast-on method, cast on the required number of stitches for your size. Make sure to leave a long tail to weave in later. Place a stitch marker to indicate the beginning of the round.
Step 2: Knit the Body
Join your work in the round, being careful not to twist your stitches. Knit every round until the body of the vest reaches the desired length. You can customize the length based on your preference.
Step 3: Shape Armholes and Neckline
To shape the armholes, you will need to bind off a certain number of stitches at each side of the work. This will create openings for your arms. You can also shape the neckline by binding off stitches in the center of the work.
Step 4: Knit the Neckline and Armhole Edgings
Pick up stitches along the edges of the armholes and neckline, using the same size circular needle. Knit these stitches in your desired ribbing pattern for the edgings. This will give the vest a polished and finished look.
Step 5: Bind off
Once you have finished knitting the edgings, bind off all stitches in your chosen method. Make sure to weave in any remaining ends and block your vest to ensure a professional finish.
By following this step-by-step guide, you can confidently knit a vest in the round. Remember to take your time, follow the pattern instructions, and enjoy the process of creating a beautiful and cozy garment!
Choosing the Right Yarn and Needles
When it comes to knitting a vest, choosing the right yarn and needles is crucial for achieving the desired result. The type and weight of yarn can greatly impact the look and feel of the finished vest, while the size of the needles determines the gauge and overall fit of the garment.
Yarn: Selecting the appropriate yarn for your vest pattern is essential. Depending on the style and intended use of the vest, you may opt for different types of yarn such as wool, cotton, or acrylic. Consider the drape, warmth, and breathability of the yarn when making your decision. Additionally, be mindful of the recommended gauge for the pattern and choose a yarn that will help you achieve that gauge. It’s also important to consider factors like the care instructions for the yarn and any potential allergies or sensitivities of the wearer.
Needles:
Type: The type of needles you choose can impact your knitting experience and the final look of the vest. Straight needles are commonly used for flat knitting, while circular needles are suitable for working in the round. If the pattern requires circular knitting, make sure to select circular needles of the appropriate length. Interchangeable needles can offer more versatility and convenience, allowing you to switch needle sizes while working on the same project.
Size: The size of the needles will determine the gauge of your knitting. Consult the pattern for the recommended needle size and consider how it aligns with your desired gauge and the yarn you have chosen. If necessary, adjust the needle size to achieve the correct gauge. Keep in mind that larger needles will create a looser fabric, while smaller needles will result in a tighter and denser fabric.
Getting Started: Casting On
Casting on is the first step in knitting a knit vest in the round. It is the process of creating the initial row of stitches on your knitting needles. There are different methods of casting on, and the one you choose may depend on the pattern or your personal preference.
One common method of casting on is the long-tail cast on. This method creates a neat and stretchy edge, perfect for the bottom hem of your vest. To begin, measure a tail of yarn that is approximately four times the width of your finished project. Make a slipknot at the end of the tail, leaving a small loop. Slip this loop onto one knitting needle, holding the tail behind the needle with your thumb and index finger. Insert the other knitting needle into the loop from left to right, and loop the working yarn (the yarn attached to the ball) over the back needle. Pull the working yarn through the loop, creating a new stitch on the needle. Repeat this process until you have cast on the required number of stitches for your pattern.
Another popular method is the cable cast on. This method creates a sturdy and decorative edge, which is great for the armholes and neckline of your vest. To start, hold the knitting needle with the cast on stitches in your right hand, and the second knitting needle in your left hand. Insert the tip of the left needle between the first two stitches on the right needle, going from front to back. Wrap the working yarn around the left needle, and pull it through the gap between the two stitches on the right needle. Slip the newly formed stitch onto the right needle. Repeat this process until you have cast on the desired number of stitches.
Once you have cast on all the stitches required for your knit vest pattern, you are ready to begin knitting in the round. Remember to join your stitches into a circle by bringing the first and last stitch together, being careful not to twist your stitches. With your cast on complete, you can now move on to the next step in creating your knit vest.
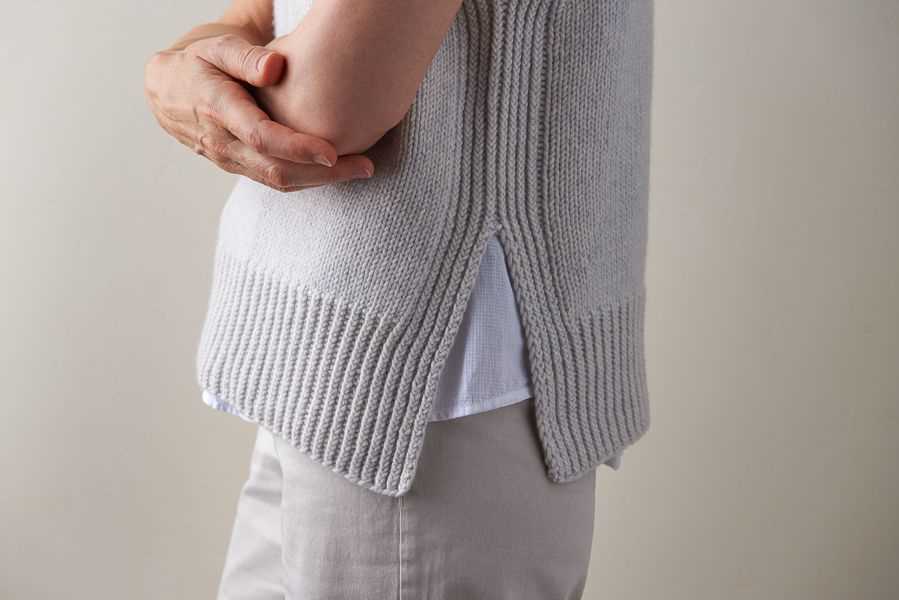
Creating the Ribbing
Before you begin knitting the main body of the vest, you will first need to create the ribbing at the bottom. The ribbing not only adds a decorative element to the vest but also helps create a stretchy and snug fit. To create the ribbing, you will be using a smaller needle size than what you will be using for the rest of the pattern.
To start, cast on the required number of stitches for the ribbing using the smaller needle size. The most common stitch pattern for ribbing is the knit 1, purl 1 (K1, P1) rib. This creates a neat and reversible ribbing that stretches easily. Continue knitting in this ribbing pattern for the desired length, making sure to keep the tension consistent to ensure an even ribbing.
If you prefer a different ribbing pattern, such as a K2, P2 rib or a twisted rib, feel free to modify the pattern accordingly. Just make sure to adjust the number of stitches for the ribbing pattern so that it matches the stitch count of the main body of the vest.
Once you have completed the ribbing, you can switch to the larger needle size and begin knitting the main body of the vest in the desired stitch pattern. The ribbing will serve as a foundation for the rest of the vest and help give it a polished and professional look. Remember to check your gauge regularly to ensure that your vest is turning out the correct size and adjust your needle size if needed.
In summary, creating the ribbing for your knit vest involves casting on the required number of stitches using a smaller needle size, knitting in the desired ribbing pattern for the desired length, and then switching to the larger needle size to knit the main body of the vest. The ribbing adds both functionality and style to your vest, making it a crucial step in the knitting process.
Transitioning to the Body
In a knit vest pattern worked in the round, transitioning to the body section marks an important step in the construction of the garment. Once you have completed the ribbing for the lower edge, it is time to begin knitting the body of the vest.
Increasing stitches: To achieve a comfortable fit, it is common to increase stitches at this stage. This can be done by evenly distributing increases throughout a round, or by working set increases at specific intervals. The pattern will typically specify the type and placement of the increases to be made.
Working the body: After increasing stitches, you will continue to knit in the round, following the stitch pattern established in the ribbing section. The body of the vest is often a plain or textured stitch pattern, allowing for easy knitting without complex shaping. It is important to keep track of the stitch count and pattern repeats to ensure accuracy.
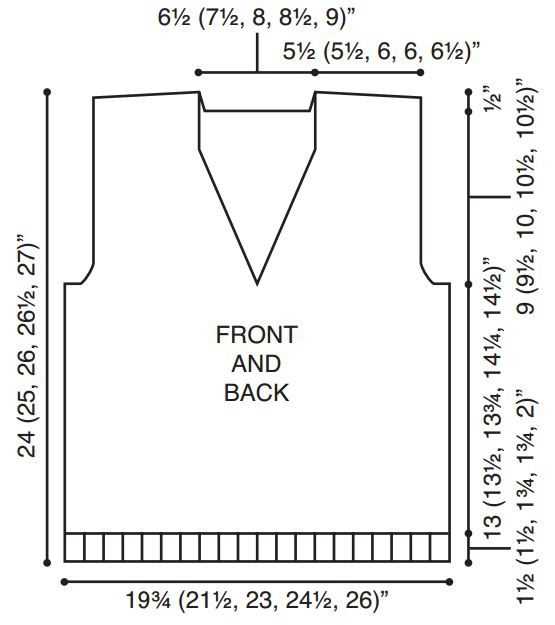
Length: The length of the vest body can vary depending on the desired style and fit. Some patterns may provide specific measurements or guidelines for the length, while others may simply instruct you to continue knitting until reaching a certain point or achieving the desired length. It is a good idea to try on the vest periodically to check the length and make any adjustments if necessary.
Finishing the body: Once you have reached the desired length for the body, you will typically end with a row or round of the stitch pattern, ensuring a clean and cohesive finish. From here, you may need to transition to a different stitch pattern for the next section of the vest, such as the armhole shaping or the neckline. Always follow the pattern instructions to ensure accurate shaping and a polished final result.
Understanding the Pattern Stitch
When working on a knit vest in the round, it is important to understand the pattern stitch. This stitch pattern is the design motif that will be repeated throughout the project and is typically specified in the pattern instructions. The pattern stitch is what gives the vest its unique look and texture, so it is crucial to follow it accurately.
The pattern stitch may involve different combinations of knit and purl stitches, as well as other techniques such as yarn overs or decreases. It is important to study the pattern stitch carefully before beginning the project to ensure that you understand how to execute each step.
To help you keep track of the pattern stitch, it is helpful to use stitch markers. These markers can be placed at specific intervals in the pattern to indicate when to begin or end a particular section of the stitch pattern. They can also help you count stitches and rows to ensure accuracy.
Additionally, the pattern may include a key or chart that provides a visual representation of the pattern stitch. This can be especially helpful for complex stitch patterns or those that involve multiple repeats. The key or chart will typically show each stitch symbol and its corresponding action, allowing you to easily follow along.
It is important to read the pattern instructions carefully and refer to any notes or explanations provided by the designer. Understanding the pattern stitch will not only make it easier to knit the vest, but it will also allow you to make any necessary modifications or adjustments to the stitch pattern if needed.
Shaping the Armholes
The armholes of a knit vest pattern in the round are an important part of creating the desired fit and shape. To shape the armholes, you will need to decrease stitches at strategic points to create a curve that allows for comfortable movement of the arms.
One common way to shape the armholes is to decrease stitches evenly on both sides of the work. This can be done by knitting two stitches together, either through the front or back loops, at the designated points. The number of stitches to decrease and the frequency of the decreases will depend on the specific pattern and the desired fit.
Here is a step-by-step guide on how to shape the armholes:
- Identify the starting point for shaping the armholes, usually indicated in the pattern.
- Count the number of stitches that need to be decreased on each side. This information should also be provided in the pattern.
- Work up to the starting point for shaping the armholes.
- Knit or purl the designated number of stitches together to decrease them. This can be done using the knit two together (k2tog) or purl two together (p2tog) techniques.
- Continue working the pattern as instructed, remembering to decrease the specified number of stitches at the designated points.
Shaping the armholes is crucial for achieving a well-fitted and comfortable knit vest. By carefully following the pattern instructions and decreasing stitches at the appropriate points, you can create armholes that allow for ease of movement while maintaining the overall shape of the garment.
Joining in the Round
When knitting a vest in the round, one of the first steps is to join the cast-on stitches to form a continuous circle. This is an important step to ensure that your pattern works out correctly and that you don’t end up with any unsightly seams. To join in the round, place a stitch marker on your needle to mark the beginning of the round, and then bring the last stitch of your cast-on row to meet the first stitch, being careful not to twist your stitches.
With the first stitch of the cast-on row now next to the last stitch of the row, you can begin knitting in the round. This means that instead of turning your work at the end of the row, you simply continue knitting in the same direction. As you knit each round, make sure to knit the stitches as they appear on the right side of the work, being careful not to twist or ladder your stitches.
If you’re working with a pattern that includes a stitch pattern, such as a ribbing or a cable, make sure to follow the instructions for that specific stitch pattern when joining in the round. For example, if the pattern calls for a certain number of knit stitches followed by a certain number of purl stitches, make sure that your first round begins with the correct type of stitch.
As you continue knitting in the round, it’s important to periodically check your work to make sure that you haven’t accidentally twisted any stitches. Twisted stitches can be difficult to correct once you’ve completed several rounds, so it’s best to catch them early on. To check for twisted stitches, simply lay your work flat and make sure that all the stitches are facing in the same direction. If any stitches are twisted, carefully unravel the round and rejoin the stitches, making sure they are all facing the correct way.
Joining in the round is an essential technique when knitting a vest or any other project in the round. By following these steps and paying attention to your work, you’ll be able to successfully join your stitches and create a seamless and beautiful garment.
Working the Body of the Vest
Once you have completed the ribbing for the bottom hem of the vest, it is time to start working on the body section. This is where you will be creating the main part of the vest, which will cover the chest and back.
To begin, you will continue knitting in the round using the main stitch pattern. This could be a simple stockinette stitch or a more complex pattern, depending on the design of the vest. It is important to carefully follow the instructions provided in the pattern to create the desired effect.
Row 1: Start by knitting the first stitch of the round. Then, continue working across the row in the specified stitch pattern until you reach the last stitch.
Row 2: After reaching the last stitch of the previous row, simply continue knitting in the specified stitch pattern. Repeat this row until you have reached the desired length for the body of the vest.
During this stage, it is important to regularly check your gauge to ensure that you are knitting to the correct measurements. This will help ensure that the vest fits correctly once it is completed.
Additionally, you may need to make adjustments for shaping the armholes or neckline, depending on the design of the vest. This could involve decreasing or increasing stitches in specific rows to create the desired shape. Again, carefully follow the pattern instructions to achieve the intended result.
Adding the Neckline
After completing the body of the knit vest pattern, it’s time to add the neckline. The neckline can be customized to your preference, whether you want a higher collar or a deeper V-neck. Here are a few steps to guide you through the process.
1. Mark the Neckline
Before starting, try on the knit vest to determine where you want the neckline to be. Use stitch markers or safety pins to mark the center front and back of the collarbone, as well as the desired width and depth of the neckline.
2. Begin Decreasing Stitches
To create a smaller neck opening, you will need to decrease the number of stitches at the center front and back of the vest. This can be done by knitting or purling two stitches together at these points. The number of decreases will depend on the desired width of the neckline and the stitch pattern you’re using.
3. Shape the Neckline
To shape the neckline, you can work short rows or use a specific stitch pattern. Short rows involve knitting a certain number of stitches and then turning your work before reaching the end of the row. This creates a gentle curve in the neckline. Alternatively, you can use a stitch pattern, such as ribbing or a decorative lace pattern, to add interest and shape to the neckline.
4. Finish the Neckline
Once you’ve achieved the desired shape and width for the neckline, you can finish it off by binding off the remaining stitches. This can be done using a stretchy bind-off method to ensure a comfortable fit around the neck. You can also add a crochet edging or a ribbed collar for a polished look.
By following these steps, you can easily add a neckline to your knit vest pattern in the round. Remember to try on the garment periodically to ensure a proper fit and make any necessary adjustments as you go along. Happy knitting!
Finishing Touches: Binding Off
When you’ve completed knitting your vest in the round, it’s time to give it a polished finish by binding off. Binding off is the process of securely finishing the edge of your knitting, creating a stable and professional-looking edge.
To bind off, work the first two stitches as usual, then use your left-hand needle to lift the first stitch over the second stitch and off the right-hand needle. Continue working the next stitch and lifting the previous stitch over until you have one stitch remaining on your right-hand needle. Cut the yarn, leaving a tail of about 6 inches, then pull the tail through the final stitch and gently tighten to secure.
One important aspect to consider when binding off is the tension. You want to make sure that your bound off edge is not too tight or too loose. If it’s too tight, it will create a tight and restrictive edge, while if it’s too loose, it will create a floppy and unstructured edge. Take care to maintain consistent tension throughout the binding off process.
Another finishing touch you can add to your knit vest is blocking. Blocking is the process of gently shaping and stretching the garment to even out any irregularities and create a more polished appearance. To block your vest, soak it in lukewarm water with a gentle wool detergent, then squeeze out the excess water and lay it flat on a clean towel. Gently shape the garment by stretching it to the desired measurements, then let it dry completely.
By binding off your vest and optionally blocking it, you’ll be able to give your knit piece the final touches it needs to become a well-finished and professional-looking garment.
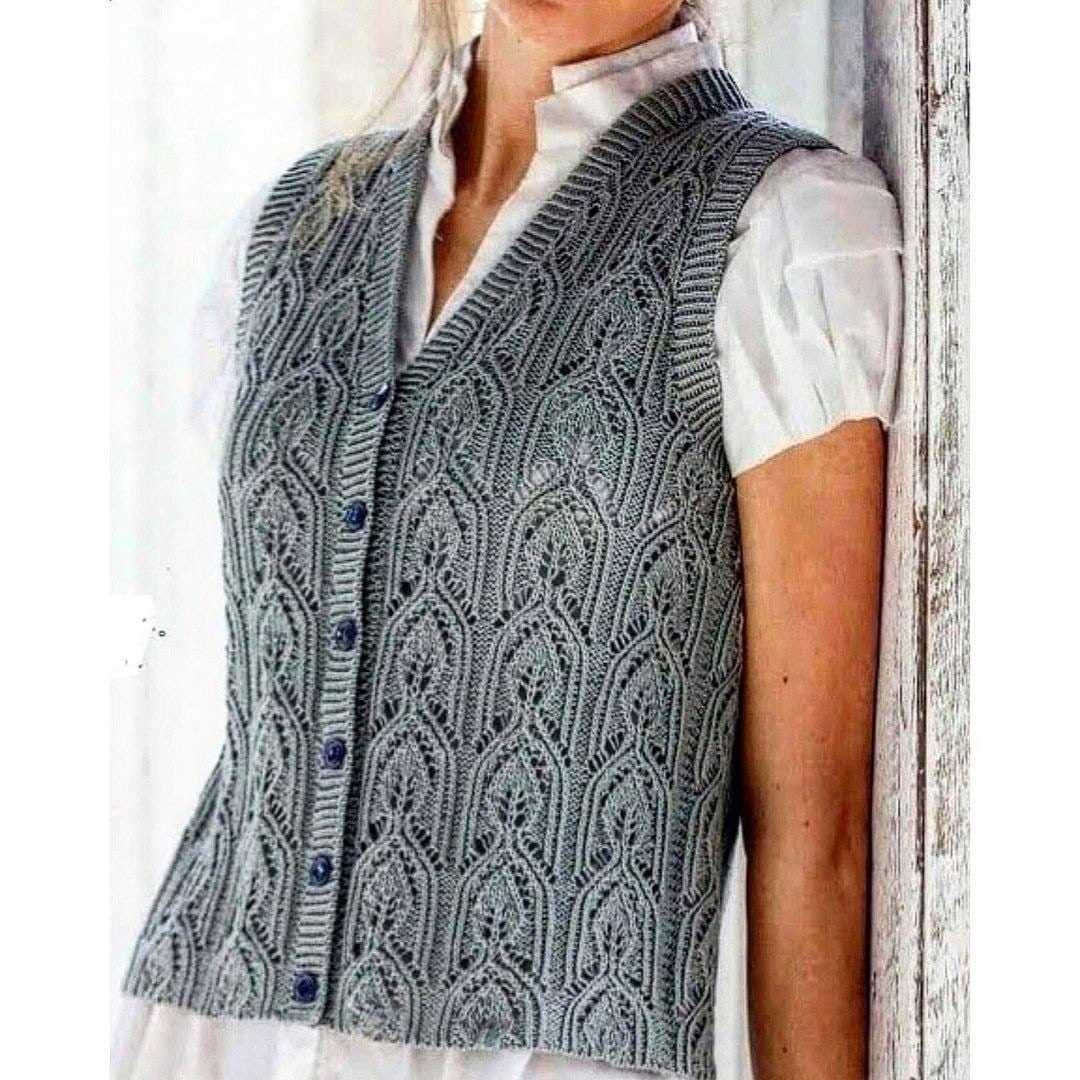
Adding Buttons or Other Closures
If you are looking to add buttons or other closures to your knit vest pattern, there are a few things you need to consider. The type and placement of the closures will depend on the design of the vest as well as your personal preferences.
Type of Closure: Buttons are a popular choice for closures on knit vests. You can choose from a variety of button styles and sizes to match your vest design. Other options include toggles, snaps, or even a zipper if you prefer a more modern look.
Placement of Closure: The placement of the closure will depend on the design of your vest. If your vest has a V-neck or a buttoned placket, the buttons can be placed along the edge of the opening. If your vest is more open or doesn’t have a defined neckline, you can choose to add buttons or closures along the sides or at the bottom hem.
Buttonholes: If you choose to go with buttons, you will need to make buttonholes. You can create vertical buttonholes by knitting a few stitches together and then binding off stitches to create the buttonhole opening. Another option is to create horizontal buttonholes by working a few rows in a contrasting stitch pattern and then cutting through the fabric to create an opening for the button.
Finishing Touch: After adding the closures, make sure to secure the ends of your yarn and sew the buttons securely to ensure they don’t come loose during wear. You can also add a small reinforcing stitch or button loop to provide additional stability to the closure.
Adding buttons or other closures to your knit vest pattern can add a decorative and functional element to your finished garment. Take your time to consider the design of your vest and choose the type and placement of the closures that best suit your style and preferences.
Block and Finish: Giving Your Knit Vest the Perfect Look
After completing your knit vest, it’s important to give it a professional finish. Blocking and finishing are the final steps in the knitting process that will help your vest look its best and hold its shape. Follow these steps to ensure your knit vest has the perfect look:
1. Blocking:
Blocking is the process of wetting your knitted garment to relax the fibers and shape it to its desired dimensions. Here’s how to block your knit vest:
- Fill a sink or basin with lukewarm water and a few drops of a gentle wool wash or baby shampoo.
- Place your knit vest in the water, gently pressing it down until it is fully submerged.
- Let the vest soak for about 15-20 minutes to allow the fibers to absorb the moisture.
- Drain the sink or basin and gently squeeze out the excess water from the vest. Avoid wringing or twisting it.
- Lay a clean towel on a flat surface and place the vest on top of it. Gently roll up the towel with the vest inside to remove more water.
- Unroll the towel and carefully reshape the vest to its desired dimensions, smoothing out any wrinkles or ripples.
- Let the vest dry completely, away from direct heat or sunlight. This may take a day or two, depending on the thickness of the yarn.
2. Finishing:
Finishing involves adding any final touches to your knit vest, such as sewing in loose ends or attaching buttons. Here are some finishing techniques to consider:
- Sewing in loose ends: Use a yarn needle to weave the loose yarn ends into the fabric of the vest. This will ensure they don’t unravel and give your vest a polished look.
- Attaching buttons or closures: If your vest has a button placket or requires closures, sew them on securely using a strong thread or yarn, matching the color of the vest.
- Blocking again, if necessary: Sometimes, after the initial blocking, you may notice that your vest needs further reshaping. Repeat the blocking process outlined above for any necessary adjustments.
By blocking your knit vest, you’ll help it maintain its shape and create a more professional appearance. Finishing techniques will give your vest those final touches that make it truly complete. Now that you’ve completed your knit vest, step back and admire your handiwork – you’ve created a beautiful and functional garment!