
When it comes to knitting, the choice of yarn can greatly influence the overall look and feel of a finished project. Bulky yarn, also known as chunky yarn, is a popular choice for many knitters due to its thick and cozy texture.
One of the great advantages of working with bulky yarn is that it knits up quickly, allowing you to create beautiful, warm pieces in no time. Whether you’re a beginner knitter or an experienced one, there are plenty of knit stitch patterns that can be used with bulky yarn to create stunning projects.
From the classic stockinette stitch to more intricate cable and lace patterns, the possibilities are endless when it comes to knit stitch patterns for bulky yarn. These patterns can be used to make a variety of projects, such as scarves, hats, sweaters, and blankets.
In this article, we will explore some popular knit stitch patterns that work well with bulky yarn, providing you with inspiration and guidance for your next knitting project. Whether you prefer a simple and classic design or a more intricate and decorative pattern, there is something for everyone.
Knit Stitch Patterns for Bulky Yarn
When working with bulky yarn, it’s important to choose knit stitch patterns that will showcase the thickness and texture of the yarn. Bulky yarn has a cozy and chunky look, so it pairs well with stitch patterns that enhance its visual impact.
One popular stitch pattern for bulky yarn is the garter stitch. This simple pattern is created by knitting every row, resulting in a fabric with a ridged texture. The garter stitch is great for showcasing the thickness of bulky yarn and is perfect for warm and cozy accessories like scarves and blankets.
Garter Stitch
The garter stitch is created by simply knitting every row. The resulting fabric has a ridged texture and adds warmth and coziness to any project. This stitch pattern is perfect for bulky yarn as it showcases the thickness and texture of the yarn beautifully. It’s a versatile stitch pattern that can be used to create a wide range of projects, from scarves and hats to blankets and sweaters.
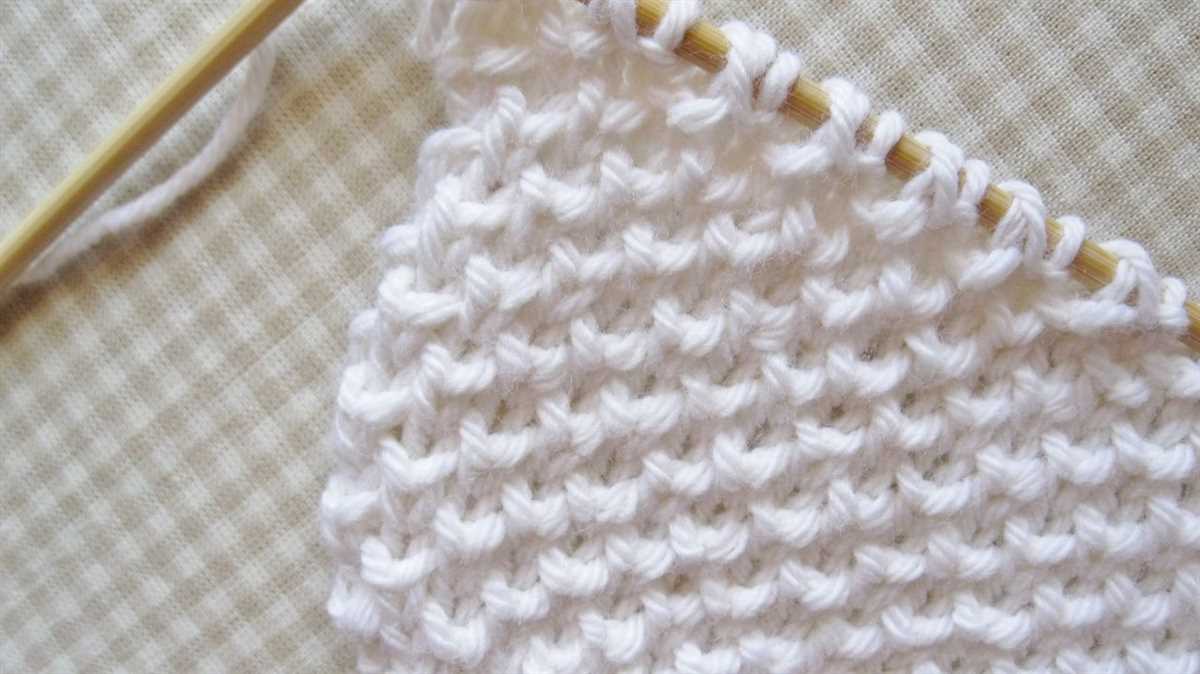
Another stitch pattern that works well with bulky yarn is the seed stitch. This pattern is created by alternating knit and purl stitches in a specific pattern. The seed stitch creates a textured fabric with small bumps that add visual interest to the finished project. It’s a great choice for bulky yarn as it enhances the texture and thickness of the yarn.
Seed Stitch
The seed stitch is created by alternating knit and purl stitches in a specific pattern. This stitch pattern creates a textured fabric with small bumps that add visual interest to any project. It works particularly well with bulky yarn as it enhances the thickness and texture of the yarn. The seed stitch is a great choice for a variety of projects, including scarves, cowls, and hats.
These are just a few examples of stitch patterns that work well with bulky yarn. The key is to choose patterns that enhance the texture and thickness of the yarn, creating a visually appealing finished project. Whether you’re knitting a cozy scarf or a warm blanket, these stitch patterns will help you make the most of your bulky yarn.
Garter Stitch Pattern
The garter stitch is one of the simplest stitch patterns in knitting, making it perfect for beginners or for those looking for a mindless, relaxing project. It is created by knitting every row, resulting in a textured fabric with a bumpy surface. This stitch pattern is ideal for showcasing the texture of bulky yarn, as the ridges created by the garter stitch stand out beautifully.
To knit the garter stitch pattern with bulky yarn, you will need a pair of knitting needles that are appropriate for your yarn weight. Start by casting on the desired number of stitches. Then, simply knit every row until you reach the desired length or complete your project. The garter stitch is reversible, meaning that both sides of the fabric will have the same textured appearance.
Bulky yarn is a great choice for the garter stitch pattern, as its thickness allows for quick progress and a cozy finished product. This stitch pattern is particularly suitable for winter accessories like scarves, cowls, and hats. It can also be used for blankets, bags, and other home decor items, adding both warmth and visual interest to your knitting projects.
If you’d like to add some variety to the garter stitch pattern, you can experiment with different needle sizes to achieve different densities of the fabric. Additionally, you can incorporate stripes or color changes to make your project more unique. Overall, the garter stitch is a versatile and timeless pattern that is perfect for showcasing the beauty of bulky yarn.
Stockinette Stitch Pattern
The Stockinette Stitch Pattern is one of the most basic and popular knit stitch patterns, commonly used for creating smooth and flat fabric. It consists of alternating rows of knit stitches and purl stitches.
To knit the Stockinette Stitch Pattern, simply knit one row and purl the next row. Repeat these two rows to create the desired length.
Key Point:
- The knit stitches create the smooth, raised side of the fabric, while the purl stitches create the bumpy, flat side.
The Stockinette Stitch Pattern is great for showcasing the texture and thickness of bulky yarn. It creates a fabric that is perfect for cozy sweaters, scarves, and blankets.
Pro Tip:
- When working with bulky yarn, it is important to choose knitting needles that are appropriate for the thickness of the yarn. Check the yarn label for recommended needle size, or experiment with different needle sizes to achieve the desired gauge and fabric drape.
| Row | Stitch |
|---|---|
| 1 | Knit |
| 2 | Purl |
| 3 | Knit |
| 4 | Purl |
| 5 | Knit |
| 6 | Purl |
| 7 | Knit |
| 8 | Purl |
Repeat rows 1-8 to continue the Stockinette Stitch Pattern.
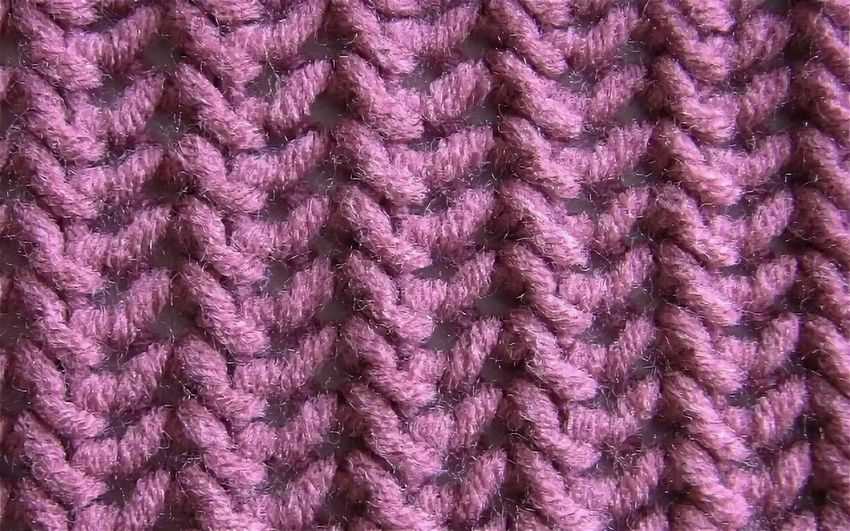
Ribbing Stitch Pattern
Ribbing stitch pattern is a popular choice for knitting with bulky yarn. It creates a stretchy and flexible fabric that is perfect for garments like hats, scarves, and sweaters. The ribbing pattern is created by alternating knit stitches and purl stitches in a specific sequence.
To create ribbing, start by casting on an even number of stitches. The most common ribbing pattern is called 1×1 ribbing, which means you alternate one knit stitch with one purl stitch. This creates a neat and textured fabric with vertical columns of knit stitches and purl stitches. You can also try different variations like 2×2 or 3×3 ribbing for a wider ribbed effect.
The ribbing stitch pattern is not only visually appealing but also functional. The alternating knit and purl stitches give the fabric elasticity and stretch, making it ideal for fitting snugly around cuffs, collars, and waistbands. The ribbing pattern also helps the fabric retain its shape and prevent it from stretching out over time.
When knitting with bulky yarn, ribbing can add an extra dimension to your project. The thick texture of the yarn combined with the ribbing pattern creates a visually interesting and cozy fabric. It’s also a great way to add some structure and definition to your knitting.
Overall, the ribbing stitch pattern is a versatile choice for knitting with bulky yarn. Whether you’re knitting a hat, scarf, or sweater, this pattern will add both style and functionality to your project. So grab your bulky yarn and needles and give ribbing a try!
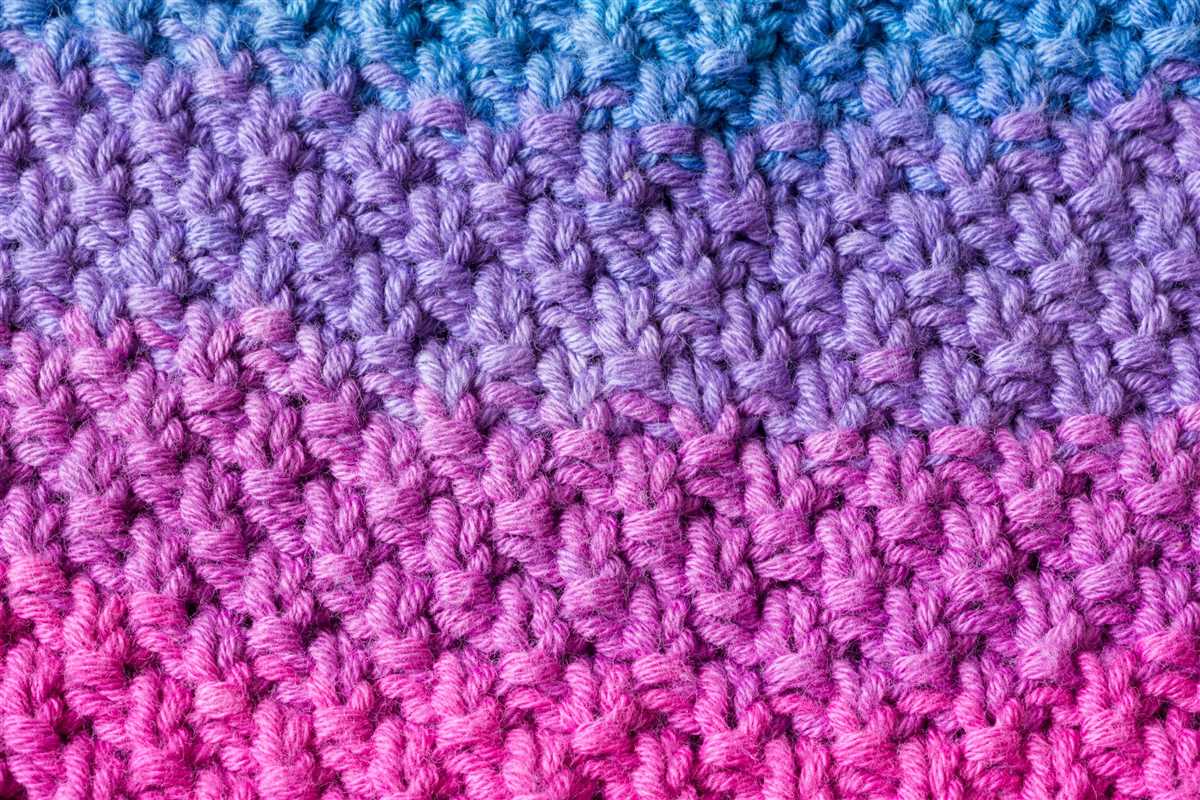
Seed Stitch Pattern
The seed stitch pattern is a versatile and popular choice for knitting with bulky yarns. It creates a textured fabric with a pebbled appearance, making it perfect for cozy sweaters, scarves, and blankets.
To create the seed stitch pattern, you alternate between knit and purl stitches in each row. The pattern is worked over an odd number of stitches, and the same row is repeated throughout the project.
Materials:
- Bulky weight yarn
- Knitting needles suitable for your chosen yarn
Instructions:
- Cast on an odd number of stitches.
- Row 1: *Knit 1, purl 1*, repeat from * to the end of the row.
- Row 2: *Purl 1, knit 1*, repeat from * to the end of the row.
- Repeat rows 1 and 2 until your project reaches the desired length.
- Bind off all stitches.
Tips:
- Make sure to maintain the seed stitch pattern by knitting the purl stitches and purling the knit stitches in each row.
- Use a bulky yarn to enhance the texture and visual appeal of the seed stitch pattern.
- Swatch before starting your project to ensure that you are achieving the desired gauge.
The seed stitch pattern adds texture and interest to your knitting projects. Give it a try with your bulky yarn, and enjoy the cozy and stylish results!
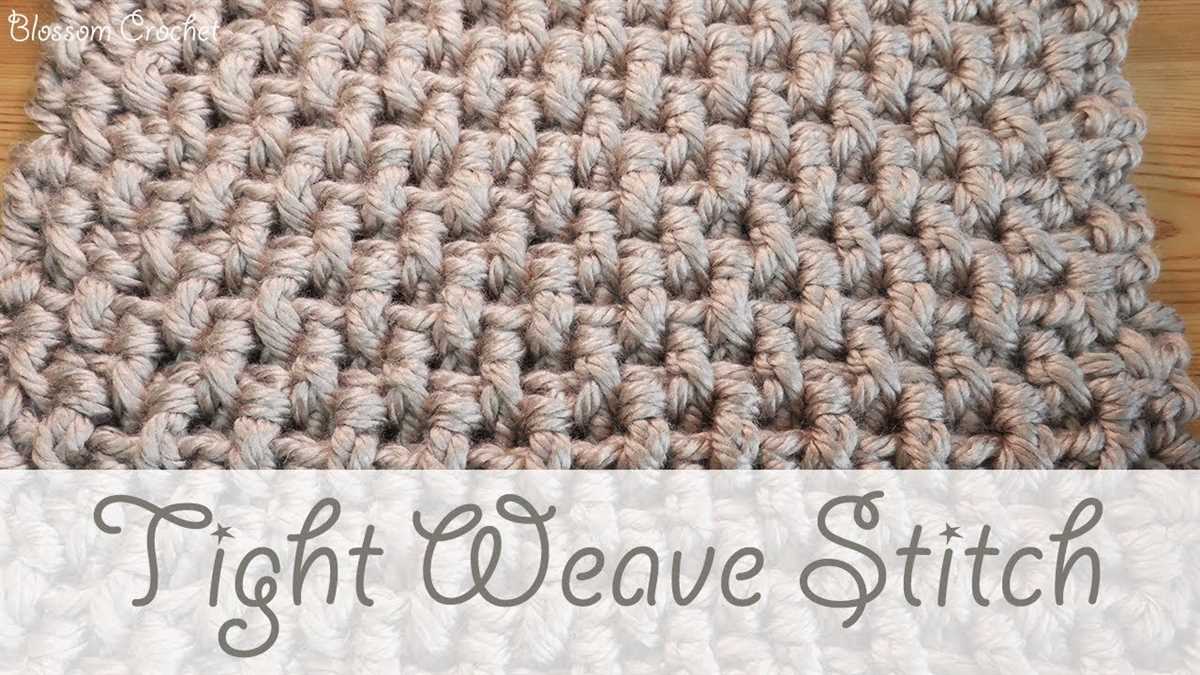
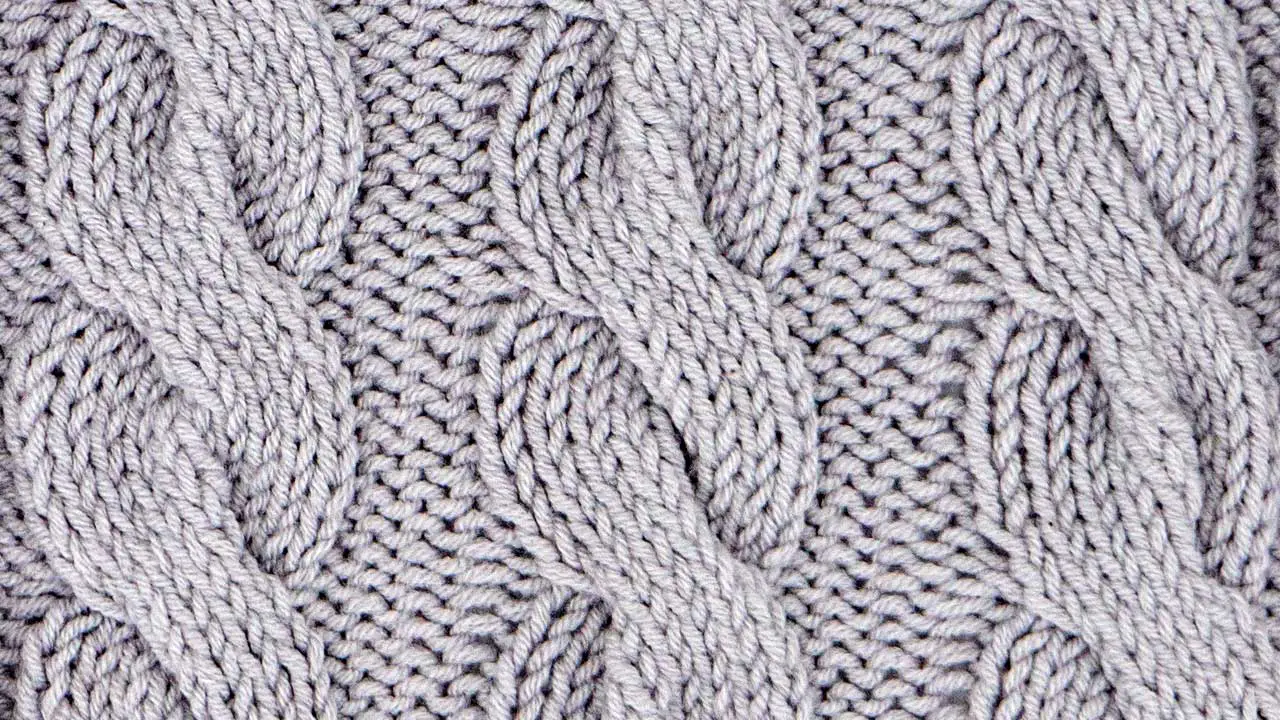
Basketweave Stitch Pattern
The basketweave stitch pattern is a classic design that creates a beautifully textured fabric. It is an ideal choice for knitting with bulky yarn as it highlights the chunkiness of the yarn and creates a cozy and warm fabric.
To create the basketweave stitch pattern, you will need to have a multiple of 8 stitches plus 4 additional stitches. This pattern alternates between blocks of knit and purl stitches, creating a woven effect that resembles a basket.
To begin, you will knit the first 4 stitches of each row. Then, you will begin the pattern repeat by working the next 8 stitches as follows:
- Rows 1 and 2: Knit all 8 stitches
- Rows 3 and 4: Purl all 8 stitches
- Rows 5 and 6: Knit all 8 stitches
- Rows 7 and 8: Purl all 8 stitches
Continue repeating these 8 rows until you have reached your desired length. The basketweave stitch pattern is easily customizable and can be adjusted to create different sizes of woven blocks or to incorporate additional design elements.
This stitch pattern is perfect for creating warm and cozy blankets, scarves, or hats using bulky yarn. The texture created by the alternating blocks of knit and purl stitches adds depth and interest to your knitting projects.
Cable Stitch Pattern
Cable stitch patterns are a classic and timeless choice for knitting with bulky yarn. The intricate twists and turns of the cable stitches create a beautiful and textured fabric that adds depth and interest to any project. Whether you’re knitting a cozy sweater, a scarf, or a hat, the cable stitch pattern is sure to make your project stand out.
The cable stitch pattern is created by crossing stitches over each other to form interlocking cables. The basic technique involves holding a set of stitches in front or in back of the work while knitting or purling the next stitches. By manipulating the order of the stitches, you can create a variety of cable designs, from simple twists to more complex braids.
To get started with cable stitch patterns for bulky yarn, you’ll need a set of cable needles and a basic understanding of knit and purl stitches. Begin by casting on the desired number of stitches and establish the pattern repeat. Cable stitch patterns often have a repeat of a certain number of stitches, for example, 8 stitches. Once you have the repeat established, you can start working the cable stitches according to the pattern instructions.
When knitting with bulky yarn, cable stitch patterns can have an even more dramatic effect. The thicker yarn creates larger and more pronounced cables, making your finished project incredibly cozy and warm. Whether you choose a simple cable stitch pattern or a more intricate design, the texture and dimension of the cables will make your garment or accessory truly special.
Tips for knitting cable stitch patterns with bulky yarn:
- Use cable needles or double-pointed needles that are larger in size than your main needles. This will make it easier to manipulate the stitches and prevent them from slipping off the needles.
- Take your time and pay attention to the pattern instructions. Cable stitch patterns can be more challenging than basic knit and purl stitches, so make sure to read the instructions carefully and practice the techniques before diving into your project.
- Consider using a cable needle with a bend or a curved shape. These types of cable needles can help keep your stitches in place while working the cable stitches.
- Don’t be afraid to experiment with different cable stitch patterns and combinations. Mix and match different cable designs to create unique and customized pieces.
- Block your finished project to help the cables stand out and the stitches to relax. Blocking can make a significant difference in the final appearance of your knitted item.
Moss Stitch Pattern
The moss stitch pattern is a versatile and attractive knit stitch pattern that works well with bulky yarn. It creates a textured fabric with a subtle pattern, making it perfect for projects such as scarves, hats, and blankets. This pattern is also known as the seed stitch or the double moss stitch.
To create the moss stitch pattern, you will need an odd number of stitches. The pattern is worked over two rows, repeating a simple four-stitch sequence. On the first row, knit one stitch, then purl one stitch, repeating this sequence to the end of the row. On the second row, you will purl the knit stitches and knit the purl stitches. This creates a staggered pattern with alternating knit and purl stitches.
This pattern is ideal for showcasing the texture and thickness of bulky yarn. The moss stitch pattern adds depth and interest to your knitting, and it can be easily modified to create different effects. For example, you can use different colors of yarn to create stripes or combine the moss stitch with other stitch patterns for more complex designs.
When using bulky yarn, the moss stitch pattern will create a warm and cozy fabric that is both soft and durable. It is a great choice for winter accessories and home decor items. Whether you are an experienced knitter or a beginner, the moss stitch pattern is an enjoyable and rewarding stitch pattern to work with.
Tips for Knitting the Moss Stitch Pattern
- Use a larger needle size than recommended for your yarn to create an airy and textured fabric.
- Always remember to bring the yarn to the front of your work for the purl stitches and to the back for the knit stitches.
- Keep your tension even throughout your knitting to ensure a consistent pattern.
- If you want a tighter fabric, you can adjust the stitch count to be more dense by adding or subtracting stitches in multiples of four.
- Experiment with different color combinations and yarn types to create unique and personalized projects.
Waffle Stitch Pattern
The waffle stitch pattern is a textured knitting pattern that creates a raised and waffle-like effect. It is perfect for knitting with bulky yarn as it showcases the yarn’s thickness and creates a cozy and warm fabric. The waffle stitch pattern is often used for blankets, scarves, and hats, adding an interesting and unique texture to these projects.
To create the waffle stitch pattern, you will need to know how to knit and purl stitches. The pattern is worked on a multiple of 3 stitches, plus 2 extra stitches for the edges. Here is a step-by-step guide on how to knit the waffle stitch pattern:
- Row 1: Knit all stitches.
- Row 2: Purl all stitches.
- Row 3: Knit 2, *purl 1, knit 2; repeat from * to the last 2 stitches, knit 2.
- Row 4: Purl 2, *knit 1, purl 2; repeat from * to the last 2 stitches, purl 2.
- Repeat rows 1-4 to continue the waffle stitch pattern.
The waffle stitch pattern is versatile and can be customized by changing the number of knit and purl stitches in each row. You can also experiment with different colors and yarns to create unique variations of the waffle stitch pattern. Whether you are a beginner or an experienced knitter, the waffle stitch pattern is a fun and interesting pattern to try with bulky yarn.
The Brioche Stitch Pattern

The Brioche Stitch is a popular knitting pattern that creates a thick, squishy fabric using bulky yarn. It is known for its unique texture and beautiful drape, making it perfect for cozy winter garments and accessories. The stitch pattern involves knitting with two different colors, creating a reversible fabric with a ribbed appearance.
To create the Brioche Stitch, you will need to know how to knit, purl, and slip stitches. The pattern is worked over an odd number of stitches, with each row consisting of a combination of knit and slip stitches. The result is a fabric that looks like it has a series of stacked ribbed columns.
Here is a basic brioche stitch pattern:
- With Color A, cast on an odd number of stitches.
- Row 1: *Bring yarn to the front, slip 1 stitch purlwise, knit 1 stitch; repeat from * to end of row.
- Row 2: *Bring yarn to the front, slip 1 stitch purlwise, yarn over, knit 1 stitch; repeat from * to end of row.
- Repeat Rows 1 and 2 until desired length is reached.
- Bind off in pattern.
When working the Brioche Stitch, it is important to keep an eye on your tension. The yarnovers and slipped stitches can sometimes make the fabric looser or tighter than usual. Experiment with different needle sizes and tension to achieve the desired result.
The Brioche Stitch pattern can be used to create a wide variety of items, from scarves and hats to sweaters and blankets. It is a versatile stitch pattern that adds interest and texture to any project. So grab some bulky yarn and give the Brioche Stitch a try!
Honeycomb Stitch Pattern
The honeycomb stitch pattern is a beautiful and textured design that is perfect for bulky yarns. It creates a dense fabric with an intricate honeycomb pattern that is both visually appealing and cozy. This stitch pattern is great for a variety of projects, such as blankets, scarves, or sweaters.
To create the honeycomb stitch pattern, you will need to know how to knit, purl, and slip stitches. This pattern is worked over a multiple of 6 stitches, plus 5 additional stitches for the edges.
To start the honeycomb stitch pattern, follow these instructions:
Row 1 (right side): Knit all stitches.
Row 2: Purl all stitches.
Row 3: *Knit 3, slip 3 purlwise with yarn in front; repeat from * to last 5 stitches, knit 2, purl 3.
Row 4: Knit all stitches.
Row 5: Purl all stitches.
Row 6: *Slip 3 purlwise with yarn in front, knit 3; repeat from * to last 5 stitches, slip 3 purlwise with yarn in front, purl 2.
- Repeat these 6 rows for the honeycomb stitch pattern.
This stitch pattern creates a textured fabric that has a geometric honeycomb design on one side and a subtle ribbing on the other side. The honeycomb pattern is achieved by slipping stitches and carrying the yarn in front, creating a raised and dimensional effect. The result is a fabric that not only looks beautiful but also provides warmth and coziness.
When using bulky yarn, the honeycomb stitch pattern can add extra thickness and insulation to your knitted items. The larger stitches created by the bulky yarn enhance the texture of the honeycomb pattern, making it even more pronounced.
Whether you’re knitting a chunky scarf or a cozy blanket, the honeycomb stitch pattern is a versatile and visually interesting choice. It adds a unique touch to your projects and is sure to impress with its intricate design.
So grab your bulky yarn, needles, and give the honeycomb stitch pattern a try. You’ll love the results!