
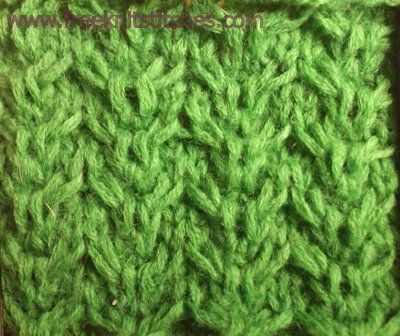
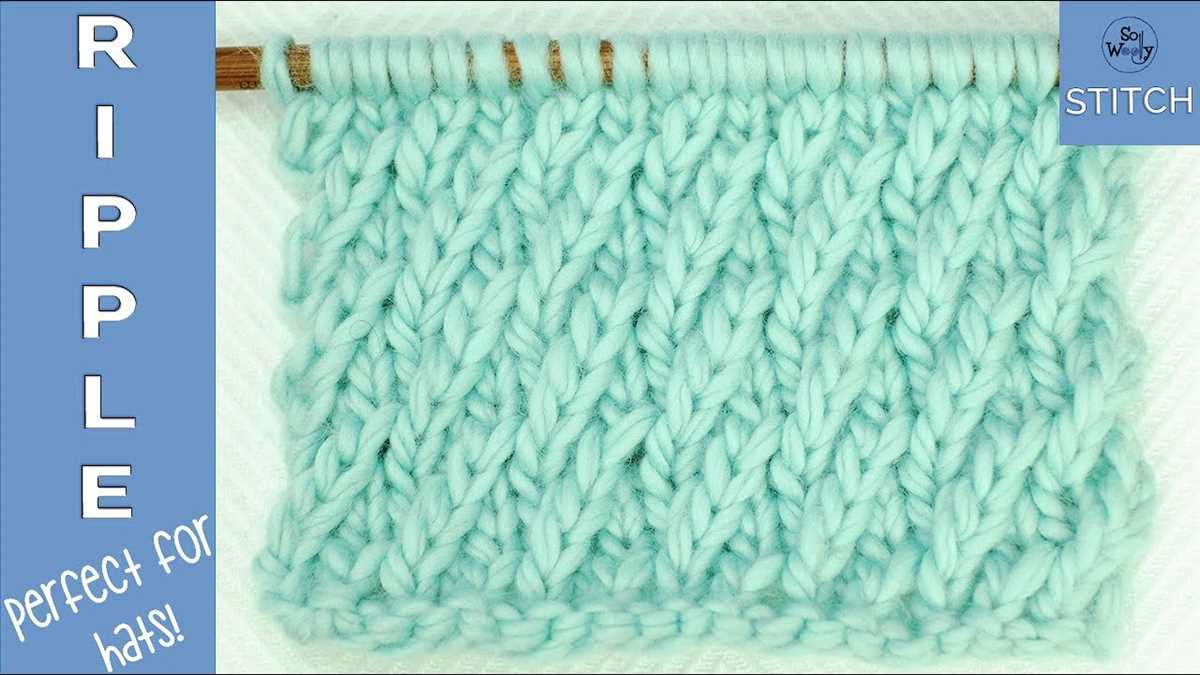
The knit ripple stitch pattern is a popular and versatile stitch pattern that creates a beautiful textured fabric. It is commonly used in various knitting projects such as scarves, blankets, and sweaters. The pattern is characterized by its alternating waves of raised and lowered stitches, which give it a unique ripple effect.
This stitch pattern is relatively easy to learn and is suitable for knitters of all skill levels. It requires basic knitting techniques such as knit and purl stitches, along with decreases and increases. The pattern is worked over a multiple of stitches, typically a multiple of 16 or 18 stitches, depending on the desired width of the fabric.
There are many variations of the knit ripple stitch pattern, allowing knitters to get creative and customize their projects. The pattern can be worked with different yarn weights and colors, giving the fabric a different look and feel. It can also be combined with other stitch patterns to create unique designs.
Whether you’re a beginner or an experienced knitter, the knit ripple stitch pattern is a great addition to your knitting repertoire. With its beautiful texture and versatility, it’s sure to enhance any knitting project you choose to use it in.
What is a knit ripple stitch pattern?
A knit ripple stitch pattern is a design technique used in knitting to create a wave-like or rippled effect in the fabric. It is achieved by alternating increases and decreases in the number of stitches across each row or round, creating a pattern of peaks and valleys.
To create a ripple stitch pattern, you would typically start by casting on an even number of stitches. The pattern would then involve increasing and decreasing stitches in a specific sequence to create the desired ripple effect. This can be done using various techniques, such as yarn overs, knit 2 togethers, and slip slip knits.
A knit ripple stitch pattern can be used to add texture and visual interest to various knitting projects, such as scarves, blankets, and garments. It can be worked in a single color or with multiple colors to further enhance the ripple effect. The pattern can also be modified to create different ripple sizes and shapes, allowing for endless design possibilities.
When working with a knit ripple stitch pattern, it is important to keep track of the stitch count and the pattern sequence to ensure that the desired ripple effect is maintained. Blocking the finished project can also help to enhance the stitch definition and create a smoother overall look.
Overall, a knit ripple stitch pattern is a versatile technique that can add an element of movement and texture to knitted creations, making them more visually appealing and unique.
How to Knit a Ripple Stitch Pattern
Knitting a ripple stitch pattern can add texture and visual interest to your projects. This stitch pattern creates a wavy, undulating effect that can be used in a variety of projects, such as scarves, blankets, and sweaters. It is a relatively simple pattern that can be achieved by following a few basic steps.
To begin knitting the ripple stitch pattern, you will need to cast on an even number of stitches. This will ensure that the pattern works correctly. Once you have cast on, the next step is to create the ripple effect by combining knits and purls.
Start the first row by knitting the first two stitches. Then, bring the yarn to the front of the work and purl the next two stitches. Repeat this pattern of knitting two and purling two across the row. At the end of the row, knit the last two stitches.
For the second row, repeat the pattern of knitting two and purling two, but start with purling two stitches. This creates the alternating ripple effect. Continue alternating between row one and row two until you have reached your desired length.
To create even more texture, you can experiment with different stitch variations, such as adding yarn overs or slipping stitches. Be creative and have fun with your ripple stitch pattern! With a little practice, you can achieve beautiful results and create unique, eye-catching knitted pieces.
Choosing the right yarn and needles
When it comes to knitting the ripple stitch pattern, choosing the right yarn and needles is crucial for achieving the desired look and feel of the finished project. The choice of yarn will determine the drape and texture of the knitted fabric, while the needles will affect the overall gauge and size of the project.
Yarn selection: It is recommended to use a medium-weight yarn for the ripple stitch pattern, such as a worsted weight or DK weight yarn. A yarn with good stitch definition will help showcase the rippled texture of the pattern. Natural fibers like wool or cotton are ideal for this stitch, as they provide excellent drape and durability. Variegated or self-striping yarns can also add an interesting visual element to the pattern.
Needle selection: The choice of needle size will depend on the yarn and the desired gauge. It is recommended to start with the needle size recommended on the yarn label and make a gauge swatch to ensure the correct tension. Circular needles are often preferred for larger projects, as they can accommodate a larger number of stitches and distribute the weight of the project more evenly. For smaller projects, double-pointed needles or straight needles can be used.
Overall, the key is to choose a yarn and needle combination that complements the ripple stitch pattern and allows you to achieve the desired look and feel of your project. It’s always helpful to experiment with different yarns and needle sizes to find the perfect match that will bring your ripple stitch pattern to life.
Casting on stitches
Casting on stitches is the first step in starting any knitting project. It is the process of creating the loops on the knitting needle that will eventually become the first row of stitches. There are several different methods to cast on stitches, each with its own advantages and disadvantages.
One common method of casting on stitches is the long-tail cast on. This method creates a sturdy edge and is commonly used for projects that require a stretchy and flexible cast on. To do the long-tail cast on, you begin by making a slipknot and placing it on one of the knitting needles. Then, you hold the working yarn in your right hand and the needle with the slipknot in your left hand. With your left thumb, you create a loop with the working yarn and place it on the needle. This process is repeated for the desired number of stitches.
Another method of casting on stitches is the knitted cast on. This method is a bit slower but creates a neat, even edge. To do the knitted cast on, you begin by making a slipknot and placing it on the needle. Then, you insert the needle into the slipknot from left to right, as if you were going to knit a stitch. Instead of knitting the stitch, however, you wrap the working yarn around the needle and pull it through the slipknot, creating a new stitch. This process is repeated for the desired number of stitches.
There are many other methods of casting on stitches, including the cable cast on, the backwards loop cast on, and the provisional cast on. Each method has its own uses and effects on the finished project. By experimenting with different casting on techniques, you can create different textures and edges in your knitting. So next time you start a new knitting project, take some time to consider which casting on method will work best for your needs.
Knitting the First Row
When starting to knit the ripple stitch pattern, the first row is crucial for establishing the foundation of the pattern. To begin, you will need to have your knitting needles and the chosen yarn ready. The pattern typically starts with a specific number of stitches, which will be mentioned in the instructions.
First, make sure that you have cast on the required number of stitches onto one of the knitting needles. It’s important to have an accurate count to ensure the pattern works out correctly. Once you have cast on the stitches, hold the knitting needle with the cast-on stitches in your right hand, and the empty needle in your left hand.
Option 1: Knitting with the Right Hand
If you are a right-handed knitter, hold the working yarn in your right hand. Insert the right-hand needle into the first stitch on the left-hand needle, going from the front to the back. Cross the right-hand needle over the left-hand needle and bring it out to the right, pulling the working yarn through the stitch.
Option 2: Knitting with the Left Hand
If you are a left-handed knitter, hold the working yarn in your left hand. Insert the right-hand needle into the first stitch on the left-hand needle, going from the front to the back. Cross the right-hand needle over the left-hand needle and bring it out to the right, pulling the working yarn through the stitch.
Repeat this process for each stitch across the row until you reach the end. Remember to keep an even tension while knitting to ensure consistent and neat stitches. After completing the first row, you will have laid the foundation for the ripple stitch pattern and can continue following the pattern instructions for subsequent rows.
Creating the ripple effect
The ripple effect is a fascinating pattern that can be created in various crafts, including knitting. It involves alternating between increases and decreases in order to create a wave-like effect in the fabric. This technique adds texture and visual interest to any project, making it a popular choice among knitters.
To create the ripple effect in knitting, you will need to follow a specific stitch pattern. One common pattern is the knit ripple stitch pattern, which involves a series of knit stitches and decreases. By repeating this pattern across your rows, you can achieve the desired ripple effect.
To start, cast on an even number of stitches for your project. This will ensure that each row begins and ends with the same type of stitch. Once you have your stitches cast on, you will begin the first row by knitting two stitches together, then knitting the next stitch. Repeat this sequence until the end of the row, and turn your work.
For the second row, you will purl two stitches together, then purl the next stitch. Repeat this sequence until the end of the row, and turn your work again. Continue alternating between knitting and purling two stitches together for each row, creating the ripple effect as you progress.
The knit ripple stitch pattern can be used to create a variety of projects, from scarves and blankets to garments and accessories. The pattern is versatile and can be customized by changing the stitch count or adding different colors. With practice, you can master the ripple effect and create stunning knitted pieces that are sure to impress.
Repeating the pattern
Once you have mastered the basic ripple stitch pattern, you can easily repeat it to create a larger project. Whether you are making a scarf, a blanket, or a sweater, the process is the same: you simply continue working the same rows of stitches over and over again.
To repeat the pattern, start by completing the first row according to the instructions. Once you have reached the end of the row, turn your work and begin working the second row. Repeat this process for as many rows as needed to achieve the desired size.
It is important to pay attention to the number of stitches and rows in each repetition of the pattern to ensure that your project turns out correctly. Be sure to count your stitches at the end of each row to make sure you haven’t accidentally added or skipped any.
In addition to repeating the pattern horizontally, you can also repeat it vertically to create a ripple effect that extends from top to bottom. This can be done by simply working additional rows in the same pattern, joining them to the previous rows as you go.
Tips for knitting a ripple stitch pattern
Knitting a ripple stitch pattern can be a fun and relaxing way to add texture to your knitting projects. Whether you’re creating a cozy blanket or a fashionable scarf, here are some tips to help you master the art of knitting a ripple stitch pattern.
1. Choose the right yarn and needle size

When knitting a ripple stitch pattern, it’s important to choose the right yarn and needle size to achieve the desired effect. A lightweight yarn and smaller needle size will result in a tighter ripple stitch pattern, while a thicker yarn and larger needle size will create a looser and more pronounced ripple.
2. Practice your tension
Consistent tension is key when knitting a ripple stitch pattern. Make sure to practice your tension before starting your project and adjust your grip or needle size if needed. Keeping a steady and even tension will ensure that your ripples are uniform throughout your knitting.
3. Use stitch markers
Using stitch markers can be helpful when knitting a ripple stitch pattern, especially if you’re working with multiple pattern repeats. Place a stitch marker at the beginning and end of each pattern repeat to keep track of your stitches and ensure that you’re following the ripple pattern correctly.
4. Block your finished project
Once you’ve completed your ripple stitch pattern, it’s important to block your finished project to even out the stitches and enhance the texture. Wet blocking or steam blocking can help relax the stitches and make your ripple pattern really pop.
By following these tips, you’ll be well on your way to knitting a beautiful ripple stitch pattern. Enjoy the process and have fun experimenting with different yarns and needle sizes to create unique and eye-catching designs.
Variations of the Ripple Stitch Pattern
The ripple stitch pattern is a popular choice for knitters looking to add texture and visual interest to their projects. This stitch pattern creates a wavy, undulating effect that resembles rolling waves or ripples in water. While the basic ripple stitch pattern is commonly used, there are several variations that can be explored to create unique and distinctive designs.
One variation of the ripple stitch pattern is the double ripple stitch. This variation adds an extra layer of depth and dimension to the pattern by incorporating two sets of ripples. The double ripple stitch can be achieved by alternating between two different ripple stitch patterns, each with their own unique wave-shaped pattern. This creates a beautiful and intricate design that is visually striking.
Another variation of the ripple stitch pattern is the color-block ripple stitch. This variation allows knitters to play with color and create bold and vibrant designs. By using different colors for each row of ripples, knitters can create a color-block effect that adds an extra element of visual interest to their projects. This variation is especially popular for blankets and scarves, where the color-block pattern can be showcased.
In addition to these variations, knitters can also experiment with different stitch heights within the ripple pattern. By varying the height of each ripple, a knitter can create a more pronounced wave effect or a more subtle undulating pattern. This allows for further customization and creativity within the ripple stitch pattern.
In conclusion, the ripple stitch pattern is a versatile and customizable design that can be adjusted and varied to create unique and individual projects. Whether it’s through the double ripple stitch, color-block ripple stitch, or playing with stitch heights, knitters can explore a range of possibilities and truly make the ripple stitch pattern their own.
Garter Stitch Ripple Pattern
The garter stitch ripple pattern is a classic knitting pattern that creates a beautiful wave-like design. It is achieved by alternating knit and purl rows to create a textured fabric. This pattern is perfect for blankets, scarves, and other cozy projects.
To create the garter stitch ripple pattern, you will need to cast on an odd number of stitches. The pattern is worked over a multiple of 18 stitches plus 1 extra stitch. Begin each row with a knit stitch and end with a purl stitch.
To start the pattern, knit the first stitch and then purl the next stitch. Repeat this pattern until the end of the row. On the next row, purl the first stitch and then knit the next stitch. Repeat this pattern until the end of the row. Continue alternating these two rows to create the wave-like design.
The garter stitch ripple pattern can be customized by changing the number of rows between each wave. For a more pronounced ripple effect, increase the number of rows between each wave. For a more subtle effect, decrease the number of rows between each wave.
This pattern is a great option for knitters of all skill levels, as it only requires basic knitting stitches. It is a relaxing and enjoyable pattern to knit, and the end result is a beautiful textured fabric that is sure to impress.
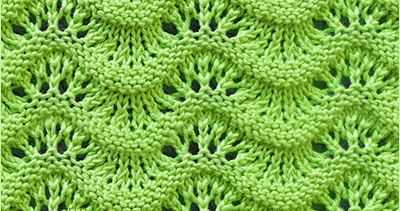
Lace Ripple Pattern
The lace ripple pattern is a beautiful and intricate design that adds texture and interest to any knitting project. It is a versatile pattern that can be used for a variety of items, such as scarves, shawls, and even blankets. The pattern consists of a series of alternating decreases and yarn overs, creating a wave-like effect.
To create the lace ripple pattern, you will need to have a basic understanding of lace knitting techniques, such as yarn overs, knit stitches, and purl stitches. The pattern is worked over a multiple of stitches, usually around 8 or 12, depending on the desired width of the ripple. It can be knit in any weight of yarn, but lace-weight or fingering-weight yarn is often used to achieve a delicate and airy look.
Here is a step-by-step guide to knitting the lace ripple pattern:
- Cast on the desired number of stitches, making sure it is a multiple of the chosen stitch count for the pattern.
- Row 1: *K2tog, yo, k1, yo, sl1, k1, psso; repeat from * to end of row.
- Row 2: Purl all stitches.
- Repeat rows 1 and 2 until the desired length is reached.
- Bind off all stitches.
The lace ripple pattern can be customized by adjusting the number of stitches in each repeat or by adding additional pattern repeats to make the ripple wider. You can also experiment with different combinations of knit and purl stitches to create different effects within the ripple. For example, adding more purl stitches can create a more textured ripple, while using more knit stitches can create a smoother ripple.
When knitting the lace ripple pattern, it is important to keep an eye on your stitch count and be mindful of any decreases or yarn overs that may be part of the pattern. It is also helpful to use stitch markers to keep track of where each repeat begins and ends.
Cable Ripple Pattern
The cable ripple stitch pattern is a beautiful and intricate design that adds texture and depth to your knitting projects. It is created by combining cable stitches with a ripple pattern, resulting in a unique and eye-catching fabric.
To create the cable ripple pattern, you will need to know how to knit cables. Cables are created by crossing stitches over each other, and they can be worked with a cable needle or without one. In this pattern, you will be working cables without a cable needle, which adds a bit of challenge to the project.
Start by casting on an even number of stitches. The cable ripple pattern is worked over a multiple of 8 stitches, so make sure your cast-on number is divisible by 8. Begin by working a few rows in a basic knit or purl stitch to create a foundation for your pattern.
Once you have established your foundation, it’s time to start the cable ripple pattern. The pattern consists of alternating rows of cables and a ripple stitch. On cable rows, you will be crossing stitches over each other to create the twist pattern. On ripple stitch rows, you will be working increases and decreases to create the ripple effect. Follow the specific instructions for your chosen pattern to complete the cable ripple stitch pattern.
The cable ripple pattern is ideal for a variety of knitting projects, such as scarves, blankets, and sweaters. It adds interest and complexity to your knitting and can be customized with different yarns and colors to suit your style. Whether you are a beginner or an experienced knitter, the cable ripple pattern is a versatile and rewarding pattern to try.
How to incorporate ripple stitch pattern in projects

Ripple stitch pattern is a versatile and popular knitting pattern that can add texture and visual interest to any project. Whether you’re knitting a scarf, a blanket, or a sweater, incorporating ripple stitch can create a unique and eye-catching design. Here are a few ideas and tips on how to incorporate ripple stitch pattern in your knitting projects:
1. Start with a small project
If you’re new to ripple stitch pattern, it’s a good idea to start with a small project like a dishcloth or a hat. This allows you to practice the stitch pattern on a smaller scale before moving on to larger projects. Once you feel comfortable with the stitch pattern, you can confidently incorporate it into larger items.
2. Use contrasting colors
Ripple stitch pattern creates a wave-like effect that can be enhanced by using contrasting colors. Choose two or more colors that have a high contrast to make the ripples stand out even more. Experiment with different color combinations to find the one that works best for your project.
3. Combine with other stitch patterns
Ripple stitch pattern can be combined with other stitch patterns to create more complex designs. For example, you can alternate between ripple stitch and stockinette stitch to create a textured effect. You can also try combining ripple stitch with lace patterns for a delicate and intricate look.
4. Consider the project’s purpose
Before incorporating ripple stitch pattern into your project, consider its purpose. Ripple stitch works well for items that need some stretch and drape, such as scarves and blankets. However, it may not be ideal for projects that require a more structured fabric, like fitted sweaters. Keep in mind the intended use of the project and choose stitch patterns accordingly.
5. Customize the stitch pattern
Don’t be afraid to customize the ripple stitch pattern to suit your preferences. You can adjust the number of stitches and rows in each ripple to create larger or smaller waves. You can also experiment with different stitch combinations within each ripple to add even more variety to your design. Feel free to get creative and make the ripple stitch pattern your own.
Conclusion
Incorporating ripple stitch pattern in your knitting projects allows you to add depth and texture to your creations. Whether you choose to start with a small project or combine ripple stitch with other stitch patterns, this versatile pattern is sure to enhance the overall design. Remember to experiment with colors and customization to make your projects truly unique. Happy knitting!