
Knitting is a centuries-old craft that allows individuals to create beautiful, functional garments and accessories using just a pair of needles and some yarn. One of the essential skills for knitters is the ability to read and understand knitting pattern graphs.
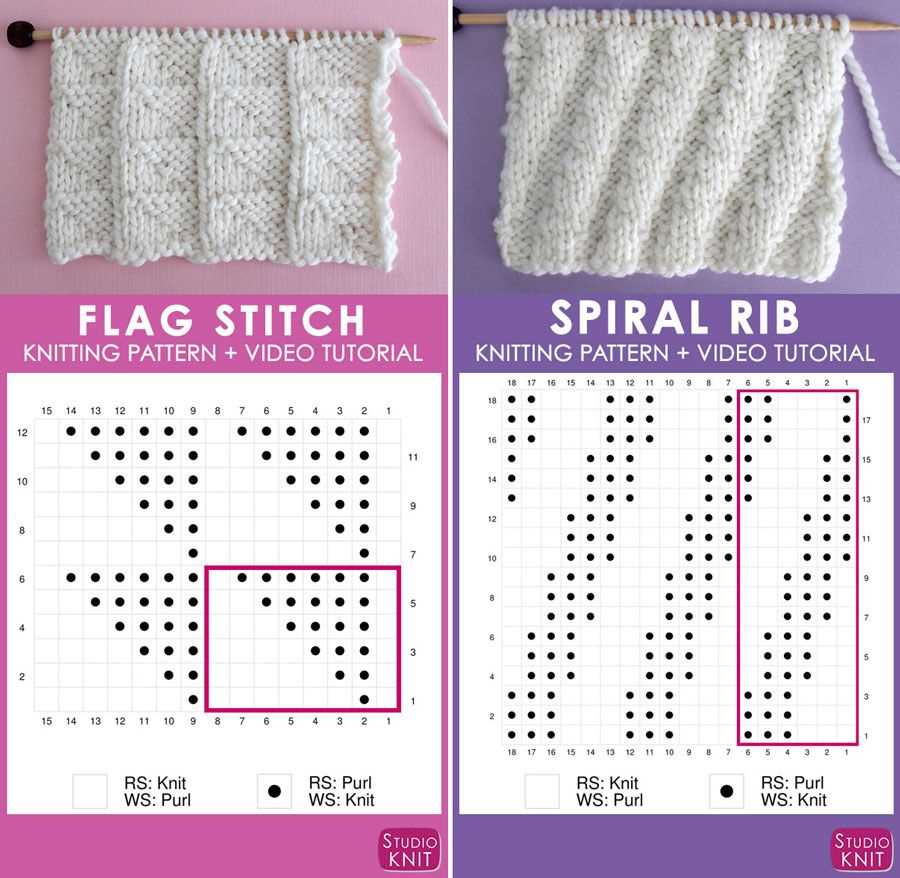
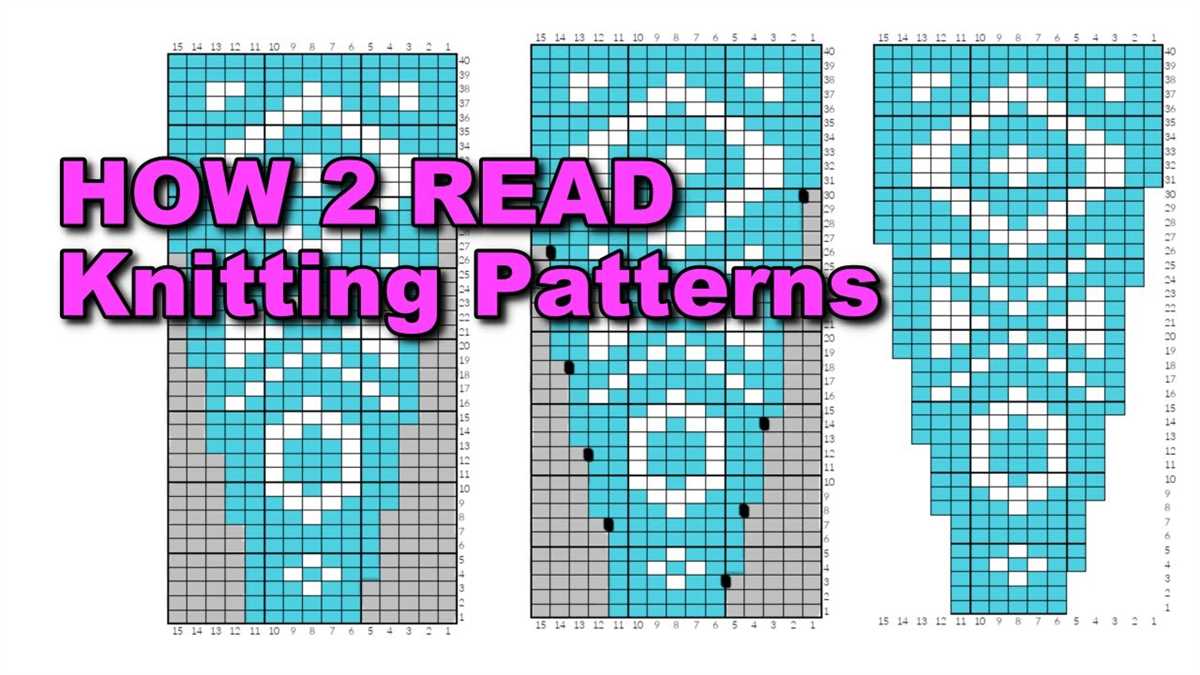
A knitting pattern graph is a visual representation of a knitting pattern, with each symbol or stitch represented by a square on a grid. These graphs are commonly used in colorwork and fair isle knitting, where multiple colors are worked in a single row. By understanding how to read a knitting pattern graph, you can follow complex patterns and create intricate designs in your knitting.
When reading a knitting pattern graph, it’s important to start by understanding the key or legend. The key will tell you what each symbol represents, whether it’s a knit stitch, a purl stitch, a yarn over, or a specific color. Take the time to familiarize yourself with the symbols and their meanings before you begin knitting. This will ensure that you can interpret the graph accurately and avoid any mistakes.
How to Read a Knitting Pattern Graph
Knitting patterns are essential tools for any knitter, as they provide a visual representation of the stitches and techniques needed to create a particular project. One common type of knitting pattern is the graph, which uses symbols and colors to represent each stitch. Learning how to read a knitting pattern graph is crucial for following complex patterns and creating beautiful knitted items.
1. Understand the symbols: A knitting pattern graph will include a key that explains what each symbol represents. It is important to familiarize yourself with these symbols before starting the pattern. Common symbols include squares for knit stitches, circles for purl stitches, and diagonal lines for decreases. Make sure to refer to the key as you work through the graph.
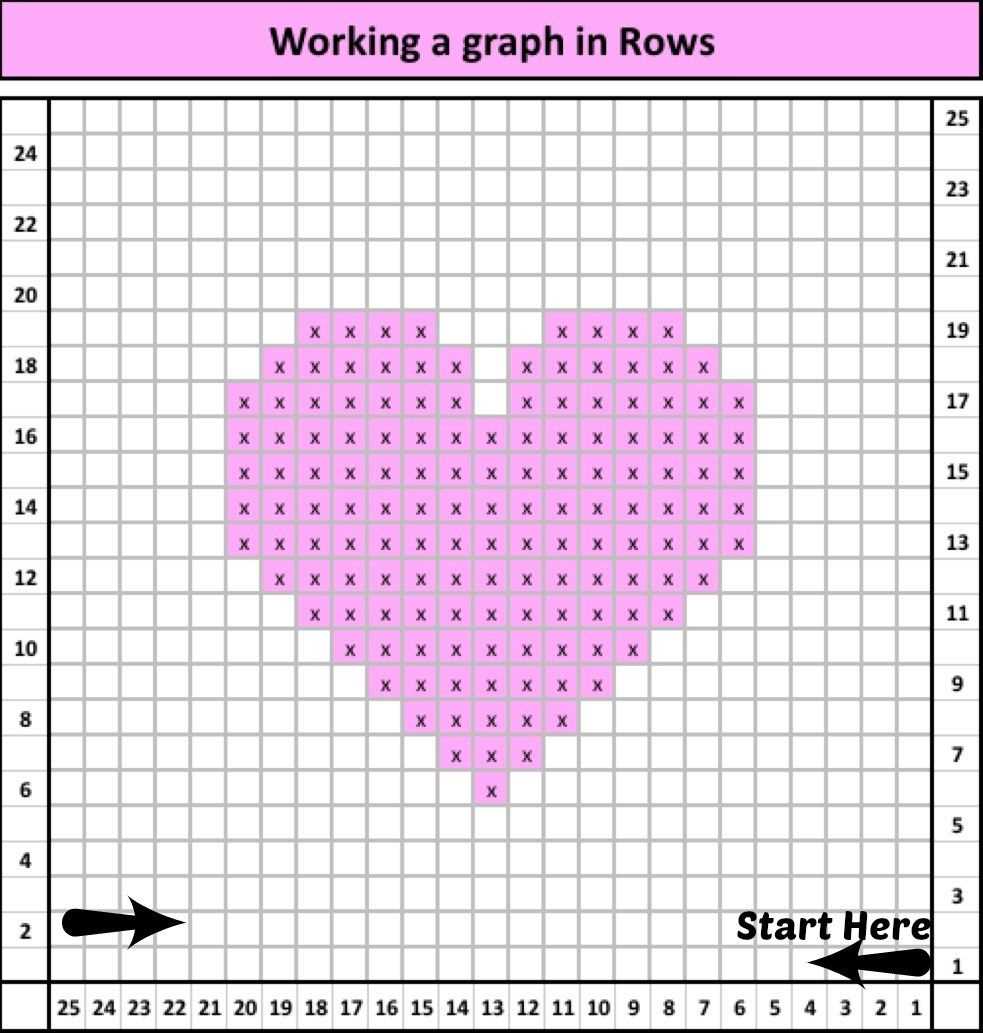
2. Follow the rows: Knitting pattern graphs are typically read from right to left, starting at the bottom. Each row of the graph represents one row of knitting. Pay attention to the number of stitches in each row and the order in which they are worked. This will ensure that you are creating the correct pattern and maintaining the desired shape.
3. Pay attention to color changes: If the knitting pattern graph uses different colors, it is important to carefully follow the color changes indicated. This will create the desired design and ensure that the graph is accurately reflected in the finished project. You can use stitch markers or sticky notes to help keep track of color changes as you work through the graph.
4. Use additional instructions: In addition to the knitting pattern graph, there may be written or charted instructions that provide further details for specific sections of the pattern. These instructions will often include information on stitch counts, repeats, and any special techniques that need to be followed. Make sure to read and understand these instructions before starting each section.
5. Practice and take your time: Reading a knitting pattern graph can be challenging, especially for beginners. It takes practice and patience to become comfortable with interpreting the symbols and following the graph accurately. Start with simpler patterns and gradually work your way up to more complex designs. With time and practice, reading knitting pattern graphs will become easier and more intuitive.
By understanding the symbols, following the rows, paying attention to color changes, using additional instructions, and practicing regularly, you will be able to confidently read and follow knitting pattern graphs. This will open up a world of possibilities for creating beautiful and intricate knitted items.
Understanding the Basics
When it comes to reading a knitting pattern graph, it is important to understand the basics. Knitting patterns can be presented in a visual format, with a graph that represents each stitch and row. These graphs can vary in complexity, but most follow a similar structure.
The Grid
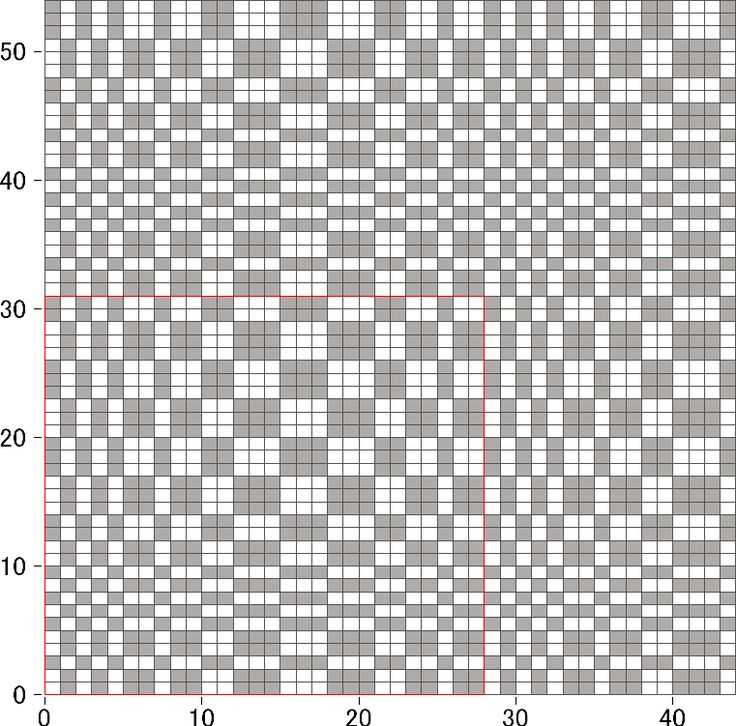
One of the first things to look for in a knitting pattern graph is the grid. The grid provides a visual representation of the stitches and rows. Each square in the grid represents one stitch and one row. By following the pattern from left to right and top to bottom, you can see how the stitches and rows are structured.
Symbol Key
In order to read the knitting pattern graph, you will need to understand the symbols used to represent different stitches. Most knitting patterns will include a symbol key that explains what each symbol means. It is important to refer to the symbol key to understand how to create each stitch.
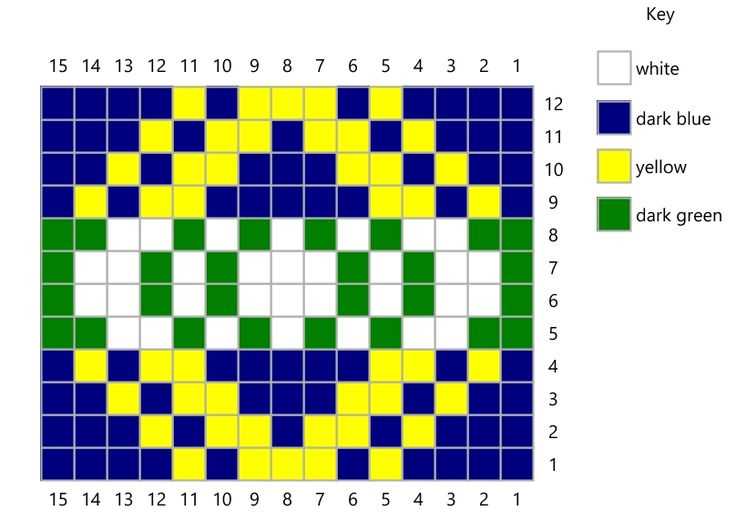
Color Key
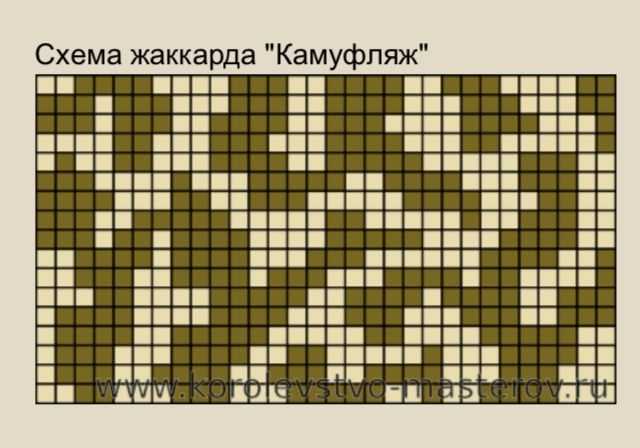
Some knitting pattern graphs will also include a color key. This key indicates which colors are used for each stitch. If the pattern contains colorwork or multiple colors, the color key will help you determine which color to use for each stitch.
Reading the Graph
Once you are familiar with the grid, symbol key, and color key, you can start reading the knitting pattern graph. Start at the bottom right corner of the graph and work your way up. Each row of the graph represents a row of knitting, and each stitch is represented by a symbol or color. By following the symbol or color pattern on the graph, you can create the design as shown.
Decoding the Symbols

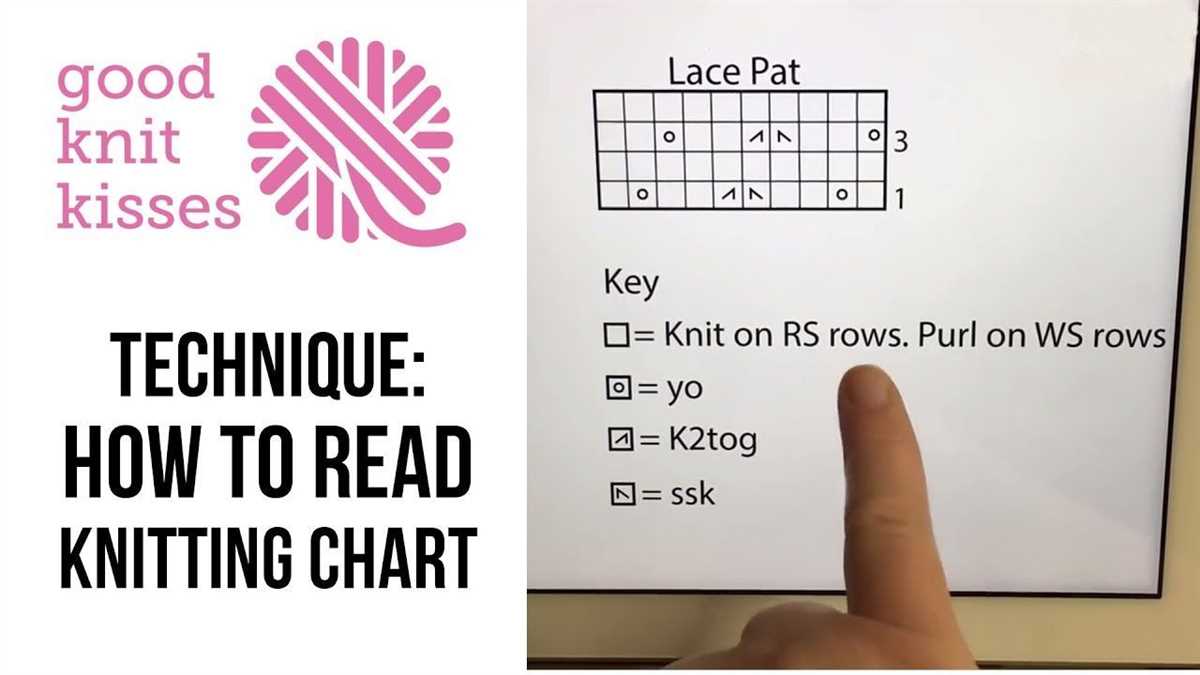
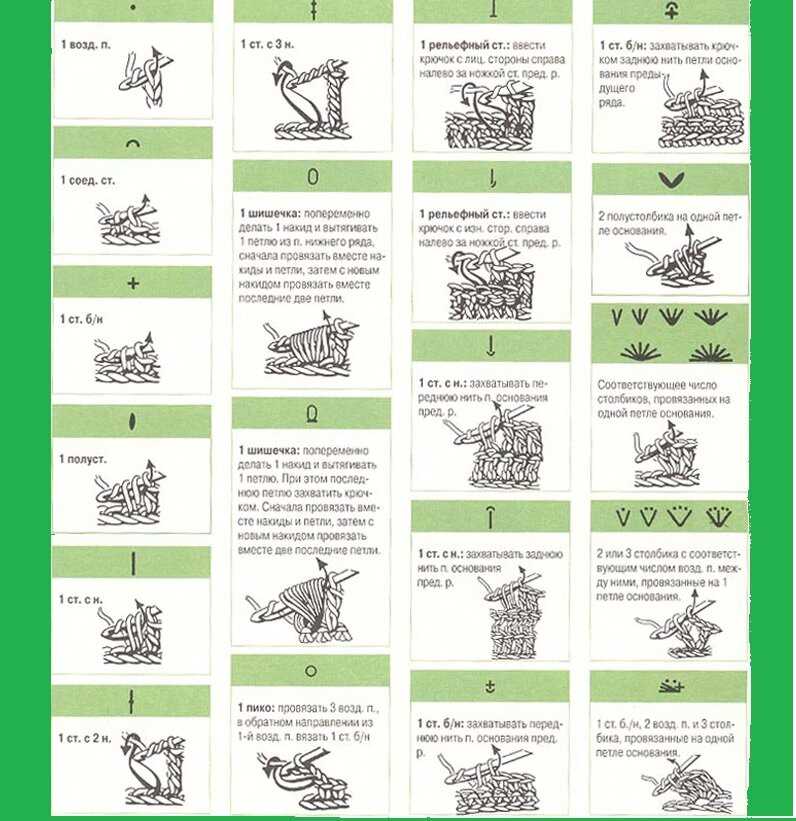
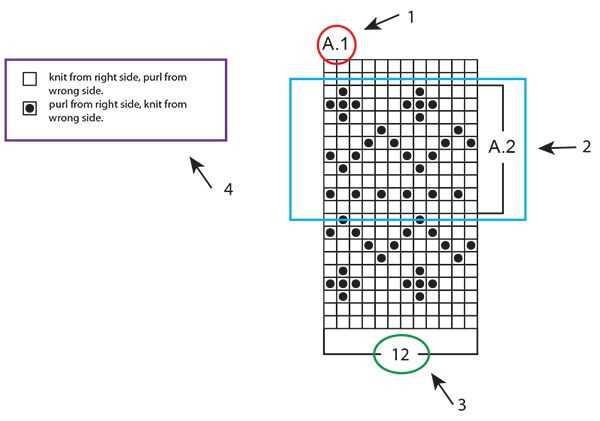
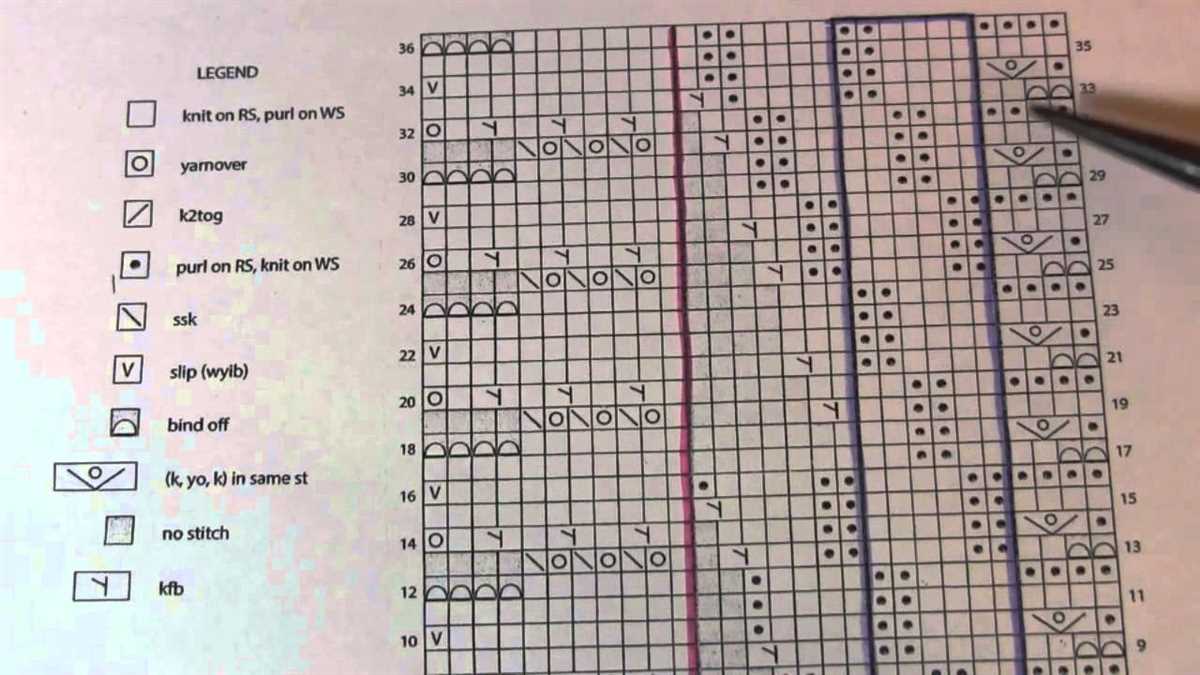
When reading a knitting pattern graph, it is important to understand the symbols used to represent different stitches and actions. These symbols are typically shown in a key or legend accompanying the graph. Here are some common symbols you may come across:
- K: This symbol represents a knit stitch, where you insert the needle from left to right through the front of the stitch and wrap the yarn counter-clockwise around the needle before pulling it through.
- P: This symbol represents a purl stitch, where you insert the needle from right to left through the front of the stitch and wrap the yarn clockwise around the needle before pulling it through.
- YO: This symbol represents a yarn over, where you simply bring the yarn to the front of the work and over the needle to create an extra stitch.
- SSK: This symbol represents a slip-slip-knit decrease, where you slip two stitches individually as if to knit, then insert the left needle into the front loops of the slipped stitches and knit them together.
- K2tog: This symbol represents a knit-two-together decrease, where you insert the needle through the front loops of two stitches simultaneously and knit them together as one stitch.
These are just a few examples of the symbols you may encounter in a knitting pattern graph. It’s important to refer to the key or legend provided by the pattern designer for the specific symbols used in the graph you are working with. Understanding these symbols will help you accurately interpret the graph and create the desired pattern.
Interpreting the Rows and Columns
When reading a knitting pattern graph, it is important to understand how the rows and columns are represented. The rows are usually represented by numbers on the side of the graph, while the columns are represented by letters at the top of the graph. These numbers and letters indicate the stitch or row number of the pattern.
In addition to the numbers and letters, the knitting pattern graph may also include symbols or colors to represent different types of stitches. These symbols or colors are often explained in a key or legend that is provided along with the graph. It is important to refer to the key or legend to understand what each symbol or color represents.
When working with a knitting pattern graph, it is common to read the pattern from right to left for right-handed knitters and from left to right for left-handed knitters. This means that you will start at the first column or letter on the graph and work your way across the row, following the pattern as indicated.
It is also important to pay attention to the number of stitches indicated in each row. Some rows may have more stitches than others, and this will affect the overall shape and structure of the knitted piece. Make sure to count the number of stitches in each row and compare it to the graph to ensure accuracy.
By understanding how to interpret the rows and columns of a knitting pattern graph, you will be able to successfully follow the pattern and create beautiful knitted pieces.
Following the Right-to-Left or Left-to-Right Pattern
When reading a knitting pattern graph, it is important to understand whether the pattern should be followed from right to left or from left to right. This information is usually indicated in the pattern instructions or near the graph. Following the correct direction ensures that the pattern is worked correctly and that the design is properly formed.
In a right-to-left pattern, you will begin knitting from the rightmost edge and work towards the left. This means that the first row of the graph represents the rightmost edge of the knitting and the last row represents the leftmost edge. As you read each row from right to left, you will follow the symbols and colors indicated in the graph to create the desired pattern.
On the other hand, in a left-to-right pattern, you will begin knitting from the leftmost edge and work towards the right. This means that the first row of the graph represents the leftmost edge of the knitting and the last row represents the rightmost edge. As you read each row from left to right, you will follow the symbols and colors indicated in the graph to create the desired pattern.
How to Read Pattern Repeats
When reading a knitting pattern, it is important to understand how pattern repeats are indicated. Pattern repeats are sections of the pattern that repeat across multiple rows or rounds. They are often used to create intricate and complex designs in knitted fabric. To read pattern repeats, you need to identify the repeat symbol or instructions and follow them accordingly.
1. Identifying the Repeat Symbol
In knitting patterns, the repeat symbol is often represented by asterisks (*) or other special characters. Look for these symbols within the pattern instructions to identify where the repeat begins and ends. The repeat symbol is usually placed at the beginning and end of the repeated section.
2. Understanding the Repeat Instructions
Once you have identified the repeat symbol, you need to understand the instructions for the repeat. The repeat instructions will tell you what actions to take within the repeated section, such as knitting certain stitches or working specific stitch patterns. Read and follow these instructions carefully to ensure you are repeating the correct actions.
3. Repeating the Pattern
Once you have identified the repeat symbol and understood the repeat instructions, you can start repeating the pattern. Work the first section of the pattern according to the initial instructions, then look for the repeat symbol to indicate where the repeated section begins. Repeat the instructions within the repeated section as many times as necessary, and then continue with the remaining instructions in the pattern.
Keeping Track of Rows and Stitches
When working with knitting patterns, it is important to keep track of the number of rows and stitches you have completed. This will ensure that your project turns out as intended and that you don’t make any mistakes along the way. There are several methods you can use to keep track of your progress.
1. Stitch markers: Using stitch markers is a helpful way to keep track of the number of stitches in a row. You can place a stitch marker at the beginning and end of each repeat or section of the pattern. This will allow you to easily count the number of stitches in each section without having to count them individually.
2. Row counters: A row counter is a small device that you can attach to your knitting needles. It allows you to keep track of the number of rows you have completed by simply turning a dial. This is a convenient method if you are working on a project with a large number of rows, as it eliminates the need for manual counting.
- 3. Pen and paper:
If you prefer a more traditional method, you can use a pen and paper to keep track of your rows and stitches. Create a simple chart with columns for the row number, stitch count, and any notes you may have. This method allows for more detailed note-taking and can be helpful if you need to make any modifications to the pattern as you go.
4. Tick marks: Another simple method is to use tick marks directly on your knitting pattern. You can use a pencil or marker to make a small mark next to each row or stitch as you complete it. This will help you visually see your progress and ensure that you don’t accidentally skip any stitches or rows.
Remember, whichever method you choose, be sure to keep your counting consistent and accurate. Double-check your work regularly to catch any mistakes early on, and don’t be afraid to ask for help if you’re unsure about any aspect of the pattern.
Using Highlighter or Sticky Notes to Mark Progress
When working with a knitting pattern graph, it can be helpful to use a highlighter or sticky notes to mark your progress. This allows you to easily keep track of where you are in the pattern and stay organized throughout your project.
One way to use a highlighter is to go row by row and color in the squares as you complete them. This creates a visual guide of your progress and helps you quickly see which rows you have already completed. You can choose a different color for each row or section of the pattern to make it even easier to follow along.
Another option is to use sticky notes to mark specific rows or sections of the pattern. You can place a sticky note at the beginning of each section or at the row you want to start from. As you complete each row, you can move the sticky note down or remove it entirely. This method allows you to easily see which section you are currently working on and helps prevent mistakes or confusion.
Using a highlighter or sticky notes can also be beneficial if you need to take a break from knitting and come back to your project later. When you return, you can quickly see where you left off and easily pick up where you left off without having to spend time trying to figure out where you were in the pattern.
Overall, using a highlighter or sticky notes to mark your progress when reading a knitting pattern graph can help you stay organized, prevent mistakes, and make it easier to pick up where you left off. Give it a try and see how it can improve your knitting experience!
Understanding Additional Abbreviations
When reading a knitting pattern graph, it’s important to be aware of any additional abbreviations that may be used. These abbreviations can provide additional information or instructions that are essential for understanding and following the pattern correctly.
WS: This abbreviation stands for “wrong side” and is used to indicate that the following instructions or rows should be worked on the back side of the knitting. It is important to pay attention to this abbreviation, as some patterns may have different instructions for the right side and wrong side.
RS: This abbreviation stands for “right side” and is used to indicate that the following instructions or rows should be worked on the front side of the knitting. Similar to the WS abbreviation, it is important to follow the instructions specifically for the right side when indicated.
dec: Short for “decrease,” this abbreviation is used to instruct the knitter to decrease the number of stitches in a particular section of the pattern. The pattern should specify which decrease method to use, such as knit two stitches together (k2tog) or slip, knit, pass slipped stitch over (skp).
inc: Short for “increase,” this abbreviation is used to instruct the knitter to increase the number of stitches in a particular section of the pattern. The pattern should specify which increase method to use, such as knit front and back (kfb) or make one (M1).
rep: Short for “repeat,” this abbreviation is used to indicate that a specific set of instructions should be repeated a certain number of times. The pattern should specify how many times the instructions should be repeated.
By familiarizing yourself with these additional abbreviations commonly used in knitting patterns, you will be better equipped to read and understand the instructions and graphs provided. Paying attention to these abbreviations will ensure that you are able to successfully follow the pattern and create the desired knitted piece.
Identifying Special Instructions and Techniques
When reading a knitting pattern graph, it is important to pay attention to any special instructions or techniques that may be included. These instructions are usually indicated by specific keywords or phrases that stand out from the rest of the text. By identifying these special instructions, you can ensure that you are following the pattern correctly and achieving the desired result.
1. Special stitches: Look for keywords such as “yo” (yarn over), “dec” (decrease), or “inc” (increase) to identify special stitches that need to be performed. These stitches are often explained in the pattern’s instructions or may have accompanying diagrams to clarify their execution.
2. Repeat instructions: If you see phrases like “repeat from * to *” or “repeat the last row for X more times,” it means that a certain set of instructions needs to be repeated multiple times within the pattern. Pay close attention to the number of times the instructions need to be repeated, as it will affect the overall design or shape of the knitted piece.
3. Edge stitches: Some patterns may include specific instructions for edge stitches, which are stitches worked at the beginning or end of each row to create a neat and finished edge. These instructions may involve slipping stitches, adding or reducing stitches, or working a special stitch pattern.
4. Finishing techniques: Towards the end of a pattern, you may come across instructions for finishing techniques, such as binding off, seaming, or adding embellishments. These instructions are crucial for completing the knitting project and giving it a polished look.
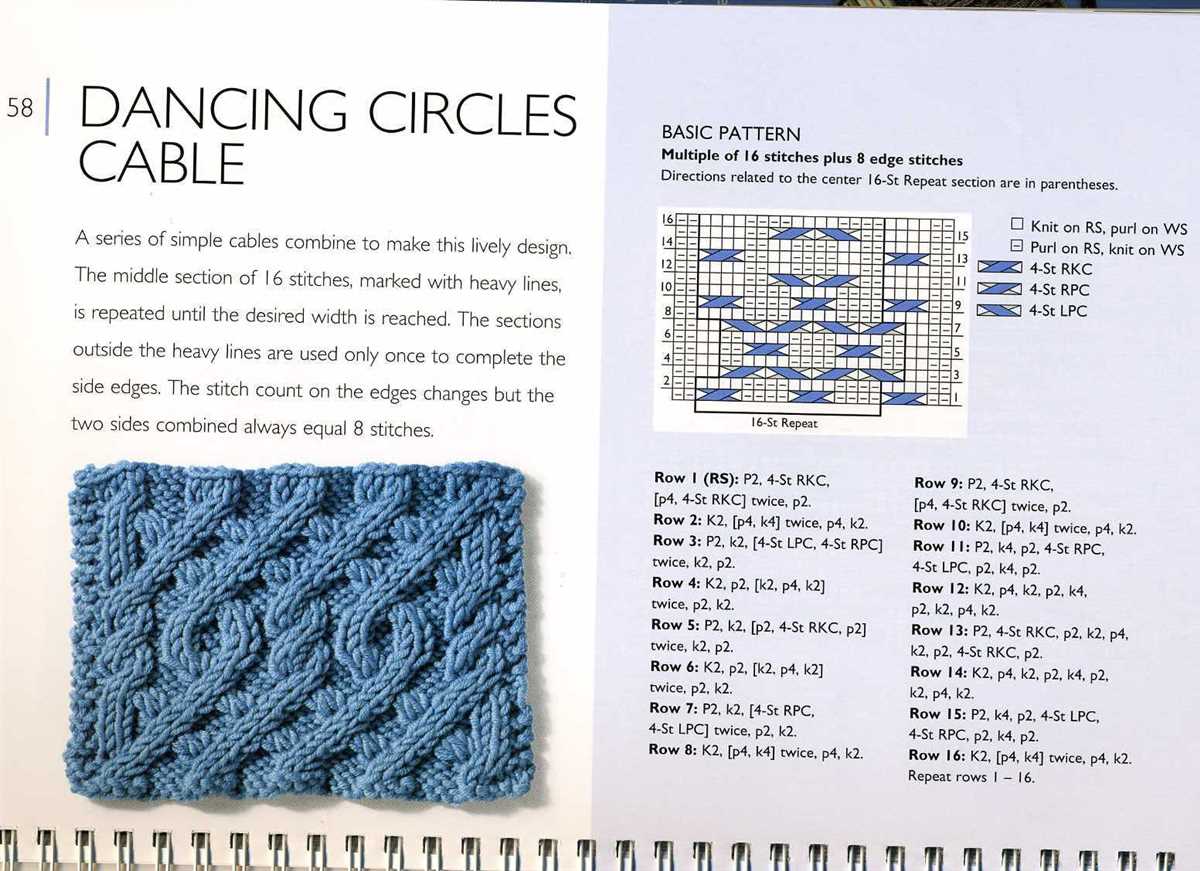
5. Chart symbols and legends: If the knitting pattern includes a chart or graph, look for a symbol legend that explains the meaning of each symbol used in the chart. By familiarizing yourself with these symbols, you can easily interpret the chart and follow the pattern accurately.
By identifying and understanding these special instructions and techniques, you can confidently read and follow a knitting pattern graph, ensuring that your finished project turns out exactly as intended.
Using Chart Markers to Highlight Key Points
When reading a knitting pattern graph, it can be easy to get lost in the sea of symbols and lines. However, chart markers can be incredibly helpful in highlighting key points and making the pattern easier to follow.
Chart markers, such as stitch markers or highlighter tape, can be used to mark important sections of the graph. For example, you can use a marker to indicate the beginning or end of a repeat, to mark a specific stitch or row, or to highlight a color change. These markers act as visual cues, making it easier to keep track of where you are in the pattern and preventing mistakes.
How to Use Chart Markers:
- Start by identifying the key points or sections in the graph that you want to highlight.
- Place a stitch marker or use a piece of highlighter tape to mark those points on the graph.
- As you work through the pattern, refer to the markers to keep track of where you are and to ensure accuracy.
- Move the markers as you progress through the pattern, if necessary.
- Make sure to remove the markers once you no longer need them.
Using chart markers is especially useful when working on complex or intricate patterns that involve multiple colors, cables, or lacework. They can help you stay organized and focused, reducing the chances of making mistakes and improving your overall knitting experience.
So, next time you’re tackling a knitting pattern graph, don’t forget to grab some chart markers to help you along the way. Happy knitting!
Practice Makes Perfect
Reading knitting pattern graphs can feel daunting at first, but like any new skill, practice makes perfect. The more you familiarize yourself with different types of graphs and symbols, the easier it will become to decipher and follow knitting patterns.
Here are a few tips to help you practice and improve your skills:
- Start with simple knitting pattern graphs and gradually work your way up to more complex designs. This will help you build your confidence and understanding step by step.
- Take note of any common symbols or abbreviations used in knitting pattern graphs. Having a reference sheet can be helpful as you work on different patterns.
- Break down the graph into smaller sections or blocks to make it more manageable. Focus on one section at a time and then connect them together as you go.
- Use stitch markers or highlighters to help keep track of your progress on the graph. This can prevent confusion and help you stay organized.
- Don’t be afraid to make mistakes. Mistakes are a natural part of the learning process, and they can help you understand and improve your skills.
- Practice regularly. Just like any skill, the more you practice reading knitting pattern graphs, the better you will become.
Remember, reading knitting pattern graphs is a skill that takes time and practice to develop. Be patient with yourself, and don’t get discouraged if you don’t understand everything right away. With persistence and practice, you’ll soon be able to confidently read and follow any knitting pattern graph that comes your way.
Q&A:
What is a knitting pattern graph?
A knitting pattern graph is a visual representation of a knitting pattern, usually in the form of a chart, that shows the stitches and rows required to create a specific design or pattern.
How do you read a knitting pattern graph?
To read a knitting pattern graph, you start at the bottom right corner and read each row from right to left. Each square on the graph represents a stitch, and the symbols or colors in the square indicate the type of stitch to be used. You read the row numbers on the right side of the graph to keep track of your progress.
What do the symbols on a knitting pattern graph mean?
The symbols on a knitting pattern graph represent different types of stitches, such as knit, purl, yarn over, decreases, and cable twists. Each knitting pattern may have different symbols and a key or legend that explains what each symbol means.
What are some tips for reading a knitting pattern graph?
Some tips for reading a knitting pattern graph include: familiarizing yourself with the key or legend, reading the graph row by row, using stitch markers or highlighters to keep track of where you are, and referring back to the written instructions if needed.
Are knitting pattern graphs necessary for all knitting patterns?
No, not all knitting patterns require a graph. Some patterns are written in a more traditional format, using abbreviations and written instructions, while others may include both a written pattern and a graph for visual reference. It ultimately depends on the complexity and design of the pattern.
What is a knitting pattern graph?
A knitting pattern graph is a visual representation of a knitting pattern. It is a chart that uses symbols or colors to represent each stitch or stitch pattern in a knitting project.
How do I read a knitting pattern graph?
To read a knitting pattern graph, start at the bottom right corner and read from right to left on the right side rows (odd rows) and from left to right on the wrong side rows (even rows). Each square on the chart represents one stitch or stitch pattern, and the symbols or colors in the squares indicate the type of stitch to be used. Follow the chart row by row and stitch by stitch to create the desired pattern.