
Knitting is a popular hobby that allows us to create beautiful and cozy garments. However, sometimes we may find ourselves wanting to make a knitting pattern larger to fit our specific size or style preferences. Whether you’re a beginner or an experienced knitter, increasing a knitting pattern can seem like a daunting task. But fear not! With a few simple techniques and tips, you can easily adjust any knitting pattern to a larger size.
One of the first steps in increasing a knitting pattern is to understand the sizing measurements provided in the pattern. Most knitting patterns will include measurements such as bust, waist, and hip circumference, as well as the length of the garment. By comparing these measurements to your own body measurements, you can determine how much you need to increase the pattern to achieve the desired fit.
Once you have determined the amount of increase needed, you can start making adjustments to the knitting pattern. One of the easiest ways to increase the size of a knitting pattern is to use a larger needle size. This will create larger stitches and result in a larger finished garment. However, it’s important to keep in mind that changing the needle size will also affect the gauge, so be sure to swatch and adjust accordingly.
How to Increase a Knitting Pattern to a Larger Size
When following a knitting pattern, it’s not uncommon to find that the size provided doesn’t match your measurements. Fortunately, it’s possible to increase the size of a knitting pattern to fit your needs. Here are a few tips to help you adjust the pattern for a larger size:
1. Choose the Right Yarn and Needles

When increasing the size of a knitting pattern, it’s important to choose a yarn and needle size that will maintain the same gauge as the original pattern. This will ensure that the finished project will have the right measurements. You may need to experiment with different needle sizes and yarn weights to achieve the correct gauge.
2. Calculate the Necessary Stitch and Row Increases
To increase the size of the knitting pattern, you’ll need to calculate how many stitches and rows to add. First, measure your gauge and determine how many stitches and rows are represented per inch. Then, multiply the number of stitches and rows per inch by the desired measurement increase. This will give you the number of stitches and rows to add throughout the pattern.
3. Adjust the Pattern Instructions Accordingly
Once you’ve determined the necessary stitch and row increases, you’ll need to adjust the pattern instructions accordingly. For example, if you need 10 additional stitches, you may need to add an extra repeat of a stitch pattern or increase the number of stitches on each row. Make sure to keep track of your adjustments to ensure consistency throughout the pattern.
- Example: If the pattern says to cast on 60 stitches and you need to add 10 stitches, you could cast on 70 stitches instead.
Remember that increasing the size of a knitting pattern will require some trial and error. It’s always a good idea to make a swatch and check your gauge before starting the project. Additionally, take notes of your adjustments as you work through the pattern to make it easier to replicate in the future.
Understanding the Basics
In order to increase a knitting pattern to a larger size, it is important to understand the basics of knitting and pattern reading. By familiarizing yourself with the fundamentals, you will be able to confidently modify patterns to suit your needs.
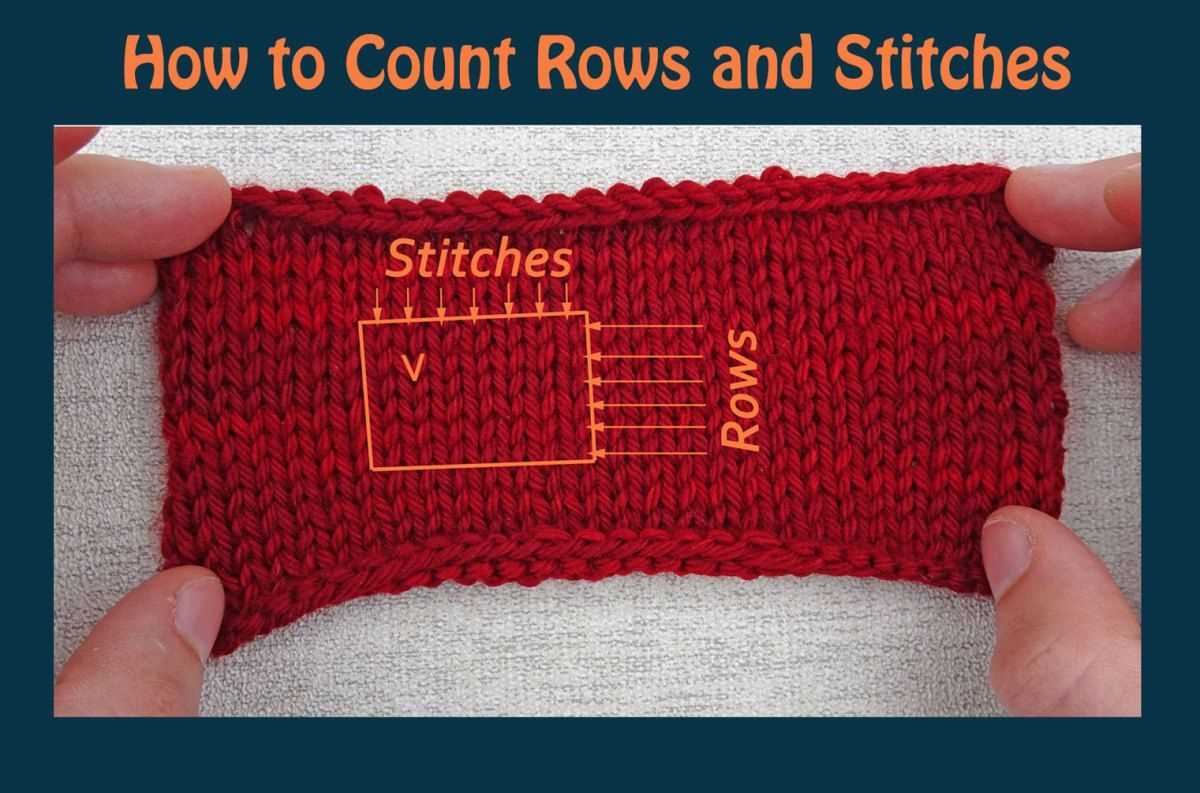
1. Gauge: The first step in modifying a knitting pattern is to determine your gauge. Gauge refers to the number of stitches and rows per inch that you achieve with your chosen yarn and needles. It is crucial to match the gauge indicated in the pattern, as it ensures that your finished project will have the correct size and fit.
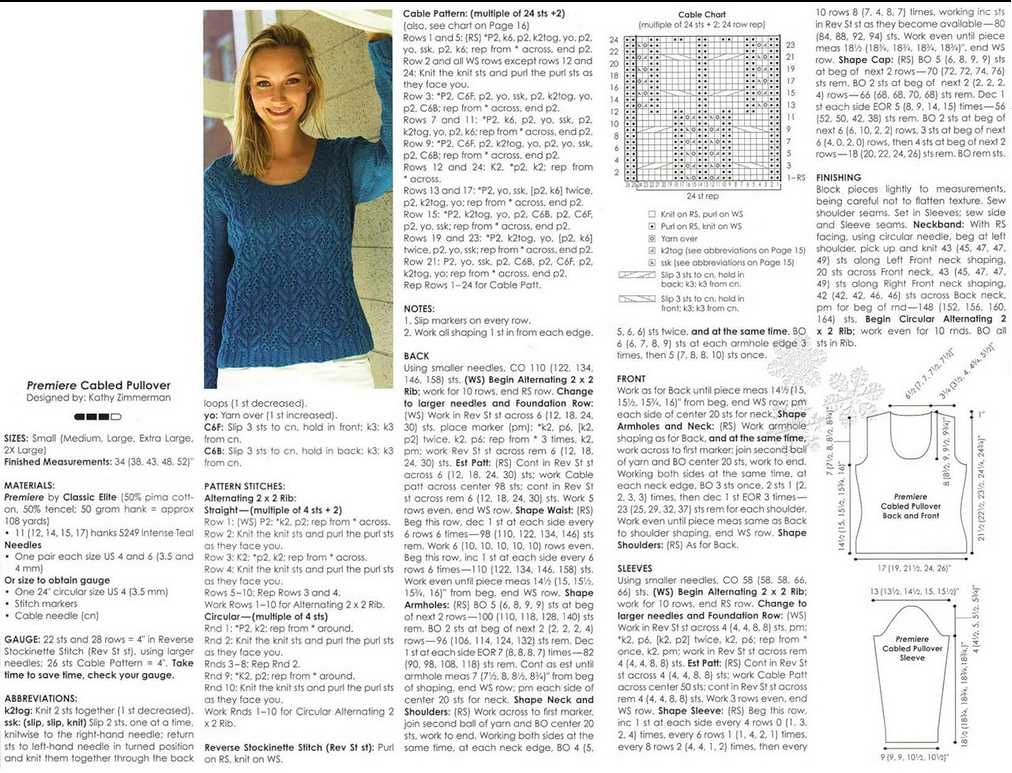
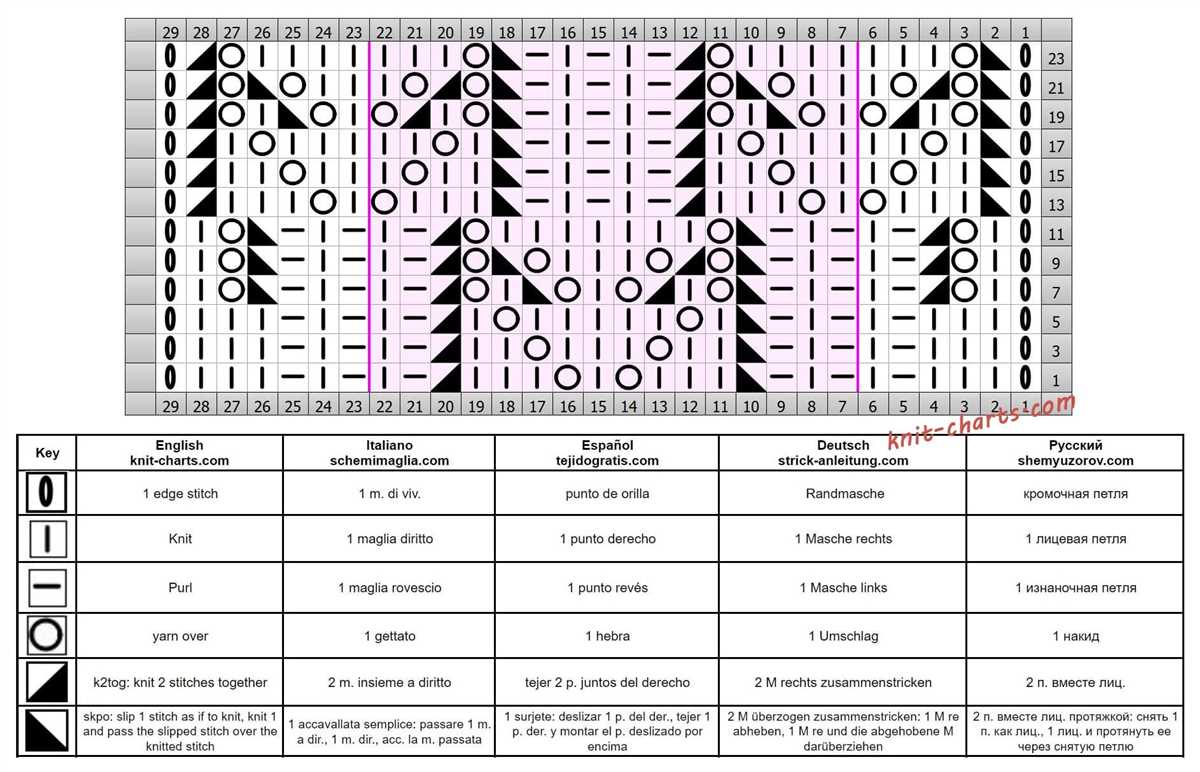
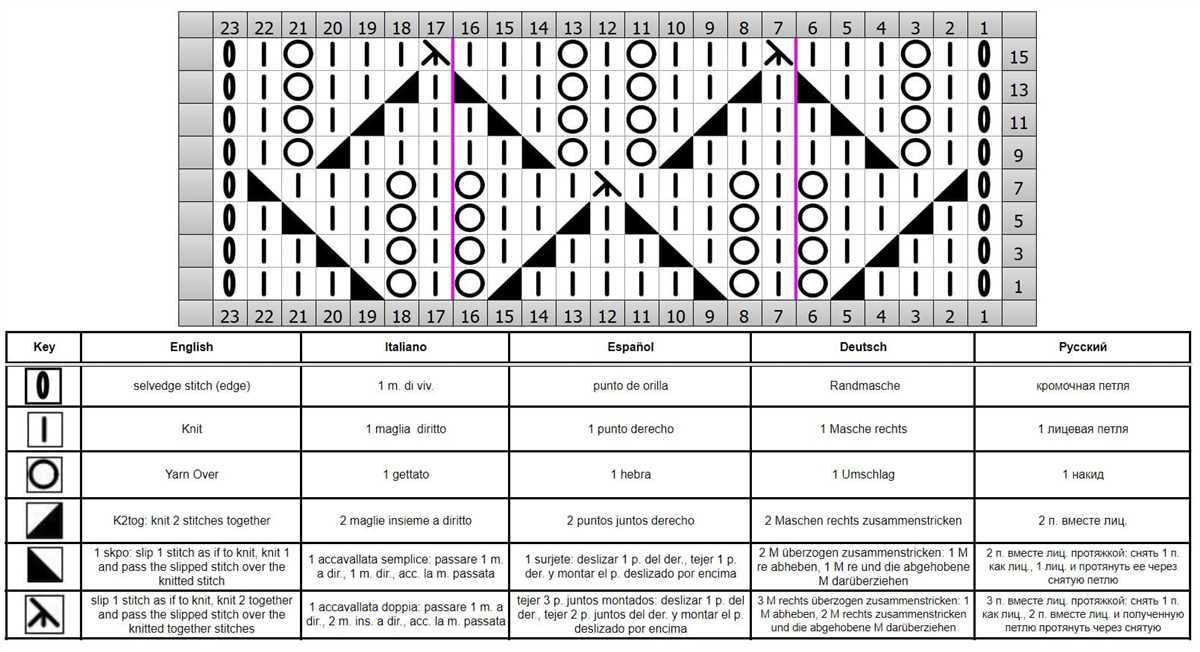
2. Stitch Pattern: Take some time to study and understand the stitch pattern used in the original pattern. This will involve recognizing different stitch techniques, such as knit, purl, yarn over, and increases or decreases. Understanding the stitch pattern will help you make adjustments in the increase areas while maintaining the overall integrity of the design.
3. Sizing Chart: Consult the sizing chart provided in the pattern, if available, to determine the measurements for each size. This will give you a clear idea of how much you will need to increase the pattern to achieve the desired size. Keep in mind that some patterns may require more complex adjustments, such as adding or subtracting pattern repeats.
4. Math: Increasing a knitting pattern to a larger size involves some basic math calculations. You will need to determine the number of additional stitches and rows required to achieve the desired measurements. This may involve adding stitches evenly across rows, increasing before or after a specific stitch, or incorporating additional pattern repeats.
5. Adjustments: Make any necessary adjustments to the pattern based on your calculations. This may involve rewriting sections of the pattern, particularly in areas where there are stitch pattern repeats. It is important to keep track of your modifications by using stitch markers or writing notes on the pattern itself.
6. Test Swatch: Before proceeding with the modified pattern, it is recommended to work a test swatch using the increased stitch and row counts. This will allow you to check if your gauge is still accurate and make any additional adjustments if necessary.
By understanding these basics and following these steps, you will be able to confidently increase a knitting pattern to a larger size and create a garment that fits perfectly.
Choosing the Right Yarn and Needles
When increasing a knitting pattern to a larger size, it is important to choose the right yarn and needles to ensure that the final project turns out the way you want it to. The yarn and needles you choose can greatly affect the size, drape, and overall look of the finished piece.
Yarn: When selecting yarn for a larger size, consider the weight and fiber content. Different yarn weights will create different densities and drapes, so choose a weight that matches your desired outcome. For example, if you want a lightweight, drapey sweater, you may want to choose a fingering weight yarn. On the other hand, if you prefer a more structured, warm garment, you may want to opt for a worsted weight yarn. Additionally, consider the fiber content of the yarn. Natural fibers, such as wool or cotton, have different characteristics and care requirements compared to synthetic fibers, such as acrylic or nylon. Consider how the yarn will behave during blocking and washing, and choose a fiber that suits your preferences and needs.
Needles: The size of your needles can also affect the size of your finished project. In general, larger needles will create a looser, more drapey fabric, while smaller needles will create a tighter, firmer fabric. When increasing a pattern size, you may need to go up a needle size or two to achieve the desired gauge. It is important to swatch before starting your project to ensure that your gauge matches the pattern instructions. Additionally, consider the type of needles you prefer to work with. Some knitters find that they prefer metal needles for their smoothness and speed, while others prefer wooden or bamboo needles for their warmth and grip. Choose needles that feel comfortable in your hands and allow you to knit with ease.
- Consider the weight and fiber content of the yarn when choosing yarn for a larger size.
- Choose a yarn weight that matches your desired outcome and consider the fiber’s characteristics and care requirements.
- Needle size can affect the size and fabric of your finished project, so swatch to achieve the desired gauge.
- Choose needles that feel comfortable in your hands and allow you to knit with ease.
Taking Accurate Measurements

Before increasing a knitting pattern to a larger size, it is essential to take accurate measurements of the person for whom the garment is intended. This ensures that the final result will fit properly and be comfortable to wear.
1. Bust/Chest Measurement: Measure the circumference of the widest part of the bust or chest. Make sure the measuring tape is parallel to the floor and not too tight or too loose.
2. Waist Measurement: Measure the circumference of the narrowest part of the waist, which is usually above the belly button. Ensure the measuring tape is snug but not constricting.
3. Hip Measurement: Measure the circumference of the widest part of the hips, usually around the fullest part of the buttocks. Keep the measuring tape parallel to the floor and snug but not tight.
4. Arm Length Measurement: Measure the length from the shoulder bone to the wrist bone. Ensure the arm is relaxed and slightly bent at the elbow during the measurement.
5. Shoulder Width Measurement: Measure the distance between the outer points of the shoulders. Keep the measuring tape straight across the back, parallel to the floor.
6. Back Length Measurement: Measure the length from the base of the neck to the desired hemline. Make sure the person stands up straight with their shoulders relaxed.
7. Sleeve Width Measurement: Measure the circumference around the fullest part of the upper arm. Keep the measuring tape parallel to the floor and ensure it is snug but not tight.
By accurately measuring these key areas, you will have the necessary information to increase a knitting pattern to a larger size. It is important to refer to the specific pattern instructions to determine how much to increase and where to make adjustments based on the measurements taken.
Calculating the Gauge

Calculating the gauge is an important step when increasing a knitting pattern to a larger size. The gauge refers to the number of stitches and rows per inch in the knitted fabric. It helps determine the size and fit of the final product. To accurately calculate the gauge, follow these steps:
- Choose the right yarn and needle size: Start by selecting a yarn and needle size that match the original knitting pattern. It is important to use the same type and weight of yarn and the recommended needle size to achieve the desired gauge.
- Knit a swatch: To determine the gauge, knit a swatch using the chosen yarn and needle size. Cast on a sufficient number of stitches to create a swatch that is at least 4 inches wide. Knit a few rows in the chosen stitch pattern and then measure the gauge using a ruler or tape measure.
- Measure the gauge: Lay the swatch flat on a surface and measure the number of stitches and rows per inch. Count the number of stitches in one inch horizontally and vertically. Write down the measurements for future reference.
- Compare the gauge: Compare the measured gauge to the gauge specified in the original knitting pattern. If the measured gauge matches the pattern gauge, you can proceed with the calculations. If the gauge is different, you may need to adjust the needle size or yarn to achieve the correct gauge.
By accurately calculating the gauge, you can ensure that the increased knitting pattern will fit properly and have the desired measurements. It is an important step to take before making any modifications to the pattern. Remember to always double-check the gauge before starting a project to avoid any sizing issues.
Increasing Stitch Count

When it comes to increasing the stitch count of a knitting pattern, there are a few different methods you can use depending on the desired outcome and the specific pattern you are working with. Here are a few techniques you can try:
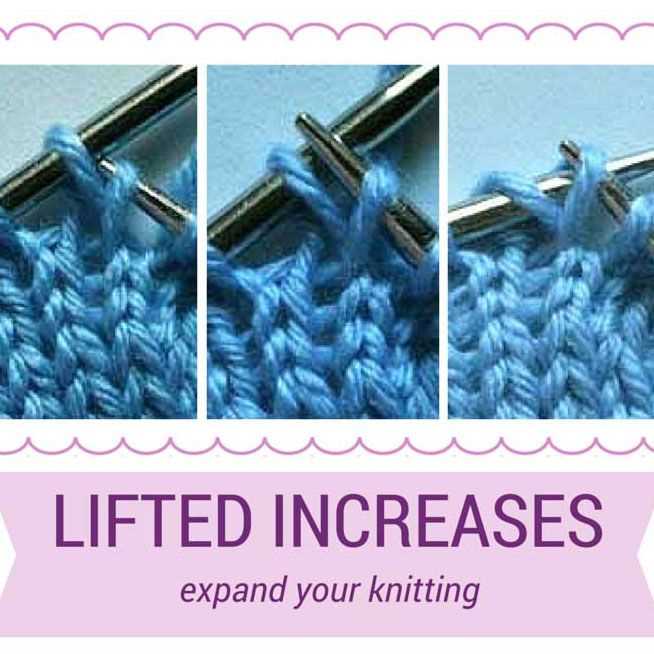
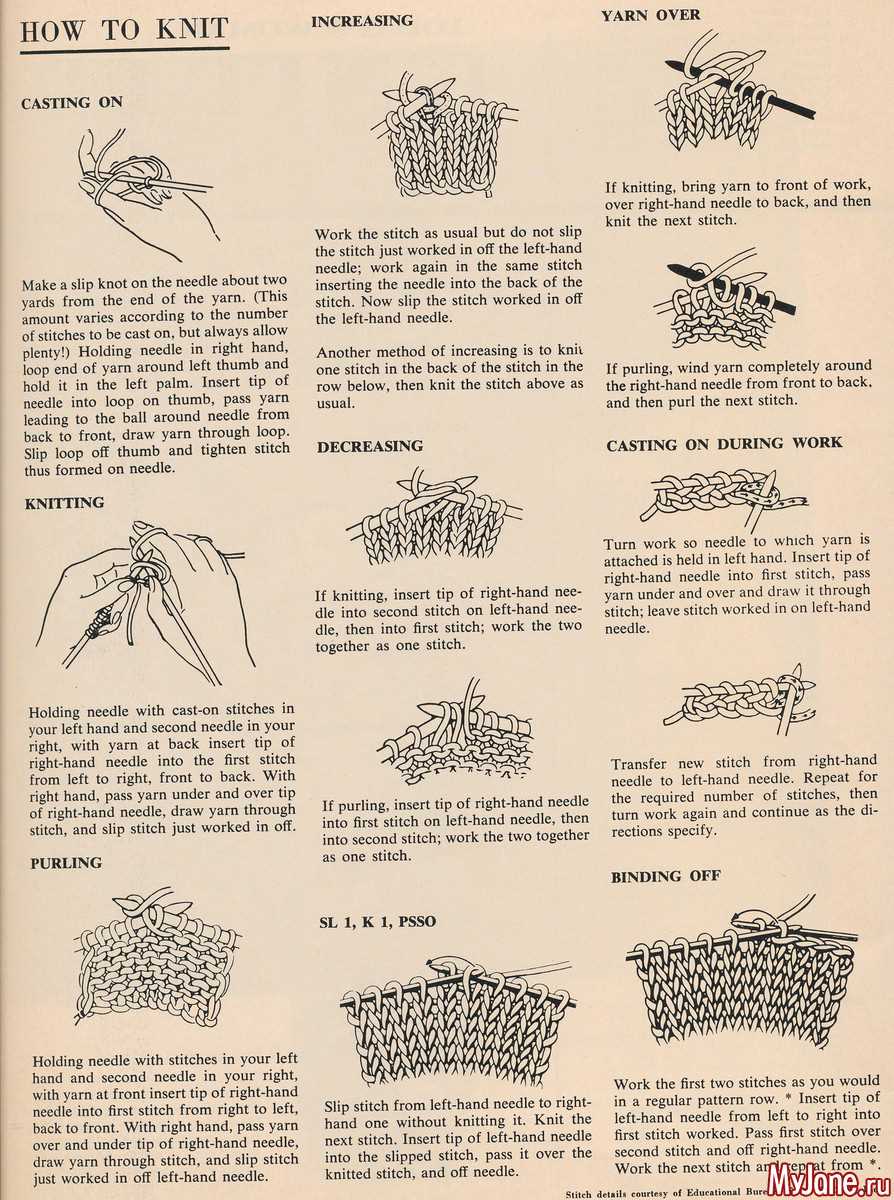
1. Knitting into the front and back of a stitch:
This is a simple way to increase stitches. To do this, knit the stitch as usual but do not slide it off the left needle. Instead, insert the right needle into the front of the stitch again, this time knitting through the back loop. Now you can slide the stitch off the left needle, and you will have created two stitches from one.
2. Making a yarn over:

To increase stitches using a yarn over, simply bring the yarn to the front of the work, then take it over the right needle to the back again. This creates a new stitch without knitting into an existing stitch. This method is often used in lace patterns, as it creates an eyelet or decorative hole in the fabric.
3. Increasing in the middle of a row:
If you need to increase stitches in the middle of a row, you can use the make one (M1) increase. To do this, lift the horizontal bar between the two stitches on the left needle, insert the right needle from front to back under the bar, then knit it as usual. This creates a new stitch, increasing the stitch count.
Remember to always consult the specific pattern you are working with for any recommended increase methods or stitch counts. These techniques will help you adjust your knitting pattern to a larger size, ensuring the finished project fits perfectly.
Modifying Pattern Repeat
When trying to increase the size of a knitting pattern, one important aspect to consider is modifying the pattern repeat. The pattern repeat is the sequence of stitches that is repeated throughout the pattern to create the desired design. By understanding how to modify the pattern repeat, knitters can easily adjust the size of the project.
To modify the pattern repeat, it is necessary to calculate the desired measurements and adjust the number of stitches accordingly. This can be done by determining the gauge of the pattern and calculating the number of stitches needed to reach the desired width. For example, if the pattern repeat is 10 stitches wide and the desired width is 20 inches, knitters would need to cast on a multiple of 10 stitches to achieve the desired size.
Once the number of stitches for the desired width is determined, it is important to ensure that the pattern repeat still aligns correctly. This may require adjusting the number of stitches in each pattern repeat or adding/subtracting stitches at the edges to maintain the integrity of the design. It is also important to consider any borders or edges in the pattern and how they may need to be modified due to changes in the pattern repeat.
When modifying the pattern repeat, it is also important to keep in mind the overall balance and proportion of the design. Knitters may need to adjust other aspects of the pattern, such as the number of rows or the placement of certain elements, to ensure that the modified pattern repeat creates a visually pleasing result.
By understanding how to modify the pattern repeat, knitters can easily increase the size of a knitting pattern to fit their specific needs. With careful calculation and adjustment, it is possible to create a larger size without compromising the overall design and integrity of the pattern.
Adjusting Shaping and Decreases
When increasing the size of a knitting pattern, it is important to adjust shaping and decreases accordingly to maintain the overall proportion and fit of the garment. This can be done by adding or subtracting stitches at the appropriate points in the pattern.
1. Shaping:
Shaping in a knitting pattern refers to the gradual increase or decrease of stitches to create curves and contours. When increasing the size of a pattern, you may need to add more shaping to achieve the desired fit. This can be done by evenly distributing the added stitches across the rows or rounds where shaping occurs.
For example, if the original pattern has shaping every 10th row, you can increase the number of rows in between shapings to accommodate the larger size. Alternatively, you can add extra shaping rows by evenly spacing them within the existing shaping intervals.
2. Decreases:
Decreases are used to create a tapered or fitted effect in a knitted garment. When increasing the size of a pattern, you may need to adjust the number and placement of decreases to maintain the desired shape.
If the original pattern has decreases placed at specific intervals, you can adjust by adding extra stitches to the areas where the decreases occur. This will allow you to maintain the same number of decreases, but with the added stitches for the larger size. Alternatively, you can space out the decreases more evenly across the rows or rounds to accommodate the larger size.
It is important to keep in mind that adjusting shaping and decreases requires careful calculations and attention to detail. It is recommended to create a swatch and make any necessary adjustments before starting the project to ensure the best fit for the larger size.
Adding Extra Length
In some cases, you may need to add extra length to a knitting pattern to accommodate a larger size. This could be due to the length of your torso or the desired fit of the garment. Here are a few ways you can add extra length to your knitting project.
1. Extended Ribbing
If you want to add length to the bottom of a sweater or cardigan, one option is to extend the ribbing. This can be done by adding extra rows of ribbing or by increasing the length of each ribbing row. For example, instead of working 2×2 ribbing for 2 inches, you could work 2×2 ribbing for 3 inches.
2. Additional Body Rows
Another way to add length is to insert additional rows in the body of the pattern. This can be done by repeating certain sections or by simply working extra rows between specified points. For example, if the pattern calls for 10 inches of stockinette stitch before shaping the armholes, you could add an extra inch or two to this section to increase the overall length.
3. Lengthened Sleeves

If you need to add extra length to the sleeves of a pattern, you can do so by working additional rows or repeats of the sleeve pattern. This can be done at any point in the sleeve, such as at the cuff or upper arm. Just make sure to keep track of any shaping or stitch pattern changes that may be affected by the added length.
When adding extra length to a knitting pattern, it’s important to consider the overall proportions and fit of the garment. Make sure to adjust any shaping or stitch pattern changes accordingly to maintain the intended design. Keeping track of your modifications and making thorough notes can also be helpful for future reference or if you plan to knit the pattern again in a different size.
Creating a Customized Fit
When knitting a larger size of a pattern, it is important to create a customized fit to ensure that the finished garment will be comfortable and flattering. Here are some tips to help you achieve the perfect fit:
1. Take accurate measurements: Before starting the project, take detailed measurements of the person who will be wearing the garment. Measure the bust, waist, hips, arm circumference, and any other relevant areas. This will help you determine the appropriate size to follow or make adjustments as needed.
2. Use a swatch: Knitting a swatch is essential to determine gauge and ensure that your stitches match the pattern’s requirements. After washing and blocking the swatch, measure the number of stitches and rows per inch to compare with the pattern’s gauge. If necessary, adjust your needle size to achieve the correct gauge.
3. Calculate the stitch and row count: Once you have determined the gauge, calculate the stitch and row count needed for the larger size. Multiply the pattern’s stitch and row counts for the smaller size by the ratio of the desired size to the original size. Round to the nearest whole number if necessary.
4. Make adjustments: Depending on the individual’s measurements, it may be necessary to make additional adjustments to the pattern. For example, if the bust measurement is larger than the pattern’s specified size, you may need to add extra stitches or increase in specific areas to accommodate the additional width. Similarly, if the length needs to be adjusted, you can add or subtract rows as needed.
5. Monitor the fit as you progress: As you knit the larger size, regularly try the garment on the intended wearer or use a dress form to ensure that it is fitting correctly. Pay attention to the ease and how the fabric drapes. Make any necessary adjustments along the way to achieve the desired fit and style.
By taking accurate measurements, using a swatch to determine gauge, calculating stitch and row counts, making necessary adjustments, and monitoring the fit as you progress, you can create a customized fit when increasing a knitting pattern to a larger size.
Adding Extra Details
When you’re looking to increase a knitting pattern to a larger size, adding extra details can really make your project stand out. Whether it’s a decorative border, an intricate cable pattern, or a unique stitch design, these extra details can elevate your knitting to the next level.
One way to add extra details to your knitting is by incorporating additional colorwork. This can be done through fair isle knitting, where you work with multiple colors in a pattern, or by adding contrasting stripes to your project. Using different colors can create visual interest and make your project more eye-catching.
Another way to add extra details is by incorporating texture into your knitting. This can be done through the use of different stitch patterns, such as cables, lace, or bobbles. These techniques can add dimension and depth to your project, making it more visually appealing.
If you’re looking to add even more intricate details, consider incorporating beads or sequins into your knitting. This can be done by threading the beads or sequins onto your yarn before knitting, and then incorporating them into your stitches as you work.
Additionally, you can add extra details to your knitting by considering the finishing touches. This can include adding buttons, embroidery, or ribbons to your project, which can enhance the overall look and make it more personalized.
Overall, adding extra details to your knitting can transform a simple pattern into a unique and eye-catching project. Whether it’s through colorwork, texture, or additional embellishments, these extra details can truly make your knitting one-of-a-kind.
Checking for Balance and Proportion

When increasing a knitting pattern to a larger size, it is important to check for balance and proportion. This ensures that the finished garment will fit well and look aesthetically pleasing. Here are some key steps to consider:
1. Assess the original pattern
Start by examining the original pattern and identifying any design elements that may need adjustment. Look for sections that may cause the garment to look unbalanced when increased in size, such as intricate stitch patterns, colorwork motifs, or shaping details. Take note of these areas as they may require additional modifications.
2. Determine the required adjustments
Based on the original pattern and the desired larger size, calculate the necessary increases for each section of the garment. This may involve adding extra stitches or rows to maintain balance and proportion. Pay attention to the gauge and stitch counts to ensure the adjustments are accurate and consistent throughout the pattern.
3. Consider the overall shape

While making adjustments, consider the overall shape of the garment. For example, if increasing the size of a sweater, evaluate the width of the shoulders, the length of the sleeves, and the circumference of the body. Ensure that these elements are proportionate to the larger size to maintain a balanced and flattering fit.
4. Test with swatches
Create swatches using the adjusted pattern to test the changes and check for balance and proportion. Take measurements and compare them to the desired larger size to ensure accuracy. Make any necessary revisions before starting the actual project to prevent any surprises in the finished garment.
- Check for any changes in stitch patterns, such as the number of repeats, to maintain consistency.
- Consider the drape of the fabric and how it will be affected by the increased size.
- Consult with experienced knitters or designers for advice and guidance on adjusting patterns for larger sizes.
- Keep track of the adjustments made for future reference and to share with others who might be interested in making the pattern in a larger size.
By carefully checking for balance and proportion during the process of increasing a knitting pattern to a larger size, you can ensure that the finished garment fits well and looks visually pleasing. Taking the time to make accurate adjustments and testing them with swatches will result in a successful and satisfying knitting project.
Test-Knitting and Making Adjustments

Once you have made the necessary calculations to increase the size of your knitting pattern and have cast on the appropriate number of stitches, it is important to test-knit a section of the pattern to ensure that your adjustments are correct. This is especially important if you have made significant changes to the original pattern.
Start by knitting a small portion of the pattern, such as a few rows or a repeat of the stitch pattern, and compare it to the original pattern. Pay attention to the stitch count, the dimensions, and the overall appearance of the fabric. If the test-knit section matches the original pattern, you can proceed with confidence. However, if there are any discrepancies, you may need to make further adjustments.
When making adjustments to your knitting pattern, there are several areas to consider:
- Stitch count: If your test-knit section has too many or too few stitches, you may need to adjust your stitch count. You can do this by adding or subtracting stitches evenly across a row or by modifying increases and decreases.
- Sizing: If the dimensions of your test-knit section are not as expected, you may need to adjust the number of rows or repeats. Remember to consider both the width and length of the pattern when making adjustments.
- Tension: If the fabric of your test-knit section feels too loose or too tight, you may need to change the size of your knitting needles. Using smaller needles will create a tighter fabric, while using larger needles will create a looser fabric.
Keep in mind that test-knitting and making adjustments can be an iterative process. It may take a few attempts to achieve the desired size and fit. Don’t be discouraged if you need to rip out your knitting and start over – it’s all part of the learning process!
Summary:
Increasing a knitting pattern to a larger size requires careful calculations and adjustments. By understanding the principles of gauge, stitch count, and sizing, you can confidently modify a pattern to fit your needs. Test-knitting and making adjustments are crucial steps to ensure that your final project turns out as intended. With practice and patience, you can successfully adapt knitting patterns to create beautiful garments in the size you desire.