
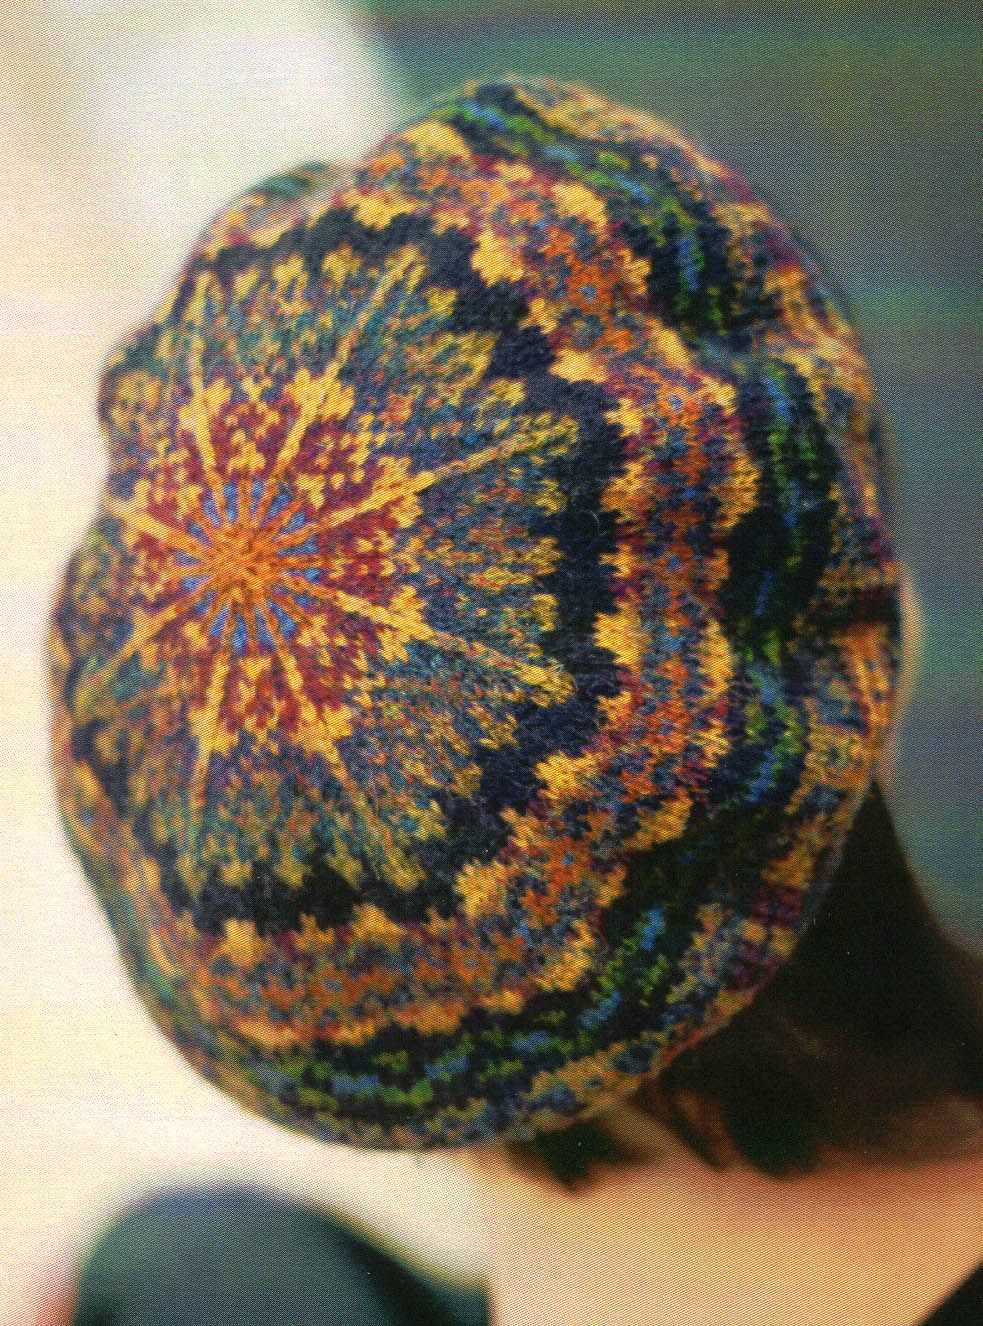
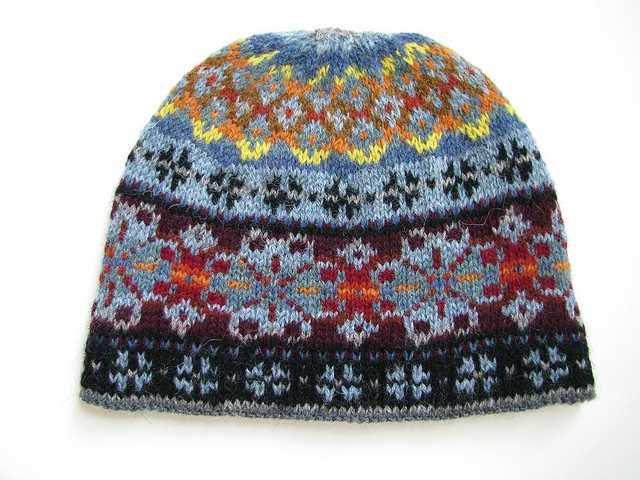
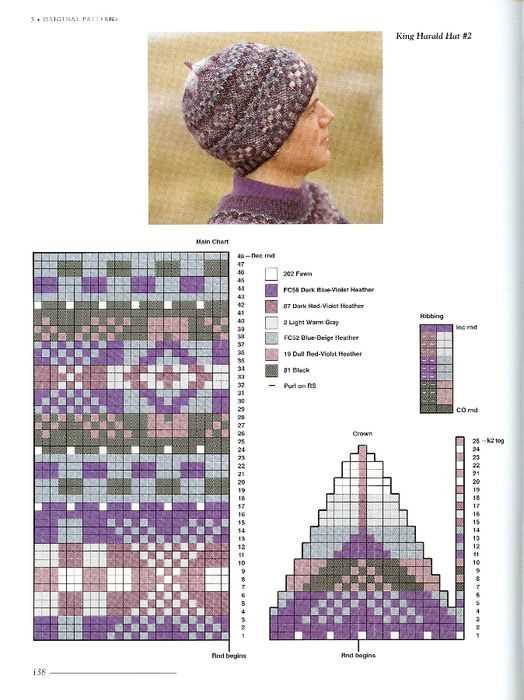
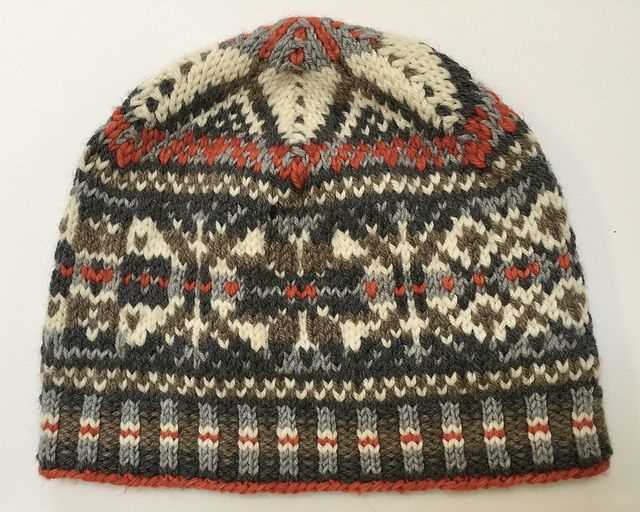
If you’re looking for a cozy and stylish winter accessory, look no further than the Fair Isle knit hat. This classic pattern, named after the Fair Isle in Scotland, features intricate colorwork and geometric designs that add charm and personality to any outfit. Whether you’re an experienced knitter or just starting out, this pattern is a great way to practice your skills and create a beautiful piece of winter wear.
The Fair Isle knit hat typically uses two or more colors of yarn to create a pattern of alternating motifs. Traditionally, the pattern is worked in the round, using circular knitting needles and double-pointed needles for the crown shaping. The colorwork is achieved by carrying the unused yarn across the back of the work, creating a warm and durable fabric.
One of the best things about the Fair Isle knit hat pattern is its versatility. You can customize the pattern by choosing your own color scheme and motifs, allowing you to create a hat that perfectly suits your style. Whether you prefer bold and vibrant colors or a more subdued and neutral palette, the possibilities are endless. With a little bit of practice, you can create your own unique Fair Isle knit hat that will keep you warm and stylish all winter long.
Fair Isle Knit Hat Pattern
If you’re looking to add some color and style to your winter wardrobe, a Fair Isle knit hat is the perfect accessory. The Fair Isle knitting technique originated in the Shetland Islands and is known for its intricate patterns and use of multiple colors. With a Fair Isle knit hat pattern, you can create a cozy and stylish hat that will keep you warm all winter long.
To start, you’ll need to gather your supplies. You’ll need two colors of yarn, one for the main color and one for the pattern. Choose colors that complement each other and give your hat a beautiful contrast. You’ll also need knitting needles in the appropriate size for your yarn, a tapestry needle for weaving in ends, and a stitch marker to keep track of your rounds.
The Fair Isle knit hat pattern begins with a ribbed brim for a snug fit. You’ll then transition into the main body of the hat, where the Fair Isle pattern will be created. The pattern consists of alternating rows of the main color and the pattern color, creating a beautiful design. The stitches used in the Fair Isle pattern are typically knit and purl, but you can also incorporate more advanced techniques like cables or lace if you’re feeling adventurous.
- Choose two colors of yarn for your hat.
- Gather your knitting supplies, including needles, a tapestry needle, and a stitch marker.
- Create a ribbed brim for a snug fit.
- Transition to the main body of the hat and begin the Fair Isle pattern.
- Alternate rows of the main color and the pattern color to create the design.
Once you’ve completed the Fair Isle pattern, you’ll finish off the hat by decreasing the number of stitches until you reach the top. Finally, you’ll weave in any loose ends and block your hat to remove any wrinkles and give it a polished look.
With a little practice, you’ll be able to create stunning Fair Isle knit hats that are both stylish and cozy. Whether you’re making one for yourself or as a gift, a Fair Isle knit hat is sure to be a winter wardrobe favorite.
What is Fair Isle Knitting?
Fair Isle knitting is a traditional knitting technique that originated in the Fair Isle, a tiny island in the north of Scotland. It is characterized by intricate patterns and the use of multiple colors in a single row. The technique gets its name from the island where it was developed, and it has become synonymous with this particular style of knitting.
One of the key features of Fair Isle knitting is the use of stranded colorwork. This means that two or more colors are carried along the back of the work, creating a pattern on the front. The different colors are typically used to create motifs and geometric designs, which are often inspired by nature or traditional folk art.
In Fair Isle knitting, only two colors are used in any given row, with colors being switched as needed to create the desired pattern. To avoid creating bulky or tangled stitches, each color is carried along the back of the work for a short distance before being picked up again. This technique requires skill and practice to ensure an even tension and avoid any puckering or pulling of the fabric.
Fair Isle knitting has become popular beyond the island itself, with many knitters incorporating this technique into their projects. The intricate designs and vibrant colors of Fair Isle patterns make them a favorite choice for garments, accessories, and home decor items. Whether you’re a beginner or an experienced knitter, learning Fair Isle knitting can open up a world of creativity and allow you to create beautiful and unique pieces.
History of Fair Isle Knitting
Fair Isle knitting is a traditional knitting technique that originated on the Fair Isle, one of the Shetland Islands in Scotland. It is known for its intricate patterns and colorful designs, making it a popular style for knitwear. The history of Fair Isle knitting can be traced back several centuries, with the technique being passed down from generation to generation.
The Fair Isle technique is characterized by the use of multiple colors in a single row, creating a distinctive pattern. This is achieved by carrying two or more colors of yarn across the back of the work and picking them up as needed. The patterns often feature geometric shapes, such as diamonds, zigzags, and stripes, as well as motifs inspired by nature, such as flowers and animals.
The popularity of Fair Isle knitting has grown over the centuries, and it has become synonymous with the Shetland Islands. In the early 20th century, the technique gained international recognition when the Prince of Wales (later King Edward VIII) was photographed wearing Fair Isle knitwear. This royal endorsement brought the craft to the attention of the fashion world, and Fair Isle patterns started appearing in high-end fashion collections.
Today, Fair Isle knitting is still practiced on the Fair Isle and in other parts of the world. It is a skill that requires precision and attention to detail, as well as a good understanding of color theory. Many knitters enjoy the challenge of creating intricate Fair Isle designs, and the finished pieces are often cherished as heirlooms. Whether you’re knitting a cozy hat or a stylish sweater, Fair Isle patterns can add a touch of tradition and beauty to your knitting projects.
Choosing Yarn for Fair Isle Knit Hats
When it comes to knitting Fair Isle hats, one of the most important decisions you’ll make is choosing the right yarn. The yarn you select will not only determine the look and feel of your finished hat, but it will also impact how easy or difficult the knitting process is. Here are some key factors to consider when choosing yarn for Fair Isle knit hats:
Color Selection
One of the defining characteristics of Fair Isle knitting is the use of multiple colors in a single project. When selecting yarn for your Fair Isle hat, it’s important to choose colors that will work well together and create a harmonious overall design. Consider using a color palette that includes both contrasting colors, such as black and white, as well as complementary colors, such as blues and greens or reds and oranges. This will help create a visually appealing and balanced design.
Yarn Weight
The weight of the yarn you choose is another important consideration. Fair Isle knitting typically involves working with multiple strands of yarn at once, so using a bulky or heavy yarn may result in a hat that is too thick and heavy. On the other hand, using a very fine yarn may make it more difficult to achieve the desired tension and create even stitches. It’s often best to choose a medium-weight yarn that allows for easy manipulation and creates a balanced fabric.
Fiber Content
The fiber content of your yarn will determine the warmth and durability of your Fair Isle hat. Consider using yarn that includes a blend of natural fibers, such as wool or alpaca, for added warmth and softness. These fibers also have natural moisture-wicking properties, making them a great choice for winter hats. Additionally, including a small percentage of synthetic fibers, such as nylon or acrylic, can help improve the durability and longevity of your hat.
Tension and Gauge
When knitting Fair Isle patterns, maintaining a consistent tension and gauge is crucial to creating a well-fitting hat. Different yarns may have different properties, such as stretchiness or bulkiness, which can influence your tension. It’s a good idea to swatch with your chosen yarn and adjust your needle size, if necessary, to achieve the recommended tension and gauge for your pattern. This will ensure that your hat fits properly and looks the way you intended.
Overall, the yarn you choose for your Fair Isle knit hat should be selected with consideration for color, weight, fiber content, and tension. By taking these factors into account, you can create a hat that is not only beautiful and stylish, but also comfortable and long-lasting.
Essential Tools and Materials for Fair Isle Knitting
When it comes to fair isle knitting, having the right tools and materials is essential for creating beautiful and intricate patterns. Whether you’re a beginner or an experienced knitter, here are some key items you’ll need to successfully tackle fair isle knitting projects.
Knitting Needles
First and foremost, you’ll need a set of knitting needles suitable for fair isle knitting. Circular needles are highly recommended, as they allow you to knit in the round and easily handle multiple colors. Choose needles that are the correct size for your yarn and ensure they have a comfortable grip for extended knitting sessions.
Yarn
A vital component of fair isle knitting is the yarn. Opt for high-quality wool or wool blend yarns that have good stitch definition and are soft to the touch. Look for yarns specifically labeled as suitable for fair isle knitting, as they often have the right weight and ply count for this technique.
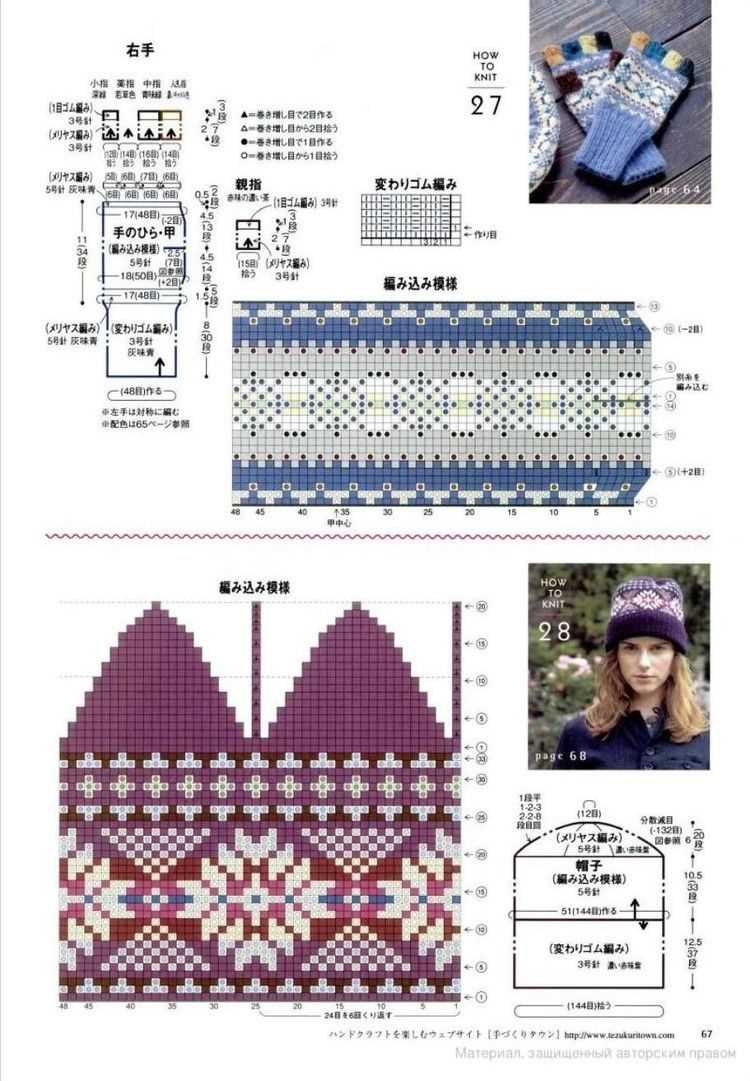
Colorwork Chart
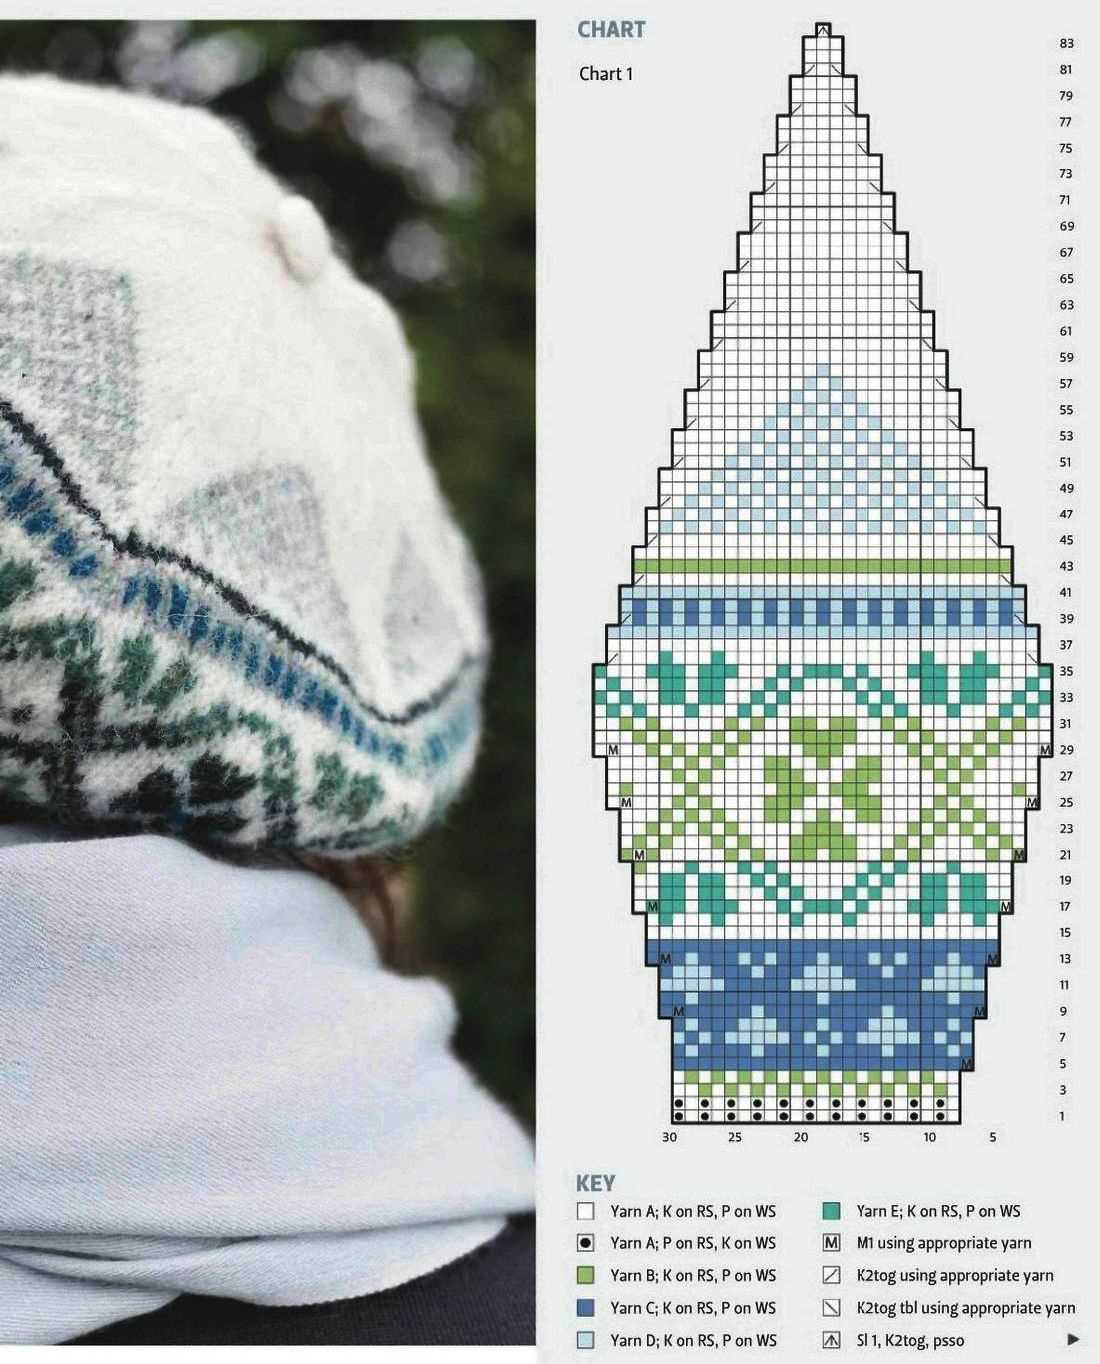
One of the defining features of fair isle knitting is its intricate colorwork patterns. To successfully create these patterns, you’ll need a colorwork chart. This chart will guide you on which colors to use and when to change them during the knitting process. Make sure to choose a chart that matches your desired fair isle design and check for any accompanying instructions.
Stitch Markers
Stitch markers are a must-have tool for fair isle knitting, especially when working in the round. They help you keep track of stitch patterns and color changes, ensuring your design stays on track. Use markers that are easily removable and won’t snag on your yarn.
Scissors and Tapestry Needles
Lastly, a pair of sharp scissors and tapestry needles are essential for finishing your fair isle knitting project. Scissors will come in handy for cutting yarn, while tapestry needles are used for weaving in loose ends and sewing up any seams.
By having these essential tools and materials on hand, you’ll be well-prepared to take on any fair isle knitting project. Remember to take your time, follow your colorwork chart, and enjoy the process of creating beautiful and unique fair isle designs.
Getting Started: Casting On and Knitting the Ribbing
Before you can begin knitting your fair isle knit hat, you’ll need to cast on and create the ribbing for the brim of the hat. The ribbing adds elasticity to the hat and helps it fit snugly on your head.
To cast on, you’ll need a set of double-pointed or circular knitting needles and your chosen yarn. Start by making a slip knot at the end of your yarn, leaving a long tail for weaving in later. Then, insert one needle into the slip knot and tighten it, making sure to leave a small loop for the first stitch.
Next, knit the first stitch using the long tail of the yarn and continue knitting across the row until you have the desired number of stitches. The number of stitches will depend on the size of your hat and the pattern you’re using.
The ribbing is created by alternating knitting and purling stitches. To start the ribbing, knit the first stitch, then purl the next stitch. Continue this pattern across the row until you reach the end. Then, turn your work and repeat the pattern on the next row. This creates a stretchy ribbed texture in the fabric.
Continue knitting the ribbing until you have the desired length, usually around 1-2 inches. Make sure to keep track of your stitches and rows, as this will be important when transitioning to the fair isle pattern.
Once you’ve finished the ribbing, you’re ready to move on to the main fair isle pattern of your knit hat. But first, take a moment to admire your work and appreciate the foundation you’ve created for your beautiful fair isle hat.
Selecting and Using Fair Isle Knit Hat Patterns
Fair Isle knit hat patterns are a popular choice for winter accessories. They feature intricate colorwork and geometric designs that add visual interest to any hat. When selecting a Fair Isle knit hat pattern, there are several factors to consider to ensure a successful project.
1. Skill level: Fair Isle knitting can be challenging, especially for beginners. It’s important to choose a pattern that matches your skill level to avoid frustration. Look for patterns labeled as beginner-friendly or with clear instructions for colorwork techniques.
2. Colors: The color palette of a Fair Isle knit hat pattern is an important aspect to consider. Opt for colors that complement each other and create a visually appealing contrast. You can follow the suggested color scheme in the pattern or experiment with your own color combinations for a unique look.
3. Yarn weight: Fair Isle knit hat patterns can be found in various yarn weights. Thicker yarns will result in a warmer and chunkier hat, while lighter yarns will create a more lightweight and breathable hat. Consider the intended use of the hat and choose a yarn weight that suits your preferences.
4. Gauge: Every knitter’s tension varies slightly, so it’s crucial to check the gauge of the pattern before starting. The gauge will determine the size of the finished hat, so use the recommended needle size and adjust accordingly if needed.
5. Sizing options: Fair Isle knit hat patterns often come with multiple sizing options to accommodate different head sizes. Take measurements of the wearer’s head circumference and choose the appropriate size in the pattern for the best fit.
Once you have selected a Fair Isle knit hat pattern, it’s time to start knitting! Follow the pattern instructions carefully, paying close attention to the colorwork charts and any specific techniques required. Remember to use a loose tension when carrying the yarn floats on the back of the work to avoid puckering.
As you progress with your Fair Isle knit hat, it’s important to periodically check your tension and make any necessary adjustments to ensure an even and consistent fabric. Take your time and enjoy the process of creating a beautiful and cozy hat using a Fair Isle knit hat pattern.
Tips for Perfecting the Fair Isle Knitting Technique
Fair Isle knitting, also known as stranded knitting, is a beautiful and intricate technique that involves working with multiple colors in a single row or round of knitting. It creates stunning patterns and designs, and is often used in traditional Scandinavian, Icelandic, and Shetland knitting. Here are some tips to help you perfect your Fair Isle knitting skills:
1. Choose the right yarn
For Fair Isle knitting, it’s important to choose yarns that have good color contrast and are of similar weight. Opt for smooth, non-fuzzy yarns that have good stitch definition. Wool or wool-blend yarns are commonly used for Fair Isle knitting as they allow for good tension and drape.
2. Practice proper tension
One of the key aspects of Fair Isle knitting is maintaining consistent tension. It’s important to keep an even tension on both the main color and contrast color yarns to ensure a neat and even fabric. Practice knitting with both colors, making sure not to pull the yarns too tightly or leave them too loose.
3. Use two hands

When working with two colors in Fair Isle knitting, it’s helpful to hold one color in your dominant hand and the other color in your non-dominant hand. This allows for more efficient and even knitting. Experiment with different techniques, such as holding one color in your left hand and the other in your right hand, or using one color in the English style of knitting and the other in the Continental style.
4. Pay attention to the floats
Floats are the strands of yarn that are carried across the back of the work when switching between colors. It’s important to ensure that the floats are not too loose or too tight to avoid puckering or distorting the fabric. Make sure to catch the floats every few stitches to prevent them from snagging or catching on anything.
5. Start with small projects
If you’re new to Fair Isle knitting, it’s a good idea to start with small projects like hats or mittens. These projects allow you to practice the technique on a smaller scale and can be completed relatively quickly. Once you feel comfortable with the technique, you can move on to larger projects like sweaters or blankets.
With these tips in mind, you’ll be well on your way to perfecting the art of Fair Isle knitting. Enjoy the process of creating beautiful and unique designs with this traditional knitting technique!
Adding Color and Design Elements to Fair Isle Knit Hats
Fair Isle knit hats are known for their intricate patterns and vibrant colors. Adding color and design elements to these hats can elevate their overall look and make them even more eye-catching. Here are a few ideas to help you get started.
1. Experiment with different color combinations: One of the key elements in Fair Isle knitting is the use of multiple colors to create beautiful patterns. Try using contrasting colors to make the design pop or opt for shades within the same color family for a more subtle effect. Play around with different combinations until you find the one that speaks to you.
2. Incorporate additional design elements: While the classic Fair Isle patterns are stunning on their own, you can add extra flair to your knit hats by incorporating other design elements. Consider adding a cable knit panel, a pom-pom, or even some embroidery to make your hat unique and personalized.
3. Use different knitting techniques: Fair Isle knitting traditionally involves carrying two colors of yarn throughout the project. However, you can experiment with different knitting techniques to create more intricate designs. Try techniques like intarsia, slip stitch, or stranded knitting to add more complexity and depth to your hat’s design.
4. Take inspiration from nature or your surroundings: Look to your surroundings for inspiration when designing your Fair Isle knit hat. Whether it’s the colors of the changing leaves or the patterns in a traditional textile, incorporating elements from your environment can make your hat truly unique and meaningful.
5. Consider the wearer’s preferences: When designing a Fair Isle knit hat, it’s essential to consider the preferences of the person who will be wearing it. Think about their favorite colors, patterns, or any specific motifs they may like. This personal touch will make the hat even more special to them.
In conclusion, adding color and design elements to Fair Isle knit hats not only enhances their overall aesthetic but also allows you to put your own creative spin on this traditional craft. Don’t be afraid to experiment and have fun with different combinations and techniques to create a hat that is truly one-of-a-kind.
Finishing the Fair Isle Knit Hat: Shaping and Decreasing
After completing the main body of the Fair Isle knit hat, it’s time to shape and decrease the crown to achieve the desired fit and style. This is an important step that will determine the final look and feel of the hat.
First, start by knitting a few rounds in the main color without any pattern. This will create a smooth transition between the patterned section and the crown shaping.
Next, you’ll need to decrease the number of stitches gradually to form the crown of the hat. To do this, you can use different decrease techniques such as knit two together (k2tog) or slip, slip, knit (ssk). These decreases will create a tapered effect and bring the stitches closer together towards the top of the hat.
Continue decreasing evenly every few rounds until you have the desired number of stitches left on your needles. It is important to adjust the decrease rate depending on the thickness of your yarn and the desired fit of the hat. Remember to keep the integrity of the Fair Isle pattern intact as you decrease.
Once you have a small number of stitches left, cut the yarn leaving a long tail. Thread the tail through the remaining stitches and pull tight to close the top of the hat. Secure the yarn by weaving it in and trimming any excess.
To finish off your Fair Isle knit hat, weave in any loose ends and block the hat to help it retain its shape. Blocking involves gently washing the hat, reshaping it, and then allowing it to dry flat. This will help the stitches settle and give the hat a polished look.
With the shaping and decreasing complete, your Fair Isle knit hat is ready to be worn and enjoyed. The intricate colorwork and careful shaping will make this hat a standout piece in your winter wardrobe. Stay warm and stylish with this classic Fair Isle pattern!
Care and Maintenance of Fair Isle Knit Hats
Proper care and maintenance of your Fair Isle knit hat is essential to ensure its longevity and to keep it looking its best. Here are some tips to help you care for your hat:
Hand wash: Fair Isle knit hats are delicate and should be hand washed to avoid damage. Use a mild detergent and lukewarm water, and gently swirl the hat in the water. Avoid wringing or twisting the hat, which can stretch the fibers and distort the pattern.
- Fill the sink or a basin with lukewarm water
- Add a small amount of mild detergent and mix well
- Gently swirl the hat in the soapy water
- Rinse the hat in cool water until the water runs clear
- Press out the excess water, but do not twist or wring
Drying: After washing, reshape the hat and lay it flat on a clean towel to dry. Avoid hanging or stretching the hat, as this can cause it to lose its shape. It is important to let the hat dry completely before wearing or storing to prevent mold or mildew.
Storage: When not in use, store your Fair Isle knit hat in a clean, dry place. Avoid storing it in direct sunlight or in a tightly sealed container, as this can cause the colors to fade. Consider using a breathable storage bag or hanging it on a hook to prevent it from getting crushed or misshapen.
Repairs: If your Fair Isle knit hat gets damaged, you can repair it using a crochet hook or a small needle. Match the yarn color as closely as possible, and carefully weave in the new yarn to mend any holes or loose strands. If the damage is extensive, it may be best to seek professional knitting or sewing services for repair.
In conclusion, by following these care and maintenance tips, you can keep your Fair Isle knit hat in great condition for years to come. Hand washing, proper drying, and safe storage will help preserve the vibrant colors and intricate patterns of your hat, ensuring that it remains a stylish and cozy accessory for every winter season.