
Knitting is a popular and timeless craft that allows you to create beautiful and functional items with just a pair of needles and some yarn. Whether you’re a complete beginner or have some knitting experience, having a reliable beginner knitting pattern is essential. It gives you a chance to practice your skills and create something that you can be proud of.
When choosing a beginner knitting pattern, it’s important to find one that matches your skill level and interests. Look for patterns that use basic knitting stitches, such as the knit stitch and the purl stitch. These stitches are the foundation of knitting and are easy to learn and master. Simple patterns, like scarves or dishcloths, are great for beginners as they provide plenty of practice while still being manageable projects.
One popular beginner knitting pattern is a basic scarf. This pattern typically uses a simple combination of knit and purl stitches to create a textured and cozy scarf. It’s a great project to practice your tension and stitch consistency while also producing a practical and stylish accessory. Once you’ve mastered the basics, you can experiment with different yarns and stitch patterns to create unique and personalized scarves.
No matter what pattern you choose, remember that knitting is a process, and it’s okay to make mistakes. Embrace the learning curve and enjoy the journey of creating something with your own two hands. With each project, you’ll improve your skills and gain confidence in your knitting abilities. So grab your needles, choose a beginner knitting pattern, and get started on your knitting adventure!
Beginner Knitting Pattern: A Step-by-Step Guide to Getting Started
Knitting can be a relaxing and rewarding hobby that allows you to create beautiful and useful items with your own two hands. If you’re new to knitting, starting with a beginner knitting pattern is a great way to learn the basics and build your skills. With a step-by-step guide, you can confidently begin your knitting journey and create something special.
Choosing the Right Pattern: When choosing a beginner knitting pattern, it’s important to select something that matches your skill level and interests. Look for patterns labeled as “beginner” or “easy” to ensure you start with something manageable. Consider the type of project you want to create, whether it’s a scarf, hat, or dishcloth, and find a pattern that aligns with your goals.
Gathering Your Supplies:
- Yarn: Select a yarn that is suitable for beginners, such as a medium-weight or chunky yarn. Avoid yarns that are too thin or slippery, as they can be more difficult to work with. Choose a color or texture that you love, as it will make the knitting process even more enjoyable.
- Needles: Start with a pair of knitting needles that correspond to the recommended needle size for your chosen yarn. Many beginner patterns will specify the appropriate needle size, such as US size 8 or 10.5. Opt for straight or circular needles, depending on your preference.
- Additional Tools: In addition to yarn and needles, you may need a few other tools to complete your beginner knitting project. This can include scissors, a tapestry needle for weaving in ends, stitch markers, and a row counter. These tools will make the knitting process easier and more efficient.
Choosing the Right Yarn and Needles
When starting a knitting project, one of the most important decisions you’ll need to make is choosing the right yarn and needles. The yarn you choose will determine the overall look, feel, and drape of your finished piece, while the needles will affect the tension and stitch size. Here are some factors to consider when making your choices.
Yarn Weight and Fiber Content
One of the first things to consider is the yarn weight. This refers to the thickness of the yarn and it can vary from lace weight (very thin) to super bulky (very thick). The weight you choose will depend on the type of project you’re making and the desired outcome. For example, if you’re knitting a delicate lace shawl, you’ll want to use a lace weight yarn. On the other hand, if you’re making a cozy winter hat, a bulky yarn would be more appropriate. Additionally, consider the fiber content of the yarn. Different fibers, such as wool, cotton, and acrylic, have different properties and may be better suited for certain projects. For example, wool is warm and durable, while cotton is lightweight and breathable.
Needle Size and Material
The needle size you choose will depend on the yarn weight and the desired tension. The general rule is to use larger needles for thicker yarns and smaller needles for thinner yarns. This will ensure that your stitches aren’t too tight or too loose. The needle material can also have an impact on your knitting. Metal needles are smooth and slippery, making them great for fast knitters. Bamboo needles, on the other hand, have more grip and are quieter, making them a good choice for beginners or those who prefer a slower pace. Ultimately, it’s important to find the needle material that feels comfortable in your hands and helps you achieve the desired result.
- Consider the yarn weight and fiber content when choosing your yarn.
- Select needle size based on the yarn weight and desired tension.
- Choose a needle material that feels comfortable and suits your knitting style.
Understanding Basic Knitting Techniques
When starting out with knitting, it’s important to understand the basic techniques that form the foundation of the craft. These techniques, once mastered, will allow you to create a variety of beautiful and functional knitted items.
Casting On: The first step in any knitting project is casting on, which creates the foundation row of stitches. There are several methods for casting on, including the long-tail cast on, the knit cast on, and the cable cast on. Each method has its own advantages and produces a slightly different edge.
Knitting: Knitting is the most basic stitch in knitting and involves pulling a loop of yarn through an existing stitch to create a new stitch. The two main types of knitting stitch are the knit stitch and the purl stitch. These stitches can be combined in various ways to create different patterns and textures.
Increasing and Decreasing: Increasing and decreasing stitches are essential techniques for shaping knitting projects. Increasing involves adding stitches to create a wider piece, while decreasing involves reducing the number of stitches to shape the fabric. Common methods of increasing and decreasing include knit front and back (kfb) and knit two together (k2tog).
Binding Off: When you have finished knitting your project, you will need to bind off to secure the stitches and create a finished edge. Binding off involves knitting two stitches, then passing the first stitch over the second stitch and off the needle. This process is repeated until only one stitch remains, which is then cut and the yarn pulled through to secure it.
Seaming and Finishing: Once your knitting is complete, you may need to seam or finish your project. Seaming involves sewing together separate pieces of knitting, such as when making a sweater or blanket. Finishing refers to any additional steps, such as blocking, weaving in ends, or adding decorative elements.
By understanding and practicing these basic knitting techniques, you will be well-equipped to tackle a wide range of beginner knitting patterns and develop your skills as a knitter. Whether you’re creating a simple scarf or a more complex sweater, mastering these techniques is the key to successful and enjoyable knitting.
Casting On: The First Stitch
When starting a knitting project, one of the first things you need to do is cast on your stitches. Casting on is the process of creating the foundation row of stitches on your knitting needle, which will form the basis for your project. There are several different methods of casting on, but the most common method for beginners is the long-tail cast on.
Long-tail cast on is a versatile method that produces a neat and elastic edge, making it suitable for a wide range of projects. To begin, you will need to estimate how long your “tail” of yarn needs to be. This will depend on how many stitches you plan to cast on and the thickness of your yarn. A good rule of thumb is to allow approximately one inch of yarn per stitch.
To perform the long-tail cast on, follow these steps:
- Make a slipknot at the end of your tail yarn, leaving a long enough loop to fit over the point of the needle.
- Hold the needle with the slipknot in your right hand, and the tail and working yarn in your left hand.
- Insert the needle through the slipknot from front to back, forming a loop with the tail yarn.
- Using your thumb and index finger, reach between the two strands of yarn and grab the working yarn.
- Pull the working yarn through the loop, creating a new loop on the needle.
- Repeat steps 3-5 until you have cast on the desired number of stitches.
- Once you have cast on all your stitches, you are ready to begin knitting!
Note: It’s important to keep your tension even and not too tight or too loose as you cast on. Experiment with different tension levels until you find what feels comfortable for you. Practice makes perfect!
The Versatile Knit Stitch
When it comes to knitting, one of the most foundational stitches is the knit stitch. This versatile stitch is not only easy to learn for beginners, but it also allows for a wide range of possibilities and patterns. Whether you’re creating a cozy scarf, a warm blanket, or a stylish sweater, the knit stitch is an essential technique to master.
Why is the knit stitch so versatile?
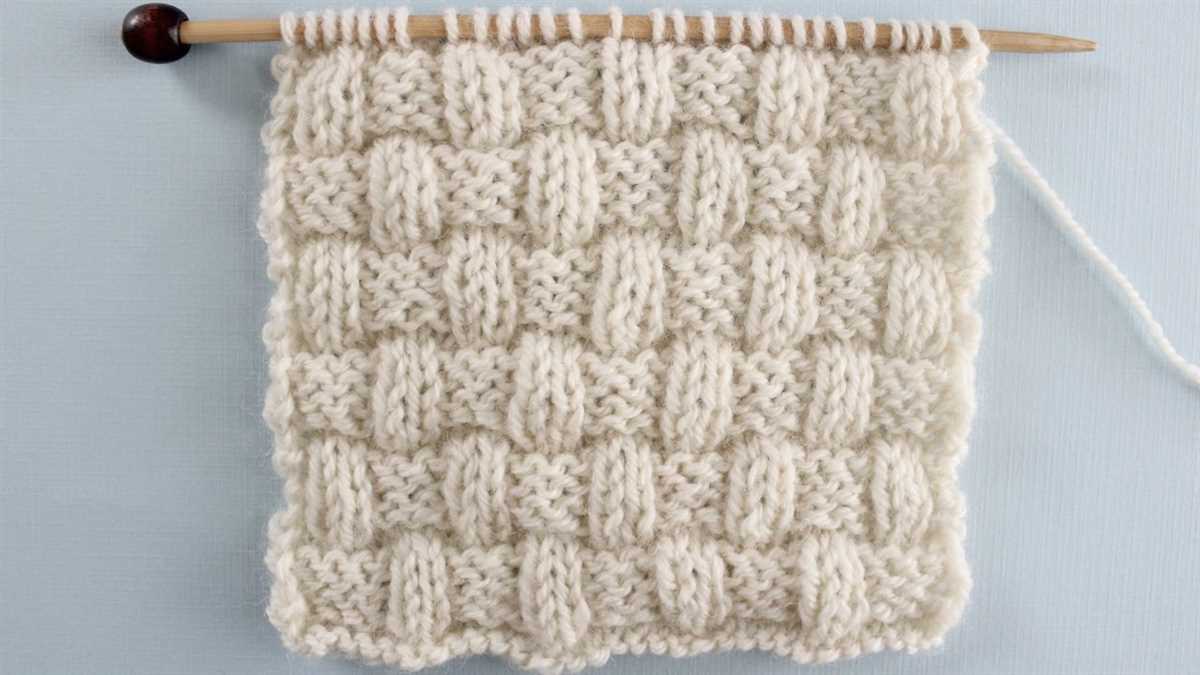
One of the reasons the knit stitch is so versatile is its ability to create different textures and patterns. By simply changing the order and combination of knit and purl stitches, you can achieve a variety of designs, from ribbing and cables to intricate lacework. This makes the knit stitch suitable for a wide range of knitting projects, from simple and classic to intricate and detailed.
How to master the knit stitch?
Mastering the knit stitch is the first step to becoming a confident knitter. Start by familiarizing yourself with the basic knit stitch technique: insert the right-hand needle into the front of the stitch on the left-hand needle, wrap the yarn around the right-hand needle, and pull it through to create a new stitch. Practice this motion repeatedly until you feel comfortable with the rhythm and tension.
Once you have the knit stitch down, you can begin experimenting with different patterns and combinations. Try adding purl stitches to create ribbing or introduce yarn overs for lacework. The possibilities are endless, and as you gain more experience, you’ll be able to create unique and personalized designs using the versatile knit stitch.
The beauty of simplicity
What makes the knit stitch so appealing is its simplicity. With just a few basic techniques, you can create stunning garments and accessories. Whether you’re a beginner or an experienced knitter, the knit stitch will always be a fundamental skill that opens up a world of creativity and possibilities.
So grab your knitting needles, choose your favorite yarn, and let the versatility of the knit stitch inspire you to create beautiful and unique pieces that will be cherished for years to come.
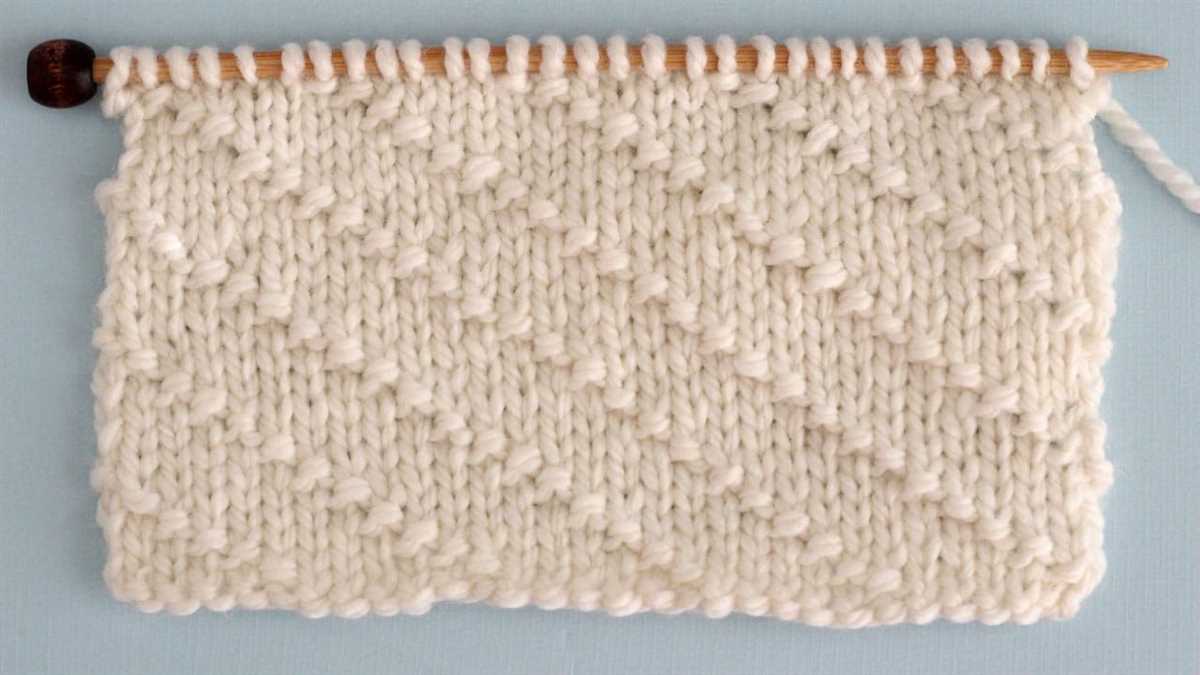
Purling: Adding Texture to Your Project
When it comes to knitting, purling is a technique that allows you to add texture to your project. While knitting typically creates a smooth and even surface, purling creates a bumpy and raised texture that can add dimension and interest to your knitting. Whether you’re a beginner or an experienced knitter, learning how to purl opens up a whole new world of creative possibilities for your projects.
What is Purling?
In knitting, purling is the process of creating a stitch by inserting the needle into the loop below the current stitch from right to left, rather than from left to right as in knitting. This creates a new stitch and changes the orientation of the previous stitch, resulting in a raised purl bump on the right side of the fabric. Purling is often used in combination with knitting to create ribbing, seed stitch, and various other textured patterns.
How to Purl:
To purl, simply follow these steps:
- Hold the working yarn in your right hand, and insert the right needle from right to left into the next stitch on the left needle.
- Wrap the yarn counterclockwise around the right needle, crossing under the left needle.
- Using the right needle, pull the wrapped yarn through the stitch, creating a new loop on the right needle.
- Slip the old stitch off the left needle, and you now have a new purl stitch on the right needle.
- Repeat these steps for each stitch until you have purled all the stitches on the left needle.
Adding Texture with Purling:
Purling can be used to add texture and pattern to your knitting projects. By alternating rows of knitting and purling, you can create ribbing, which is commonly used for cuffs, hems, and necklines. Purling can also create a seed stitch pattern, where the purl bumps are scattered across the fabric, creating a richly textured surface. Additionally, purling can be combined with other stitch patterns to create cables, lace, and various other intricate designs.
Tips for Purling:
- Make sure to keep your tension even while purling to avoid loose or tight stitches.
- Practice purling with different yarn weights and needle sizes to see how it affects the texture of your project.
- Count your stitches regularly to ensure you haven’t dropped or added any unintentionally.
- Take breaks and stretch your fingers and wrists to prevent strain or fatigue.
With practice and experimentation, purling can become a versatile tool in your knitting repertoire, allowing you to add texture, pattern, and visual interest to your projects.
Knitting in the Round: Creating Seamless Projects
Knitting in the round is a popular technique for creating seamless knitting projects. Instead of knitting back and forth in rows, you work in a continuous spiral, which eliminates the need for seaming. This technique is commonly used for knitting hats, socks, and sweaters.
One of the main benefits of knitting in the round is that it creates a smooth, seamless fabric without any visible seams. This is especially desirable for projects like hats and socks, where seams can be uncomfortable or unsightly. Additionally, knitting in the round allows you to easily create patterns that continue seamlessly around the entire project, such as cables or colorwork.
Tools
- Circular needles: Circular needles are essential for knitting in the round. They consist of two needle tips connected by a flexible cable. The length of the cable will depend on the circumference of your project.
- Stitch markers: Stitch markers are used to mark the beginning of each round. They can be either removable or fixed, and are placed on the needle between stitches.
- Tapestry needle: A tapestry needle is used for weaving in the ends of your yarn and sewing any finishing touches on your project.
Instructions
- Cast on: Start by casting on the required number of stitches onto your circular needles.
- Join in the round: Place a stitch marker to indicate the beginning of the round. Make sure not to twist your stitches.
- Knit in the round: Knit each round continuously, working in a spiral. You can use the “magic loop” technique or double-pointed needles if your project is too small for circular needles.
- Finish your project: Once you have completed the required number of rounds or reached the desired length, bind off your stitches and weave in any loose ends.
With some practice, knitting in the round can become a favorite technique for creating seamless projects. The process may seem a bit unfamiliar at first, but once you get the hang of it, you’ll enjoy the efficiency and seamless finish it offers.
Increasing and Decreasing Stitches
When knitting, it is important to know how to increase and decrease stitches in order to shape your project. Increasing stitches can be done in several ways, including yarn overs, knit into front and back of the same stitch, and making one stitches. Decreasing stitches, on the other hand, involves removing stitches from your knitting. This can be achieved through techniques such as knit two together, slip slip knit, and purl two together.
One common way to increase stitches is by doing a yarn over. To create a yarn over, simply bring the yarn from the back of your work to the front, and then continue knitting the next stitch as usual. This creates an extra stitch and a small hole in your knitting. Another method for increasing stitches is the knit into front and back of the same stitch, commonly abbreviated as kfb. This technique involves knitting into the front loop of a stitch, and then without taking the stitch off the needle, knitting into the back loop of the same stitch. This creates two stitches out of one.
On the other hand, to decrease stitches, you can use techniques such as knit two together (k2tog). This involves knitting two stitches together as if they were one stitch, resulting in a decrease. Another method is the slip slip knit (ssk), which involves slipping two stitches individually to the right needle, and then knitting them together through the back loops. This also creates a decrease. Lastly, purl two together (p2tog) is a common method for decreasing stitches when working in purl stitches. Similar to k2tog, you simply purl two stitches together as if they were one.
By mastering these increasing and decreasing techniques, you will be able to create more complex patterns and shapes in your knitting projects. It is important to practice and experiment with these techniques to become more comfortable with them. Remember to always follow the instructions of your knitting pattern and pay attention to the specific techniques required for each project.
Creating Beautiful Ribbing
When it comes to knitting, ribbing is an essential technique that adds both functionality and beauty to your project. Ribbing is commonly used for cuffs, hems, and neckbands in garments, and it gives the fabric a stretchy and textured appearance. Whether you are a beginner or an experienced knitter, learning how to create beautiful ribbing can take your knitting skills to the next level.
Choosing the Right Pattern: Before you start knitting your ribbing, it’s important to choose the right pattern that suits your project. Different patterns create different ribbing effects, such as classic 1×1 ribbing (alternating knit and purl stitches), 2×2 ribbing (alternating two knit stitches and two purl stitches), or even more complex variations. Consider the overall design and purpose of your project to determine the best ribbing pattern to use.
Here are some tips for creating beautiful ribbing:
- Consistent Tension: Maintaining consistent tension is crucial for achieving an even and professional-looking ribbing. Make sure to consistently pull the yarn to the same tension for both knit and purl stitches. This will ensure that your ribbing has a uniform appearance.
- Using the Right Needles: The needle size you choose can also affect the outcome of your ribbing. Smaller needles tend to create tighter ribbing, while larger needles create looser ribbing. Consider the type of yarn you are using and experiment with different needle sizes to achieve the desired effect.
- Blocking: Blocking your ribbing after knitting can help to even out any irregularities and enhance the overall look of the fabric. Wet blocking or steam blocking are common methods used to shape and smooth out the ribbing. Follow the instructions provided for your yarn to ensure proper blocking techniques.
- Adding Variations: While classic ribbing patterns are timeless, don’t be afraid to add variations to make your ribbing more unique and interesting. For example, you can incorporate different stitch patterns within the ribbing or experiment with asymmetrical ribbing. Get creative and have fun with your ribbing designs!
By following these tips and practicing your ribbing skills, you will be able to create beautiful and professional-looking ribbing in your knitting projects. Remember to be patient and enjoy the process, as mastering ribbing can open up a world of design possibilities for your future knitting endeavors.
Adding Color with Stripes and Fair Isle
If you’re looking to add some visual interest to your knitting projects, incorporating color is a great way to achieve that. One simple yet effective way to add color is by using stripes. Stripes can be created by alternating between different colored yarns, making it easy to customize the look of your project. Whether you want bold, contrasting stripes or subtle, tonal ones, you can create a unique design by playing around with different color combinations.
Another technique that allows for more intricate colorwork is Fair Isle knitting. Fair Isle, also known as stranded knitting, involves working with multiple colors in the same row to create beautiful patterns. The technique originated in the Fair Isle of Scotland and is known for its intricate motifs and intricate color designs. In Fair Isle knitting, two colors are used in each row, with the unused color being carried across the back of the work. This creates a double layer of fabric, making Fair Isle projects warm and cozy.
Stripes:
Creating stripes in your knitting project is quite simple. All you need to do is knit a few rows in one color and then switch to another color for a few rows. Repeat the process until you achieve the desired stripe pattern. Depending on your project and the effect you want to achieve, you can use different widths and colors for your stripes. For bold, graphic stripes, use contrasting colors with a high color contrast. For a more subtle look, choose colors that are closer in tone or from the same color family.
Fair Isle:
While Fair Isle knitting may seem more challenging than simple striping, it is worth giving it a try. To work Fair Isle, you will need to be comfortable with knitting with multiple colors in the same row. One popular way to start with Fair Isle is by knitting a small accessory like a hat or a cowl. This allows you to practice the technique on a smaller scale before moving on to larger projects like sweaters. To achieve the best results in Fair Isle knitting, it’s important to have good tension control to ensure that your stitches are even. Start with simple motifs and gradually work your way up to more complex designs as you gain confidence and experience.
In conclusion, adding color to your knitting projects can elevate their visual appeal. Whether you opt for simple stripes or more intricate Fair Isle designs, experimenting with color can bring new life to your creations and showcase your creativity. So don’t be afraid to mix and match different colors and have fun with your knitting!
Finishing Touches: Binding Off
Binding off is the final step in completing your knitting project and is essential for creating a neat and polished edge. It involves securing the stitches and removing them from the needles. There are several methods for binding off, but the basic technique involves knitting two stitches, then passing the first stitch over the second stitch and off the needle. This process is repeated until only one stitch remains, which is then cut and fastened.
One common method for binding off is the basic bind off. To do this, knit the first two stitches as usual, then use the left needle to lift the first stitch over the second stitch and off the needle. Continue knitting one stitch and lifting the previous stitch over until only one stitch remains. Cut the yarn, leaving a tail, and pull the tail through the last stitch to secure it. This method creates a neat edge that is slightly stretchy.
An alternative method is the stretchy bind off, which is useful for projects that require a more flexible edge, such as hats or cuffs. To do this, knit the first two stitches as usual, then knit a third stitch. Insert the left needle into the first stitch and lift it over the second and third stitches, dropping it off the needle. Knit one more stitch, then repeat the process of lifting the previous stitch over until only one stitch remains. Cut the yarn, leaving a tail, and pull it through the last stitch to secure.
If you prefer a decorative and slightly more time-consuming bind off, the picot bind off is a great option. This method creates a delicate and lacy edge that adds a beautiful touch to shawls or scarves. To do this, knit the first two stitches as usual, then bind off two stitches by passing the first stitch over the second and off the needle. Slip the remaining stitch back onto the left needle, then cast on two stitches using the backward loop method. Repeat this process until you reach the end of the row, then cut the yarn and secure the last stitch.
Remember to choose the binding off method that best suits your project and desired outcome. Practice each method before using it on your actual project to ensure a clean and professional finish.
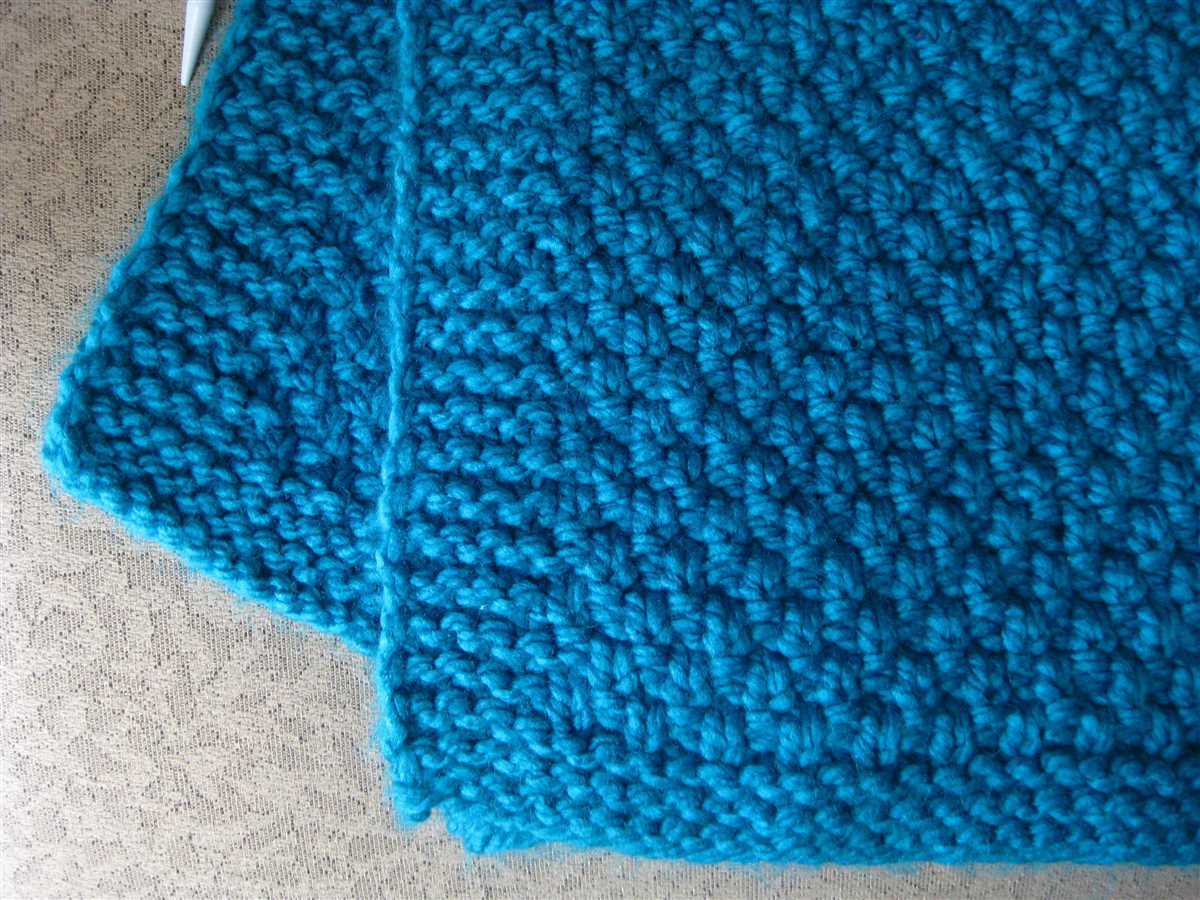
Blocking Your Knitted Creation
Blocking is an essential step in the knitting process that helps give your project a polished and professional look. It involves wetting or steaming your knitted piece to even out stitches, straighten edges, and improve the overall drape and shape of the finished item. Whether you’re knitting a scarf, a sweater, or a blanket, blocking can make a significant difference in the final appearance of your creation.
Why should you block your knitted items?
- Even out stitches: Blocking helps to even out any inconsistencies in tension throughout your project. It can eliminate lumpy or uneven stitches, making the fabric look more refined.
- Straighten edges: Sometimes, the edges of a knitted item can curl or roll. Blocking can help to prevent this and create straight, neat edges.
- Improve drape: Certain fibers and patterns may result in a stiff or rigid fabric. Blocking can soften the texture and improve the drape of the knitted piece, making it more comfortable to wear or use.
- Adjust size: Blocking can also be used to adjust the size of a knitted item. If your project came out slightly smaller or larger than intended, wet blocking or steam blocking can help stretch or shrink the fabric to achieve the desired dimensions.
There are different methods of blocking, depending on the fiber content and desired end result. Wet blocking involves soaking your knitted item in water, gently squeezing out the excess moisture, and then shaping and pinning it to the desired measurements. Steam blocking, on the other hand, involves using steam from an iron or a steamer to relax and reshape the fabric. Whichever method you choose, always refer to the specific blocking instructions for your pattern and yarn.
Remember: Not all knitting projects need to be blocked. Some items, like hats or small accessories, may not require blocking since their shape and size won’t be affected significantly. However, for larger garments or lace patterns, blocking can truly elevate your knitting and give it a professional finish.
Common Mistakes and How to Fix Them
Knitting may seem daunting at first, but with practice and patience, you’ll soon find yourself creating beautiful pieces. However, it’s common for beginners to make mistakes along the way. Here are some common mistakes and how to fix them:
Twisted Stitches
A twisted stitch occurs when you knit or purl through the back loop instead of the front loop. This mistake can lead to uneven tension and a distorted fabric. To fix twisted stitches, simply unravel the affected stitches back to the mistake, place the stitches back on the needle correctly, and continue knitting.
Dropped Stitches
Dropping a stitch can be quite frustrating, but it’s a common mistake, especially for beginners. When you notice a dropped stitch, use a crochet hook or a small knitting needle to pick up the dropped stitch and place it back on the needle. If you’re unable to fix it, you may need to tink back a few rows and fix the mistake from there.
Inconsistent Tension
Having inconsistent tension can result in a finished project that looks unprofessional. To improve tension, try using needles with a larger or smaller size to achieve the desired gauge. Additionally, practice knitting with a relaxed grip and take breaks to stretch your hands and fingers.
Miscounting Stitches
Miscounting stitches can lead to an incorrect pattern and a lopsided finished piece. To avoid this, always double-check your stitch count at the end of each row or round. If you find that you’ve made a mistake, carefully unravel the stitches back to the error and correct it.
Confusion with Stitch Patterns
It’s easy to get confused with complex stitch patterns, especially as a beginner. When working on a new stitch pattern, take your time to understand the instructions and use stitch markers to help you keep track of the pattern repeats. If you make a mistake, don’t be afraid to rip back and start over.
Forgetting to Slip Stitches
In some patterns, it’s necessary to slip stitches to create certain textures or to set up for the next row. Forgetting to slip stitches can affect the overall look of your project. Always double-check the pattern instructions to ensure you’re slipping stitches when necessary.
Remember, making mistakes is a part of the learning process. Embrace them, learn from them, and soon enough, you’ll become a confident knitter. If you’re unsure about how to fix a mistake, don’t hesitate to ask for help from fellow knitters or consult online tutorials. Happy knitting!