
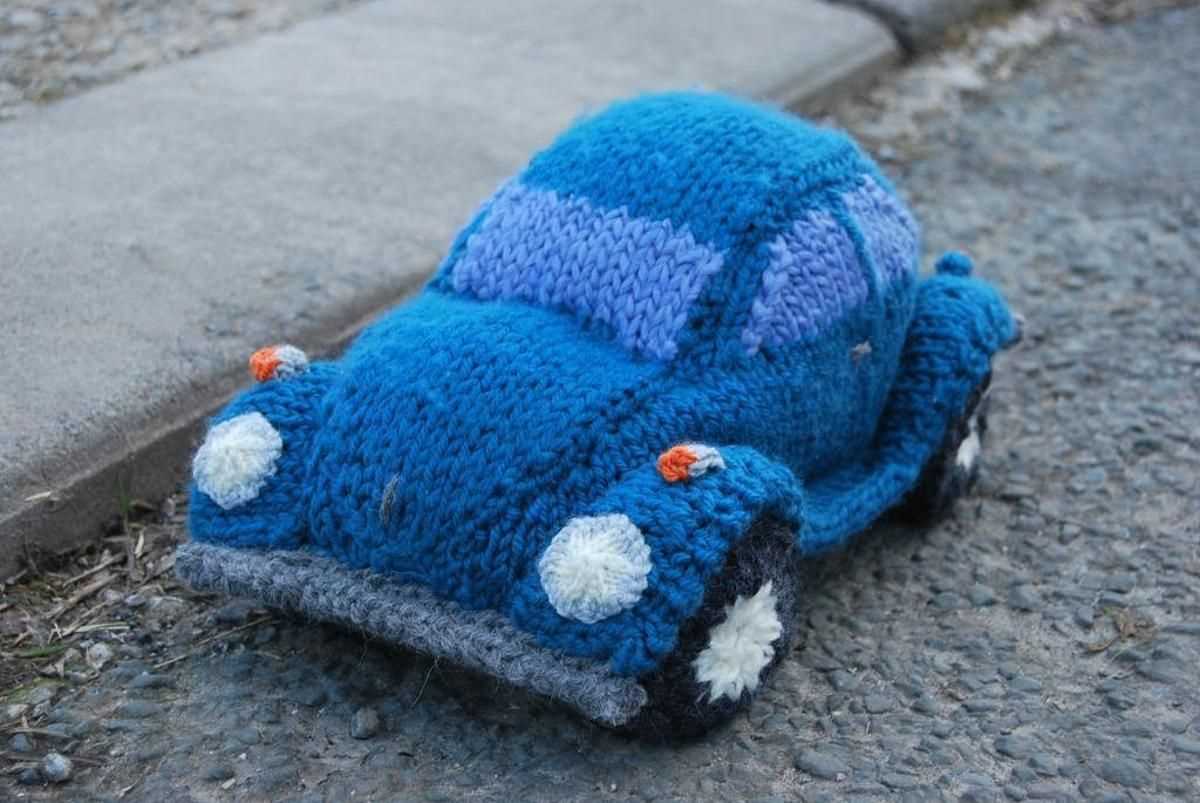
If you are a knitting enthusiast looking for a new and fun project, consider trying out a beetle knitting pattern. These adorable beetle toys can be made with just a few simple knitting techniques and some basic supplies. Not only will you have a cute toy to add to your collection, but knitting these beetles can also be a relaxing and enjoyable activity.
One of the great things about knitting is the endless variety of patterns available. Whether you’re an experienced knitter or just starting out, there is always something new to learn. The beetle knitting pattern is a great way to practice different stitches and techniques, such as decreases, increases, and color changes. With each completed beetle, you will gain confidence and improve your knitting skills.
Not only are these beetle toys fun to knit, but they also make great gifts for children and insect lovers. The small size of the beetles makes them perfect for little hands to play with and carry around. Plus, the bright colors and charming design are sure to bring a smile to anyone’s face. You can customize your beetle by choosing different colors for the body, wings, and eyes, making each one unique.
Whether you’re looking for a new project to challenge yourself or a cute toy to knit for someone special, the beetle knitting pattern is a great choice. Pick up your knitting needles, some yarn, and get started on this fun and creative project today!
Your Guide to Creating a Beetle Knitting Pattern
Knitting can be a fun and creative hobby, and creating your own beetle knitting pattern can add an extra level of excitement to your projects. Whether you’re a beginner or an experienced knitter, this guide will provide you with the steps and tips necessary to bring your beetle design to life.
Gather Inspiration:
The first step in creating a beetle knitting pattern is to gather inspiration. Look for pictures, drawings, or even real beetles to get an idea of the colors and details you want to include in your design. Pay attention to the beetle’s body shape, wing pattern, and any distinctive features that you’d like to incorporate into your knitting.
Choose Your Materials:
To create your beetle knitting pattern, you’ll need the right materials. Select yarn in the colors that match your beetle design, and choose knitting needles that are appropriate for the yarn weight. Additionally, you may need other tools such as stitch markers, a tapestry needle for sewing, and stuffing for any parts that need to be stuffed.
Sketch Your Design:
Next, take your design ideas and sketch out the basic shape of your beetle on plain paper. Keep in mind that the knitting pattern will be worked in rows or rounds, so consider how you will translate the details of your beetle onto the knitted fabric. You may want to draw separate sections for the body, wings, legs, and any other features you plan to include in your pattern.
Create the Pattern:
Once you have your design sketched out, it’s time to create the actual knitting pattern. Break down your beetle into smaller sections and determine the stitch patterns or techniques you’ll use to recreate each part. Consider using a combination of knit and purl stitches, as well as increases and decreases, to add texture and shape to your beetle.
- Start with the body: Begin by casting on the necessary number of stitches for the body of your beetle. Work in the stitch pattern you’ve chosen, adding any shaping as necessary to create the desired shape.
- Move on to the wings: Knit the wings separately and then sew them onto the body. You can use basic shapes like triangles or rectangles, or get creative with lace or colorwork for more intricate wing designs.
- Add the legs and other details: Use small sections of knitting to create the legs, antennae, and any other features you want to include. You can sew these pieces onto the body or work them directly into the knitting.
Test and Adjust:
Once you’ve written your beetle knitting pattern, it’s important to test it out by knitting a sample. This will allow you to check for any mistakes or areas where the pattern may need adjusting. Keep track of your stitch counts and any modifications you make along the way.
When you’re satisfied with your beetle knitting pattern, share it with other knitters or publish it for others to enjoy. Remember, the process of creating a knitting pattern is both challenging and rewarding, so have fun and let your creativity soar!
Materials Needed for Knitting a Beetle
Knitting a beetle can be a fun and creative project to undertake. To get started, you will need a few materials to ensure you have everything necessary to complete the project. Whether you are an experienced knitter or just starting out, these materials will be essential for creating your very own knitted beetle.
Yarn:
One of the most important materials for knitting a beetle is yarn. You will need various colors of yarn to recreate the vibrant and unique patterns found on beetles. Choose yarns that are lightweight and suitable for the size of beetle you want to create.
Knitting Needles:
To knit a beetle, you will need a set of knitting needles. The size of the needles will depend on the yarn you have chosen. It is best to use needles that are recommended for the thickness of yarn you are working with.
Stuffing:
To give your knitted beetle its shape and structure, you will need stuffing. This can be in the form of polyester fiberfill or any other suitable material that you find comfortable to work with.
Embroidery Thread:
To add intricate details to your knitted beetle, such as eyes or pattern embellishments, you will need embroidery thread. Choose thread colors that complement the colors of your chosen yarn to create a realistic and visually appealing beetle.
Tapestry Needle:
A tapestry needle will be essential for weaving in loose ends and sewing any pieces of your beetle together. Choose a needle with a large enough eye to accommodate the thickness of your yarn.
Scissors:
Lastly, you will need a pair of sharp scissors to cut yarn, embroidery thread, and any other materials as needed during the knitting process.
Different Types of Beetle Knitting Patterns
Beetle knitting patterns are a popular choice for knitters who want to create unique and whimsical designs. There are several different types of beetle knitting patterns that offer a variety of styles and techniques to choose from. Whether you’re an experienced knitter or just starting out, there’s a beetle knitting pattern for you.
1. Simple Beetle Knitting Pattern
If you’re a beginner knitter, a simple beetle knitting pattern is a great place to start. These patterns usually feature basic stitches and easy-to-follow instructions, making them perfect for those who are new to knitting. You can choose from various beetle designs, such as ladybugs, scarab beetles, or stag beetles, and customize the colors to create your own unique creation.
2. Intricate Beetle Knitting Pattern
For more experienced knitters looking for a challenge, there are intricate beetle knitting patterns available. These patterns often include more complex stitch patterns and techniques, such as cables or lacework, to create detailed and realistic beetle designs. These patterns require more advanced knitting skills and attention to detail, but the result is a stunning and intricate beetle that will impress everyone.
3. Toy Beetle Knitting Pattern
If you’re looking to create a beetle that can be enjoyed by children or used as a decorative item, a toy beetle knitting pattern is a great choice. These patterns usually provide instructions on how to create a stuffed beetle toy, complete with details like eyes and wings. They are fun and playful projects that can be enjoyed by knitters of all skill levels.
4. Beetle Accessories Knitting Pattern
For those who want to incorporate beetles into their wardrobe or accessories, there are beetle accessories knitting patterns available. These patterns provide instructions on how to create items like hats, scarves, or mittens that feature beetle motifs or designs. They are a great way to add a touch of whimsy to your everyday outfits or to create unique gifts for insect enthusiasts.
No matter what type of beetle knitting pattern you choose, the key is to have fun and let your creativity shine. With so many different options available, you’re sure to find a pattern that sparks your interest and allows you to create a beetle-inspired masterpiece.
Basic Knitting Stitches for a Beetle Pattern
When knitting a beetle pattern, it is important to have a good grasp of basic knitting stitches. These stitches will form the foundation of your beetle design and ensure that your finished project looks neat and professional. Here are some essential knitting stitches to master:
1. Knit Stitch
The knit stitch is the most basic and commonly used stitch in knitting. It creates a smooth and even fabric. To knit, insert the right-hand needle into the front of the first stitch on the left-hand needle from left to right. Loop the yarn around the right-hand needle, pulling it through the stitch and dropping it off the left-hand needle. Repeat this process across the row.
2. Purl Stitch
The purl stitch is the second basic stitch in knitting and is often used in combination with the knit stitch to create various patterns. To purl, insert the right-hand needle into the front of the first stitch on the left-hand needle from right to left. Loop the yarn around the right-hand needle, pulling it through the stitch and dropping it off the left-hand needle. Repeat this process across the row.
3. Increase Stitch
Increasing stitches is essential for shaping your beetle pattern. The most common increase stitch is the knit front and back (KFB) stitch. To work a KFB, knit the stitch as usual, but instead of dropping it off the left-hand needle, insert the right-hand needle into the back of the same stitch and knit it again. This creates a new stitch, effectively increasing the stitch count.
4. Decrease Stitch
Decreasing stitches is necessary for shaping your beetle design, especially when working on details such as legs and antennae. The most common decrease stitch is the knit two together (K2tog) stitch. To work a K2tog, insert the right-hand needle into the front of the next two stitches on the left-hand needle from left to right. Loop the yarn around the right-hand needle, pulling it through both stitches and dropping them off the left-hand needle as one stitch. This creates a decrease in the stitch count.
5. Slip Stitch
The slip stitch is often used for creating texture and adding interest to your beetle pattern. To slip a stitch, insert the right-hand needle into the front of the next stitch on the left-hand needle as if to knit, but instead of knitting it, simply slide the stitch onto the right-hand needle without working it. This stitch will be transferred to the right-hand needle without being knit or purled.
By mastering these basic knitting stitches, you will be well-equipped to tackle a beetle pattern and create a cute and unique knitted insect. Experiment with different combinations of stitches to add texture and dimension to your design, and don’t be afraid to get creative!
Tips for Selecting the Right Yarn for your Beetle
When knitting a beetle, choosing the right yarn is an important decision that can greatly impact the final result. Here are some tips to help you select the perfect yarn for your beetle knitting project:
Consider the size of your beetle: Be sure to choose a yarn that is appropriate for the size of your beetle. If you are knitting a smaller beetle, you will want to choose a thinner yarn with a smaller gauge. For larger beetles, a chunkier yarn will work well.
Think about the texture: The texture of the yarn can add an extra dimension to your beetle. Consider whether you want a smooth, sleek finish or a more textured look. There are yarns available with various textures, such as boucle or mohair, which can give your beetle a unique appearance.
Take into account the color: The color of the yarn is another important factor to consider. Think about the type of beetle you are knitting and choose a yarn color that complements or matches its natural coloring. You can also use different shades of the same color to add depth and dimension to your beetle.
Check the fiber content: Different yarns are made from different types of fibers, such as wool, cotton, acrylic, or a blend of these. Consider the desired characteristics of your beetle – for example, if you want it to be soft and cuddly, you might choose a yarn with a higher percentage of wool. If durability is more important, a yarn with synthetic fibers might be a better option.
Test the yarn: Before committing to a specific yarn, it’s a good idea to test it out. Knit a small swatch with the yarn and see how it feels and looks. This will give you a better idea of how the yarn will work for your beetle and whether you are happy with the result.
By considering these factors and taking the time to select the right yarn, you can ensure that your beetle knitting project turns out beautifully. Happy knitting!
Step-by-Step Instructions for Knitting a Beetle
Knitting a beetle can be a fun and creative project for those who enjoy knitting and crafting. With these step-by-step instructions, you will be able to create your own adorable beetle in no time.
To begin, gather all the necessary materials. You will need yarn in various colors, knitting needles, stuffing, and a tapestry needle. Choose colors that closely resemble the body and features of a beetle, such as black, brown, and yellow.
1. Body
Start by casting on stitches to create the body of the beetle. Use the main color for this part, such as black. Knit rows in garter stitch until the body reaches your desired length. Remember to leave a long tail of yarn for later sewing.
Once the body is complete, stuff it firmly with the stuffing material. Make sure to distribute the stuffing evenly to give the beetle a rounded shape. Use the long tail of yarn to sew the opening closed.
2. Head and Eyes

For the head, switch to a different color yarn, such as brown. Cast on fewer stitches to create a slightly smaller piece compared to the body. Knit in garter stitch for a few rows, then decrease stitches evenly across each row until a small ball shape is formed.
Add the eyes by attaching small circular pieces of yellow yarn using the tapestry needle. Sew them securely onto the head, positioning them to the front to give the beetle a realistic appearance.
3. Legs and Antennae
To create the legs, make a total of six small rectangular pieces using black yarn. These will serve as the beetle’s legs. Attach them to the body by sewing them on, three on each side.
For the antennae, knit two small strips of black yarn and sew them onto the head of the beetle. Curl the ends slightly to mimic the natural shape of a beetle’s antennae.
4. Finishing Touches
To give your beetle a polished look, sew any loose ends and trim excess yarn. You can also add additional details such as spots or stripes using different colored yarn. Be creative and experiment with different patterns to make your beetle unique.
Once you are satisfied with the appearance of your knitted beetle, give it a gentle pressing with an iron to smooth out any wrinkles or creases.
And there you have it! Follow these step-by-step instructions, and you will have your own adorable knitted beetle. Display it as a decoration, give it as a gift, or use it as a fun toy for children. Enjoy the process and let your imagination soar!
Adding Details to your Beetle Knitting Pattern
When creating a beetle knitting pattern, adding details is essential to bring the design to life and make it more realistic. Details can make a big difference in the final result and add a personal touch to your creation. Here are some tips on how to add details to your beetle knitting pattern.
1. Embroidery
One way to enhance your beetle knitting pattern is by using embroidery techniques. You can use different stitches to embroider eyes, mouth, and other features on your beetle. This will give it a more three-dimensional appearance and make it more visually appealing.
2. Beads and Buttons

Another way to add details to your beetle knitting pattern is by incorporating beads or buttons. You can sew small beads on the beetle’s body to create spots or use buttons for the eyes. This will add texture and make your beetle look more interesting.
3. Stripes and Patterns
You can also add details to your beetle knitting pattern by creating stripes or patterns on its body. This can be achieved by using different colors of yarn or by knitting different stitch patterns. Experiment with different combinations and see what works best for your design.
4. Antennae and Legs
Don’t forget to add antennae and legs to your beetle knitting pattern. These small details can make a big difference in the overall look of your beetle. You can knit or crochet the antennae using a thin yarn and attach them to the head. For the legs, you can use pipe cleaners or knit them using a different color yarn.
Remember, adding details to your beetle knitting pattern is all about creativity and personalization. Have fun with it and let your imagination guide you. Happy knitting!
Common Challenges in Knitting a Beetle Pattern
When knitting a beetle pattern, there are several common challenges that may arise. These challenges can sometimes make the process more difficult or time-consuming, but with a little patience and practice, they can be overcome.
1. Complex stitches:
The beetle pattern often includes complex stitches, such as cables, bobbles, or lacework, which can be challenging for beginners or those unfamiliar with these techniques. It is important to carefully read and understand the pattern instructions before starting and practice the specific stitches beforehand to ensure accuracy and avoid mistakes.
2. Small and intricate details:
Beetle patterns often feature small and intricate details, such as the beetle’s legs, antennae, or spots. Knitting these details can require a high level of precision and attention to detail. It is crucial to use the right size of needles and yarn to achieve the desired level of detail. Additionally, working with smaller needles can be more challenging as they can be harder to handle and require more dexterity.
3. Colorwork:
Some beetle patterns may involve colorwork, where multiple colors are used to create patterns or designs. This technique requires careful yarn management and keeping track of different colored yarns and their correct placement. Tension and evenness of stitches can also be a challenge when working with multiple colors. It is recommended to practice colorwork techniques on smaller projects before attempting a beetle pattern with colorwork.
4. Sewing and assembly:

Completing a beetle pattern often involves sewing and assembling various parts, such as attaching wings or adding eyes. This step requires attention to detail and careful stitching to ensure a neat and professional finish. It is important to follow the pattern instructions precisely and take time to sew each component securely and evenly.
Troubleshooting Tips for Beetle Knitting Patterns
Knitting a beetle pattern can be a fun and rewarding project, but sometimes issues may arise along the way. Here are some troubleshooting tips to help you navigate any challenges you may encounter:
1. Gauge Problems:
If your beetle pattern is turning out larger or smaller than intended, the first thing to check is your gauge. Make sure you are using the recommended needle size and yarn weight specified in the pattern. If your gauge still doesn’t match, try adjusting your needle size accordingly. You may need to go up or down a size to achieve the correct tension. Swatching before starting the pattern can also help you determine if any adjustments are needed.
2. Stitch Count Errors:
If you find that your stitch count is off at certain points in the pattern, double-check that you are following the instructions correctly. Count your stitches and make sure you haven’t accidentally skipped any or added extras. If you’re consistently having trouble with a specific section, try reading the instructions carefully and, if necessary, reach out to the pattern designer or an experienced knitter for clarification.
3. Difficulty with Special Techniques:
Some beetle knitting patterns may include special techniques or unfamiliar stitches. If you’re having trouble with these, don’t get discouraged! Take your time to read through the instructions carefully and practice the technique on a swatch before incorporating it into the pattern. There are also many online tutorials and video resources available that can guide you through tricky techniques.
4. Finishing and Assembly:
The finishing steps of a beetle knitting pattern, such as attaching limbs, eyes, or other embellishments, can sometimes be challenging. Make sure to carefully follow the assembly instructions provided in the pattern. Using stitch markers or safety pins to hold pieces in place can be helpful, as well as using a tapestry needle to neatly weave in any loose ends. If you’re struggling with a specific step, don’t hesitate to seek out tutorials or ask for help from fellow knitters.
Remember, knitting is a skill that improves with practice. Don’t be discouraged if you encounter challenges while working on a beetle knitting pattern. With patience and perseverance, you’ll be able to overcome any troubleshooting issues and create a beautiful beetle creation.
Creative Ideas for Customizing your Beetle Knitting Pattern
Knitting is not only a relaxing and fulfilling hobby, but it also allows for a lot of creativity and personalization. With a beetle knitting pattern, you have the opportunity to customize your project in unique and fun ways. Here are some creative ideas to inspire you:
1. Colorful Beetles
Experiment with different color combinations to create a vibrant and eye-catching beetle. Consider using bright and bold colors for the body, and contrasting shades for the legs, antennas, and eyes. This will make your beetle stand out and add a playful touch to your finished project.
2. Embroidered Details
Add extra dimension and texture to your beetle by incorporating embroidered details. You can embroider patterns or motifs onto the body or wings to give your beetle a unique and personalized look. Consider using metallic or sparkly thread for a touch of glamour.
3. Beaded Accents
Add a touch of sparkle and glamour to your beetle by incorporating beads into your knitting pattern. You can attach beads as eyes, or embellish the body with bead patterns. This will give your beetle a beautiful and elegant finish.
4. Customized Hats or Accessories
Transform your beetle into a character by knitting tiny hats or accessories for it. You can create a mini top hat, a colorful scarf, or even tiny glasses to give your beetle some personality. This will make your finished project even more whimsical and adorable.
5. Experiment with Sizes
Play with the size of your beetle knitting pattern to create a variety of adorable beetles. Try making a larger version for a cuddly toy, or a smaller version as a keychain or bag charm. By varying the size, you can create a whole family of beetles to display or give as gifts.
With these creative ideas, you can turn a simple beetle knitting pattern into a unique and personalized masterpiece. Let your imagination run wild and have fun customizing your project!
Resources for Finding Inspiration for Beetle Knitting Patterns
Finding inspiration for beetle knitting patterns can be an exciting and rewarding process. There are various resources available that can help you in your search for ideas and designs. Whether you are a beginner or an experienced knitter, these resources can provide you with inspiration and guidance to create unique and beautiful beetle-themed knitted creations.
1. Nature observation: One of the best ways to find inspiration for beetle knitting patterns is to observe beetles in their natural habitat. Take a walk in a garden or park, or even explore your backyard, and observe the different types of beetles you come across. Pay attention to their colors, patterns, and textures, which can give you ideas for creating unique beetle designs.
2. Knitting books and magazines: Knitting books and magazines often feature patterns and designs inspired by nature, including beetles. Look for books or magazines that specialize in insect or nature-inspired knitting patterns. These resources can provide you with step-by-step instructions and tips on how to create beetle designs using different knitting techniques.
3. Online knitting communities: Joining online knitting communities can be a great way to connect with fellow knitting enthusiasts and share ideas and inspiration. There are various online forums and social media groups dedicated to knitting, where you can find discussions, tutorials, and even beetle-inspired knitting patterns shared by other members.
4. Pinterest and other image-based platforms: Platforms like Pinterest are a treasure trove of inspiration for knitting patterns. Search for keywords like “beetle knitting patterns” or “insect knitting patterns” to discover a wide range of images and ideas. You can create boards to save your favorite designs and use them as references for your knitting projects.
- 5. Craft fairs and exhibitions: Visiting craft fairs and exhibitions can expose you to a wide range of knitting patterns and designs. Keep an eye out for exhibits that feature nature-inspired themes or insect motifs. You may come across unique beetle knitting patterns or get ideas to create your own designs.
- 6. Knitting pattern databases: There are several online databases and websites that offer a collection of knitting patterns, including those inspired by beetles. These platforms allow you to search for specific keywords or browse through different categories to find beetle knitting patterns that suit your style and skill level.
- 7. Local yarn shops: Your local yarn shop can be a valuable resource for finding inspiration for beetle knitting patterns. Check if they carry knitting pattern books or have any samples on display that feature beetle-inspired designs. The staff at the yarn shop may also be able to recommend specific patterns or provide guidance on creating your own beetle patterns.
With these resources at your disposal, you can find plenty of inspiration for creating unique and beautiful beetle knitting patterns. Whether you prefer intricate designs or simple motifs, there are endless possibilities to explore in the world of beetle-inspired knitting.
Showcasing and Sharing your Finished Beetle Knitting Projects
After spending hours carefully knitting your beetle, it’s time to share your finished creation with the world. Showcasing your beetle knitting projects not only allows you to exhibit your skills and creativity, but it also inspires other knitting enthusiasts who may be looking for new patterns to try.
One way to share your finished beetle knitting projects is through social media platforms such as Instagram, Facebook, and Pinterest. Take high-quality photos of your beetle from different angles and in various settings to truly capture its intricate details. Write a caption that highlights your knitting process, the pattern you used, and any modifications you made. Use relevant hashtags like #beetleknittingpattern or #handknitbeetle to reach a wider audience of knitting enthusiasts.
Create a dedicated blog post or website page
If you prefer a more detailed and long-lasting platform, consider creating a dedicated blog post or website page to showcase your beetle knitting projects. Describe your inspiration behind choosing the beetle pattern, share your knitting journey, and provide tips for others who may want to attempt the project. Include high-resolution photos and even videos to give readers a closer look at your finished beetle.
Don’t forget to include a link to the beetle knitting pattern you used or mention any modifications you made. This will allow others to replicate your work or use it as a starting point for their own creative variations. Encourage readers to leave comments or reach out to you with any questions or feedback.
Join online knitting communities
To further showcase and share your finished beetle knitting projects, consider joining online knitting communities such as Ravelry or knitting-specific forums. These platforms provide a space for knitters to connect, share patterns, and showcase their finished projects. Create a profile and upload photos of your beetle along with a description of your process. Engage with other members by commenting on their projects and participating in discussions related to knitting.
Sharing your finished beetle knitting projects not only allows you to celebrate your accomplishment but also helps build a supportive and inspiring community of fellow knitters. Your creativity and attention to detail may even inspire others to start their own beetle knitting projects or explore different knitting patterns. Embrace the opportunity to showcase your work and connect with like-minded individuals who share your passion for knitting.
Exploring Advanced Beetle Knitting Techniques
After mastering the basic techniques of beetle knitting, you may be ready to take your skills to the next level with some advanced techniques. These techniques will allow you to create more intricate and detailed beetle designs, and add a touch of sophistication to your projects. Here are a few advanced techniques to explore:
1. Intarsia:
Intarsia is a colorwork technique that allows you to create large blocks of color within your beetle design. By using separate balls of yarn for each color section, you can create crisp and clean color transitions. This technique is perfect for adding complex patterns and designs to your beetle knitting projects.
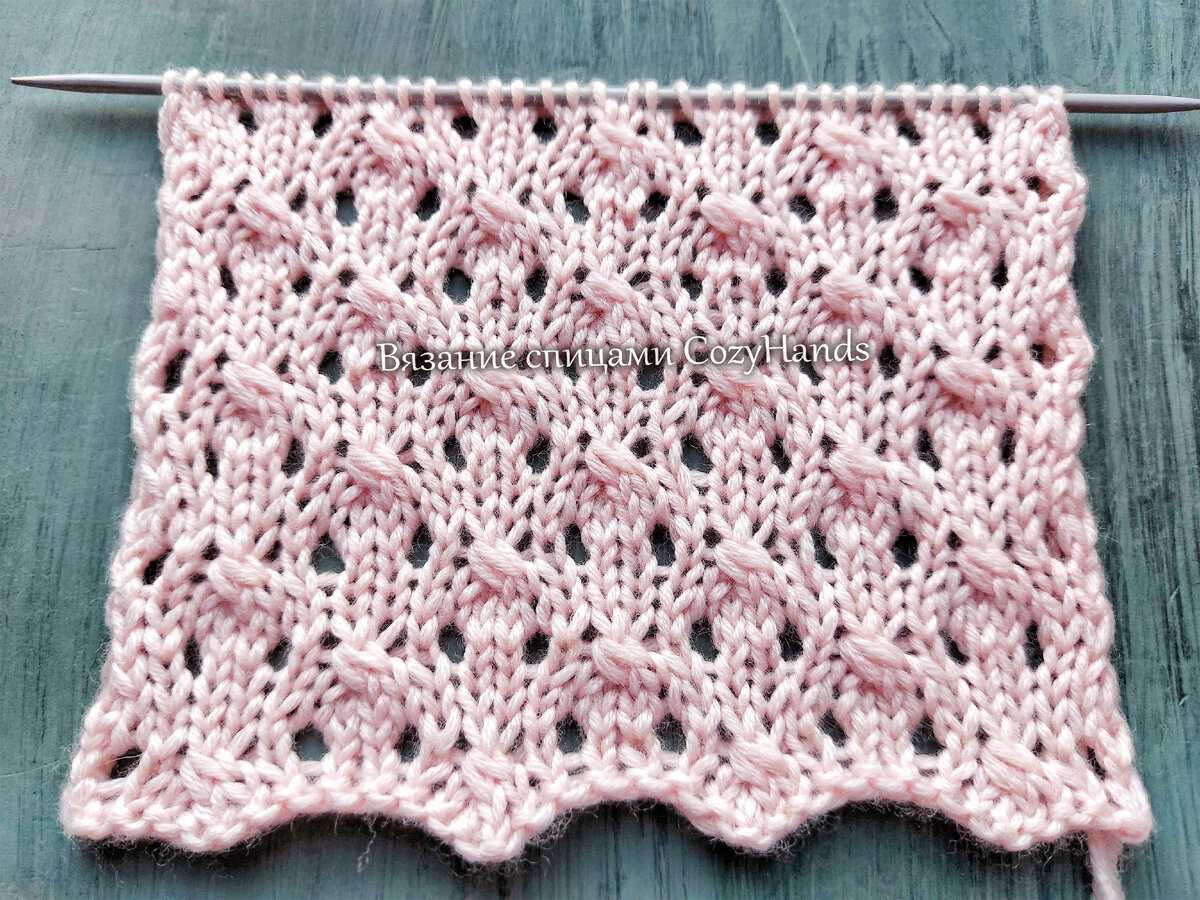
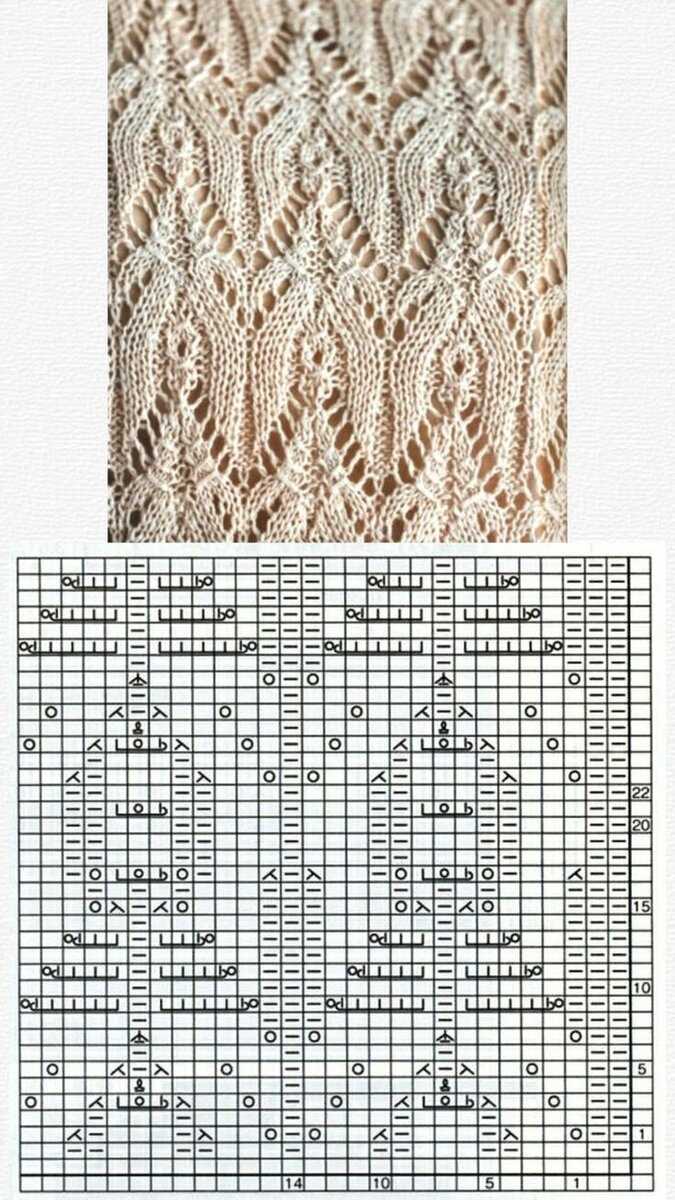
2. Lace Knitting:
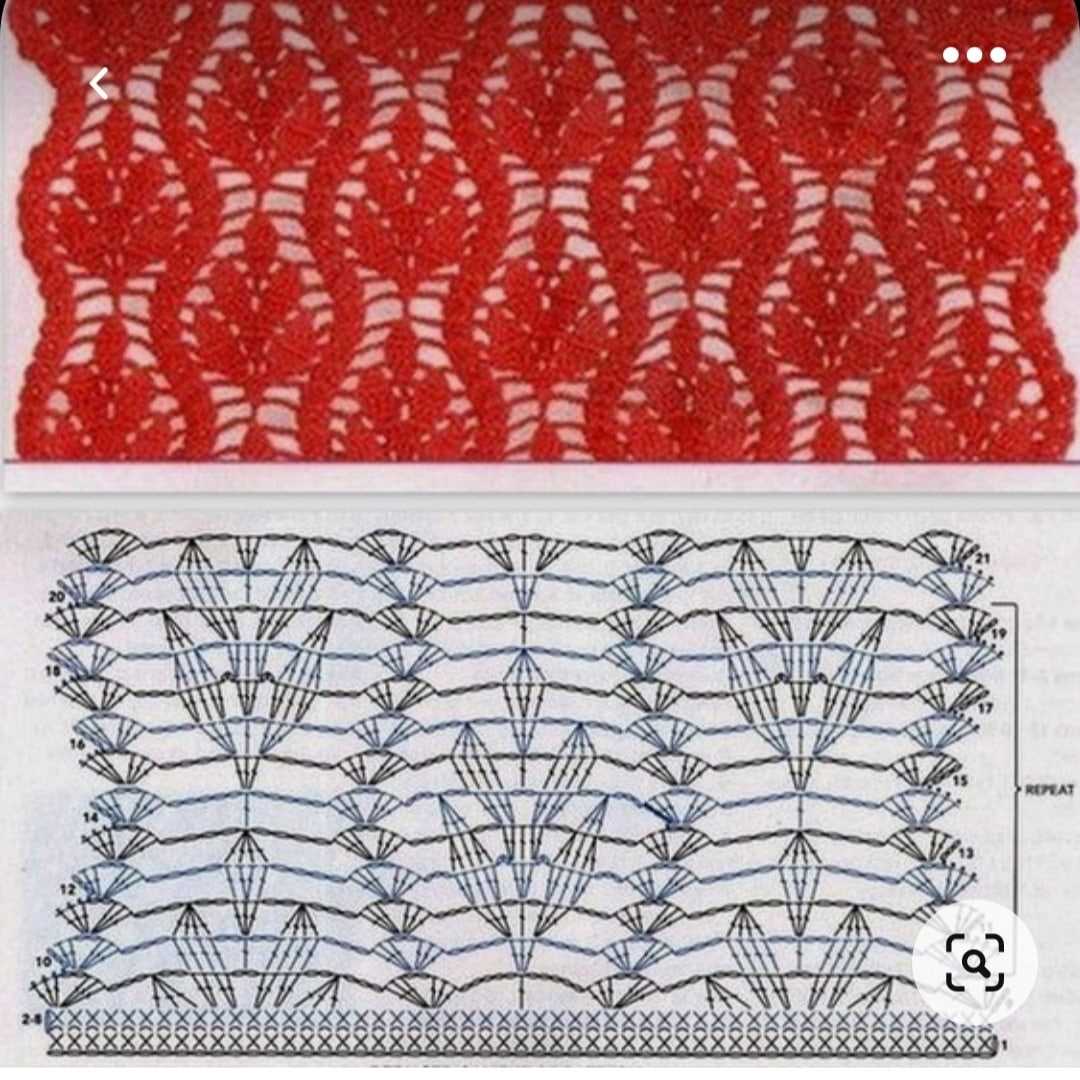
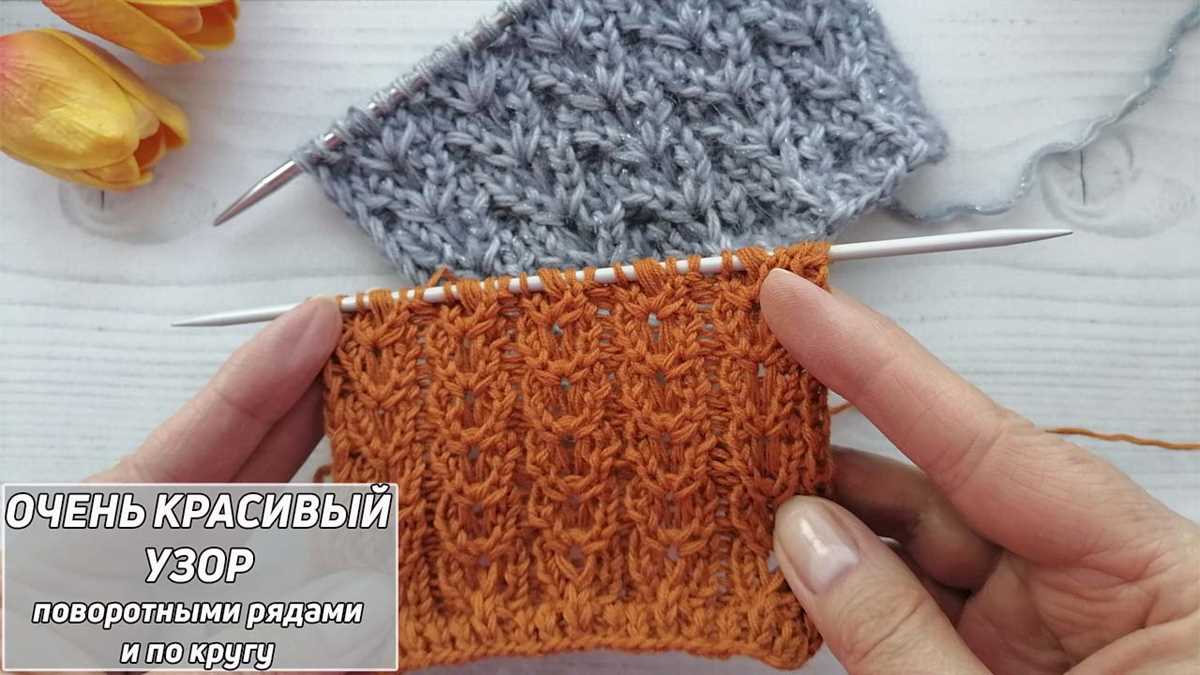
Lace knitting involves creating patterns with holes and openwork, resulting in a delicate and airy fabric. By incorporating lace knitting into your beetle designs, you can add a sense of elegance and intricacy. Lace patterns can be used for beetle wings or other decorative elements, making your beetles truly stand out.
3. Beadwork:
Adding beads to your beetle knitting can create stunning embellishments and add sparkle and texture to your projects. Beads can be stitched onto your beetle’s body, wings, or eyes to give them a unique and eye-catching look. This technique requires a bit of patience and precision but can yield beautiful results.
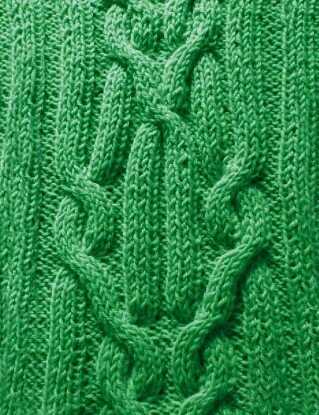
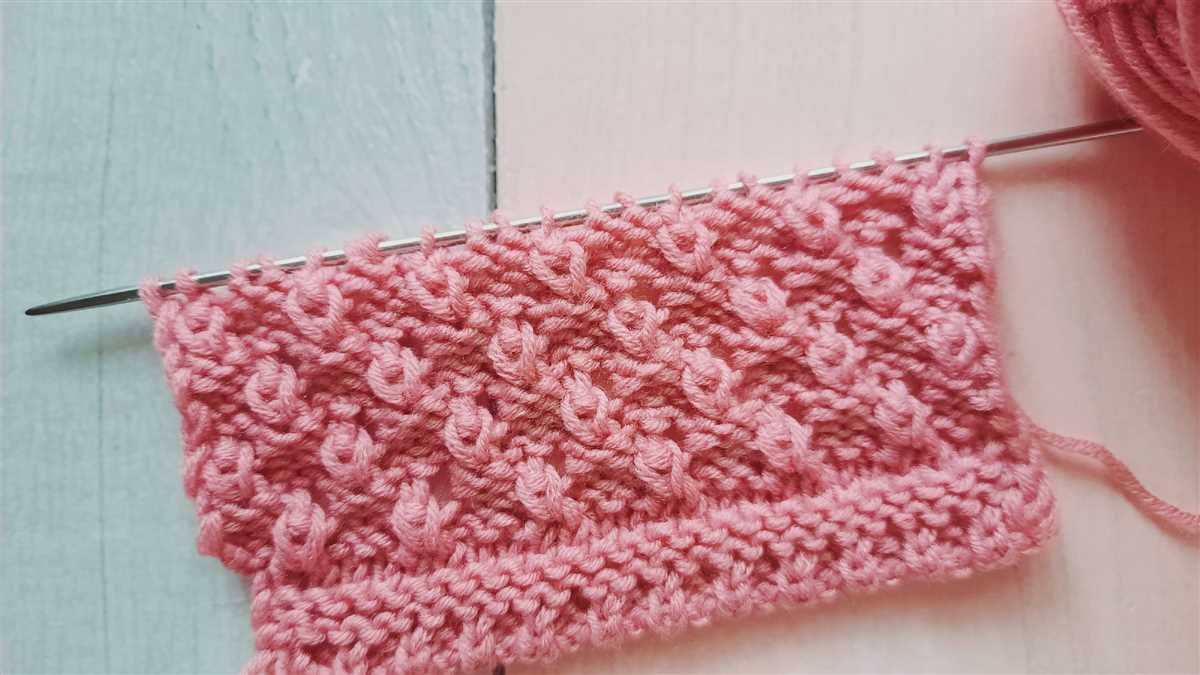
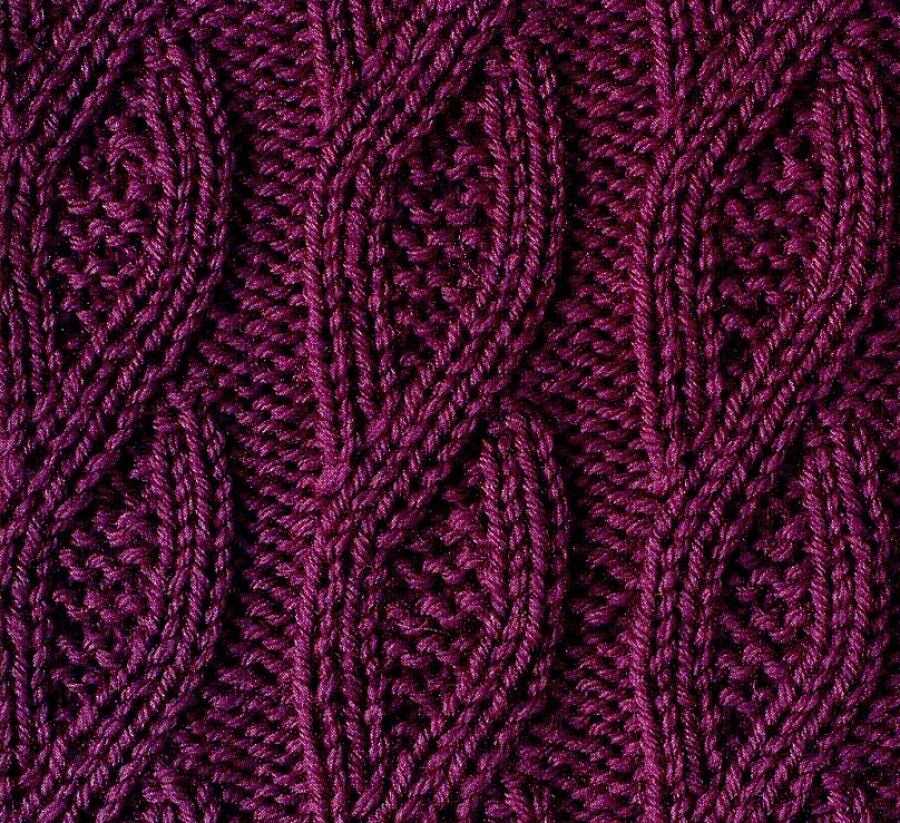
4. Cable Knitting:
Cable knitting is a technique that involves crossing stitches over each other to create intricate and textured patterns. Incorporating cables into your beetle designs can add depth and dimension to your projects. You can create cable patterns for the beetle’s body, legs, or even antennae, giving them a lifelike appearance.
By exploring these advanced techniques, you can take your beetle knitting to new heights and create truly impressive and unique projects. Remember to practice and experiment with these techniques to develop your skills and create your own signature beetle knitting style.