
As the weather turns colder and winter approaches, staying warm becomes a top priority. One of the best ways to ensure you’re cozy and stylish in the chilly months is by wearing a knit hat. And if you’re looking for a luxurious and comfortable option, an Alpaca knit hat is the perfect choice.
Alpaca fiber is known for its exceptional qualities, making it an ideal material for winter accessories. It is soft, lightweight, and incredibly warm, providing insulation against the cold temperatures. Additionally, Alpaca fiber is hypoallergenic, making it suitable for those with sensitive skin or allergies.
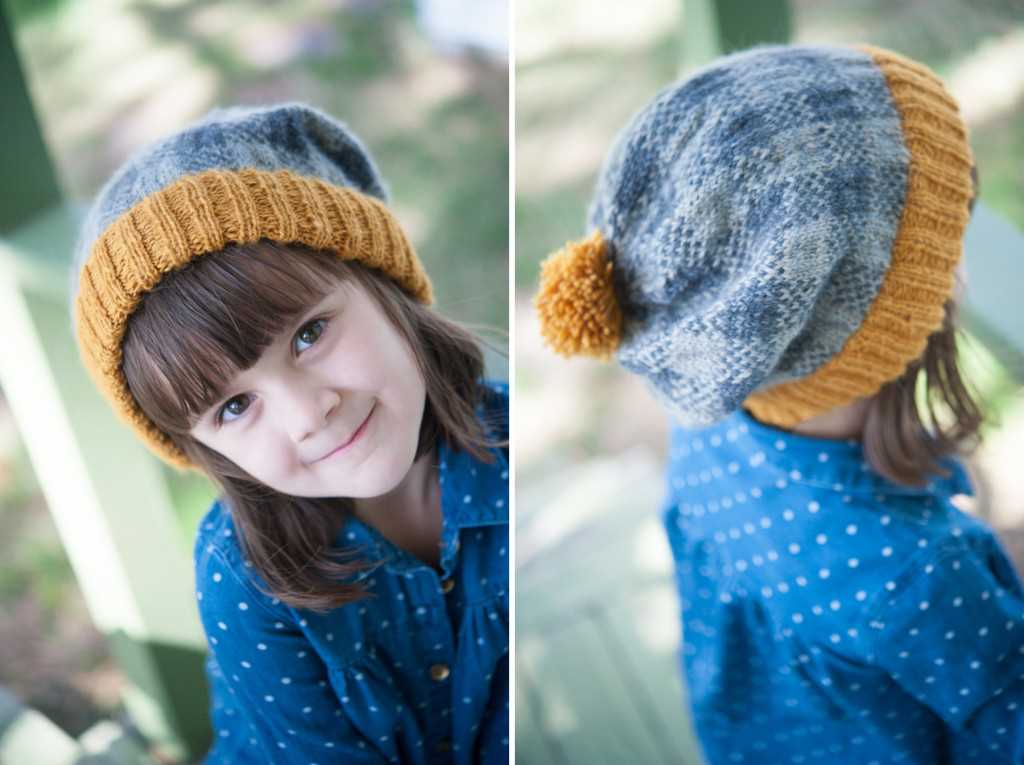
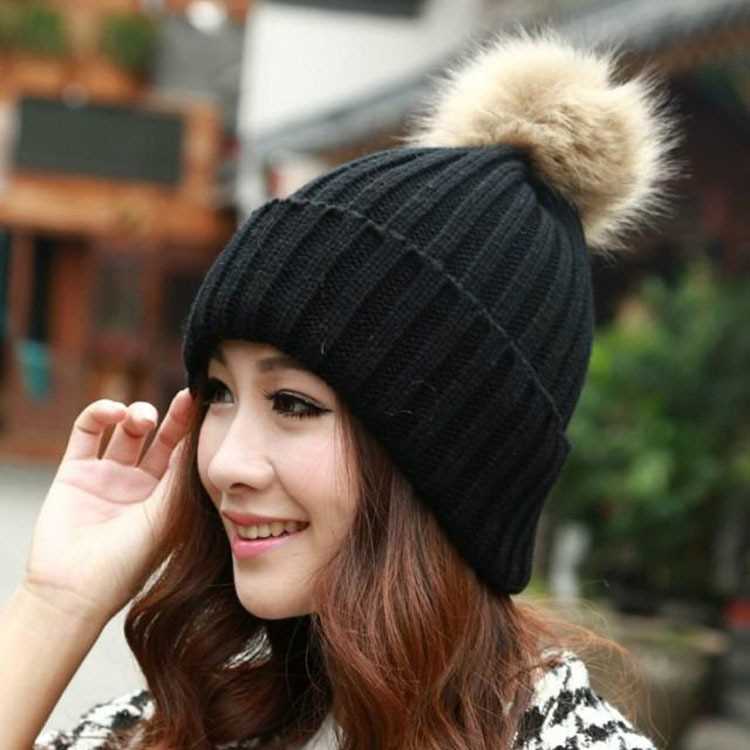
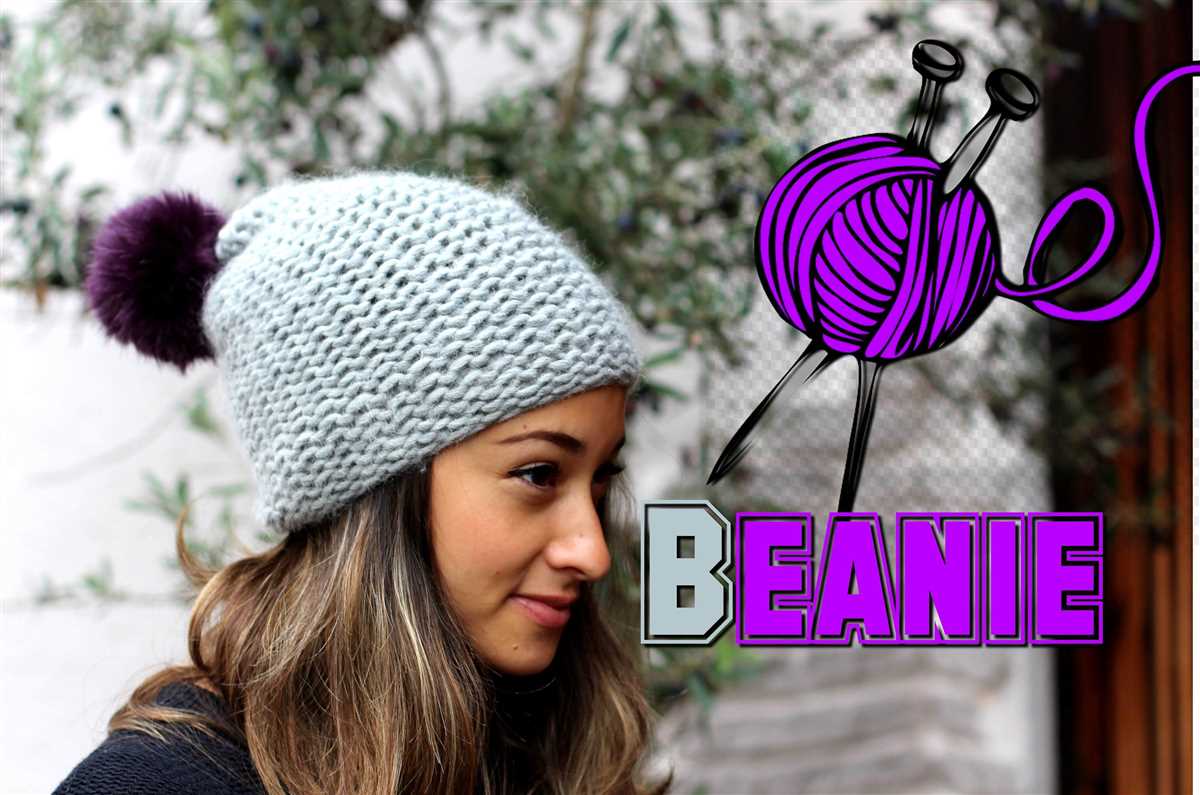
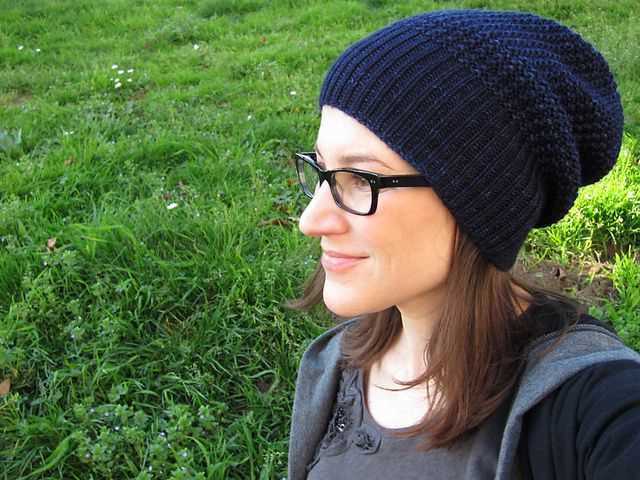
With an Alpaca knit hat, you can not only stay warm but also showcase your personal style. There are numerous Alpaca knit hat patterns available, allowing you to find the perfect design that suits your taste. Whether you prefer a classic cable knit, a trendy slouchy hat, or a whimsical pom-pom adorned hat, there’s a pattern out there for everyone.
In this article, we will delve into the world of Alpaca knit hat patterns, exploring the different styles, stitches, and techniques you can use to create your own cozy headwear. Whether you’re a seasoned knitter or a beginner, you’ll find inspiration and guidance to create the perfect Alpaca knit hat that will keep you warm and stylish all winter long.
Alpaca Knit Hat Pattern: A Step-by-Step Guide
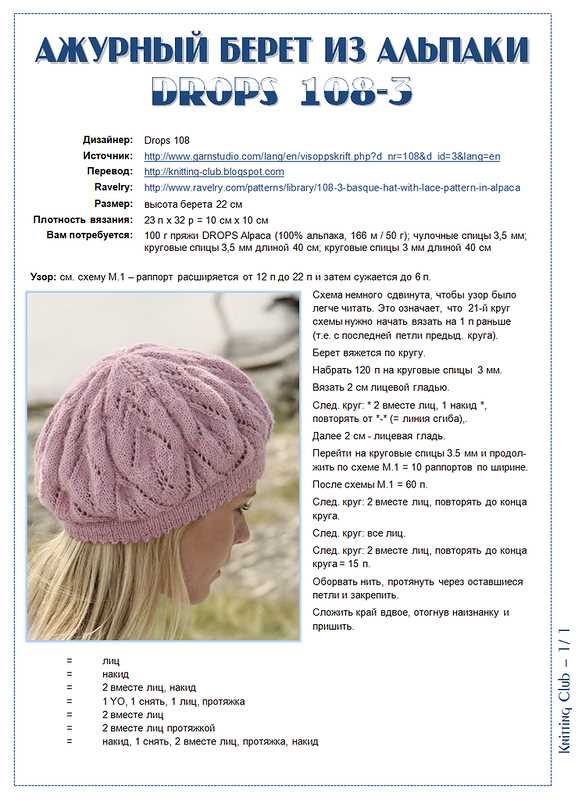
If you’re looking for a cozy and stylish winter accessory, an alpaca knit hat is the perfect choice. Alpaca yarn is known for its softness and warmth, making it ideal for keeping your head and ears toasty in cold weather. With a simple and straightforward pattern, you can easily create your own alpaca knit hat.
To start, gather the materials you’ll need for this project. You’ll need two skeins of alpaca yarn in your desired color, a set of double-pointed knitting needles in size US 8, a stitch marker, and a tapestry needle for finishing.
Step 1: Cast On
Begin by casting on 80 stitches using the long-tail cast-on method. This will create the brim of the hat, which gives it a snug and comfortable fit. Once you’ve cast on, join the ends of the stitches to form a circle, being careful not to twist them.
Step 2: Ribbing
Next, work a rib stitch pattern for the brim of the hat. *K2, p2* repeating this pattern to the end of each round. This will create a stretchy and textured brim that adds a nice detail to the hat. Continue working the rib stitch pattern for approximately 2 inches.
Step 3: Body

After completing the ribbing, switch to knitting every round for the body of the hat. Simply knit each stitch for every round until the hat measures approximately 7 inches from the cast-on edge, or until you reach your desired length.
Step 4: Decrease Rounds
Once you’ve reached the desired length, it’s time to decrease the stitches to shape the crown of the hat. Begin by knitting 8 stitches, then knit 2 together. Repeat this pattern for the entire round. On the next round, knit 7 stitches, then knit 2 together, and so on. Continue in this manner, decreasing 8 stitches in each decrease round, until you have 8 stitches remaining.
Step 5: Finishing
Cut the yarn, leaving a long tail. Thread the tail through a tapestry needle and slip the needle through the remaining stitches, removing them from the knitting needles. Pull tight to close the top of the hat. Finally, weave in any loose ends and give your hat a gentle blocking to even out the stitches.
Now you have a beautiful alpaca knit hat that will keep you warm and stylish all winter long. Feel free to customize your hat with embellishments such as pom-poms or a ribbed pattern. Enjoy your cozy creation!
Gather Materials
Before you begin knitting your alpaca hat, you’ll need to gather a few essential materials. Here’s a list of everything you’ll need:
- Alpaca yarn: Choose a soft and cozy alpaca yarn in your desired color. Alpaca yarn is known for its warmth and luxurious feel.
- Knitting needles: Select a pair of knitting needles that are appropriate for the gauge of your alpaca yarn. The size will depend on the pattern you’re using.
- Tape measure: You’ll need a tape measure to check your gauge and ensure your hat is the correct size.
- Darning needle: A darning needle is useful for weaving in ends and finishing your hat.
- Stitch markers: Stitch markers can be helpful for keeping track of your stitches and marking important sections of your pattern.
- Scissors: You’ll need a pair of scissors to cut your yarn and trim any excess.
- Pattern: Find a pattern for an alpaca knit hat that you like. You can search online or use a knitting book or magazine.
Once you have all of these materials, you’ll be ready to start knitting your alpaca hat. Make sure you have a comfortable and well-lit space to work in, and gather any additional supplies you may need, such as a stitch holder or row counter, depending on the pattern.
Choosing the Right Alpaca Yarn
When it comes to knitting an alpaca hat, choosing the right yarn is essential to create a comfortable and warm accessory. Alpaca yarn is known for its softness, warmth, and hypoallergenic properties, making it an excellent choice for winter garments. However, there are a few factors to consider when selecting the right alpaca yarn for your project.
Fiber content: Alpaca yarn comes in various blends, including 100% alpaca or a mixture of alpaca with other fibers like wool or silk. Each blend offers different characteristics, so it’s important to consider your specific needs. If you’re looking for extra warmth, a 100% alpaca yarn would be ideal. On the other hand, a blend with wool or silk can add strength and durability to the yarn.
Weight: Alpaca yarn comes in different weights, ranging from lace to bulky. The weight of the yarn will determine the thickness and drape of your finished hat. For a delicate and lightweight hat, you might opt for a lace or fingering weight alpaca yarn. However, if you desire a chunky and cozy hat, a bulky weight alpaca yarn would be more suitable.
Color: Alpaca yarn is available in a wide range of natural and dyed colors. The choice of color depends on your personal preferences and the style you want to achieve. If you prefer a classic and timeless look, natural neutral shades like beige or gray would be a great choice. On the other hand, if you want to make a bold statement, vibrant and eye-catching colors can add a fun element to your alpaca hat.
Yardage: It’s important to consider the yardage of the alpaca yarn, especially if you’re working with a specific pattern. Make sure to choose a yarn that has enough yardage to complete your hat without running out. Checking the recommended yardage for the pattern or consulting with the yarn manufacturer can help ensure you have enough yarn for your project.
By considering these factors, you can choose the right alpaca yarn for your hat project and create a cozy and stylish accessory that will keep you warm during the winter months.
Selecting the Proper Knitting Needles
Choosing the right knitting needles is essential to ensure a successful and enjoyable knitting experience. With so many options available, it can be overwhelming to find the perfect pair for your project. However, by considering a few key factors, you can easily select the proper knitting needles.
The first factor to consider is the material of the needles. Different materials, such as bamboo, metal, and plastic, offer different benefits. Bamboo needles, for example, are lightweight and have a natural warmth that can be gentle on the hands. Metal needles, on the other hand, are durable and slick, making them great for fast knitting. Plastic needles are often budget-friendly and lightweight, making them suitable for beginners.
Another important factor to consider is the size of the needles. Knitting needle sizes are indicated by numbers ranging from 0 to 50, with lower numbers representing smaller needles. The needle size you choose will depend on your knitting project and the type of yarn you’re using. Thicker yarns typically require larger needles, while thinner yarns require smaller needles. It’s important to check the gauge of your pattern and adjust needle sizes accordingly to achieve the desired finished dimensions.
Additionally, the needle length should be taken into account. Needles come in various lengths, such as 9 inches, 12 inches, and 16 inches, as well as circular needles that can be longer. The length of the needles you choose will depend on the size and shape of your project. For smaller projects, shorter needles can be more convenient, while larger projects may require longer needles for accommodating a larger number of stitches.
Overall, selecting the proper knitting needles involves considering the material, size, and length that best suit your project and personal preferences. By taking these factors into account, you can ensure a more enjoyable and successful knitting experience.
Casting On Stitches
Before you begin knitting your alpaca knit hat, you will need to cast on the required number of stitches. Casting on is the process of creating the first row of stitches on your knitting needle. There are several methods you can use to cast on stitches, but the most common method is the long-tail cast on.
Long-Tail Cast On:
The long-tail cast on is a versatile method that creates a neat and stretchy edge. To begin, you will need to estimate how much yarn you will need for your cast on. A good rule of thumb is to measure out a length of yarn that is approximately three times the width of your finished project. Create a slipknot on your needle, leaving a long “tail” of yarn.
- Hold the needle with the slipknot in your right hand.
- With your left hand, pinch the tail of the yarn against the needle.
- Using your right hand, bring the needle over the tail, then under and over the working yarn to create a loop.
- Pull the loop tight against the needle to create your first cast on stitch.
Continue this process, making sure to maintain an even tension and spacing between your stitches. Most patterns will specify how many stitches you need to cast on, so be sure to count your stitches as you go. Once you have cast on the required number of stitches, you are ready to start knitting your alpaca knit hat!
The Basic Knit Stitch

The basic knit stitch is the fundamental stitch used in knitting. It is also known as the knit stitch or the plain stitch. It is used to create a variety of patterns and textures in knitted fabric. The basic knit stitch is formed by inserting the right needle into a stitch on the left needle, wrapping the yarn around the right needle, and pulling a loop of the yarn through the stitch, creating a new stitch on the right needle.
To create the basic knit stitch, start with the yarn at the back of the work. Insert the right needle from left to right through the first stitch on the left needle. The right needle should be below the left needle. Wrap the yarn around the right needle, moving it from back to front. With the right needle, pull the wrapped yarn through the stitch on the left needle, creating a new stitch on the right needle. Repeat this process for each stitch on the left needle until all stitches have been transferred to the right needle.
The basic knit stitch is often used in combination with other stitches to create various patterns and textures in knitting. It can be used to create ribbing, cables, lace, and many other stitch patterns. By changing the order and combination of knits and purls, different textures and designs can be achieved. The basic knit stitch is versatile and can be used to create both simple and intricate knitting projects.
When knitting with the basic knit stitch, it is important to maintain an even tension to ensure consistent stitch size throughout the project. It is also important to pay attention to the stitch count, as dropping or adding stitches can affect the overall pattern and shape of the finished piece. With practice and experience, the basic knit stitch can be mastered, opening up a world of possibilities for creating beautiful knitted items.
Creating the Ribbing
The ribbing is an essential part of an alpaca knit hat as it provides elasticity and helps the hat stay in place on the head. To create the ribbing, you will need to use a combination of knit and purl stitches in a specific pattern.
Start by casting on the required number of stitches onto your knitting needles. The number of stitches will depend on the size of the hat and the desired width of the ribbing. Make sure to use a stretchy cast-on method to ensure the ribbing has enough elasticity.
Next, begin the ribbing pattern by working *k1, p1* across the row. This means you will knit one stitch, then purl one stitch, and continue this pattern until the end of the row. Repeat this pattern for the desired length of the ribbing. The length of the ribbing will depend on your personal preference, but a common length is around 2-3 inches.
To create a more pronounced ribbing, you can also try a *k2, p2* pattern, where you knit two stitches, then purl two stitches. This pattern will create a deeper texture and more elasticity in the ribbing.
Example Ribbing Pattern:
Row 1: *k1, p1* across the row
Row 2: Repeat row 1
Repeat rows 1-2: Until the desired length of ribbing is reached
Shaping the Crown
The crown of the alpaca knit hat is the topmost part of the hat that fits snugly over the head. Shaping the crown is an important step in the knitting process as it determines the size and fit of the hat. By carefully following the pattern instructions, you can create a beautifully shaped crown that complements the overall design of the hat.
When shaping the crown, it is common to use decrease stitches to gradually reduce the number of stitches. This creates a tapered effect, allowing the hat to fit snugly on the head. The specific decrease stitch pattern will vary depending on the knitting pattern you are using. Common decrease stitches include knit two together (k2tog) and slip slip knit (ssk).
One common technique for shaping the crown is to divide the stitches evenly onto double-pointed needles or a circular needle and then decrease every few rounds. For example, you might start by dividing the stitches onto three double-pointed needles and then decrease by knitting two stitches together every fourth round. This gradual decrease in stitches will create a dome-shaped crown with a rounded top.
Another technique for shaping the crown is to decrease the stitches more rapidly towards the top. This can create a more pointed or slouchy crown, depending on the desired style. In this case, you might decrease every round or every other round, using multiple decrease stitches in each round to create a more rapid decrease in the number of stitches.
As you shape the crown of your alpaca knit hat, it is important to regularly try it on to ensure the proper fit. You can also refer to the pattern instructions for guidance on the desired circumference and length of the crown. Remember to keep track of your stitches and rows to maintain consistency throughout the shaping process. Once you have completed shaping the crown, you can move on to finishing the hat with ribbing or other decorative elements.
Adding Texture with Cable Knitting
Knitting provides endless opportunities for creativity and personalization, especially with the use of different techniques and patterns. One technique that can add beautiful texture and depth to your knitted projects is cable knitting. Cable knitting involves crossing stitches over each other to create intricate patterns that resemble woven cables or braids. This technique can be used in various projects, including hats, scarves, sweaters, and blankets, to add visual interest and uniqueness.
How to Knit Cables: To knit cables, you will need a cable needle or a double-pointed needle to temporarily hold the stitches. Begin by knitting a few rows or rounds in your desired stitch pattern. When you reach the point where you want to create a cable, follow these steps:
- 1. Slip a set number of stitches (typically 2 or 4) onto the cable needle.
- 2. Hold the cable needle in front or behind your work, depending on the direction of the cable.
- 3. Knit the same number of stitches from the left-hand needle.
- 4. Then, knit the stitches from the cable needle.
- 5. Continue knitting in your preferred stitch pattern until the next cable.
Creating Exciting Patterns: By combining different cable stitches, you can create a wide range of patterns and designs. For example, a simple 2-stitch cable can be repeated across a hat to create a classic braided look. Alternatively, you can experiment with more complex cable patterns, such as the honeycomb or horseshoe cables, to add intricate details to your projects.
Note: It’s important to pay attention to your pattern instructions, as they will specify the cable needle size and direction of the cable crosses. Additionally, using a cable needle that is similar in size to your knitting needles will ensure a consistent gauge and overall appearance.
Adding texture with cable knitting is a fun and rewarding way to elevate your knitting projects. Whether you’re knitting a cozy alpaca hat or a warm cable-knit sweater, incorporating cable stitches can add dimension and interest to your finished piece. So, grab your needles and start exploring the world of cable knitting!
Instructions for Decreases
In order to create the desired shape and fit for your alpaca knit hat, decreases are an important technique to master. Decreases are used to reduce the number of stitches in a row, creating a taper or shaping the crown of the hat.
There are several types of decreases that can be used, depending on the desired effect and the stitch pattern being used. Two common types of decreases are the knit two stitches together (k2tog) decrease and the slip, slip, knit (ssk) decrease.
- To perform a k2tog decrease, insert your right needle through the next two stitches on your left needle as if to knit. Wrap your yarn around the right needle and pull through, completing a knit stitch. Slip both stitches off the left needle.
- For an ssk decrease, slip the next stitch knitwise onto your right needle, then slip the following stitch purlwise onto your right needle. Insert your left needle into the front of both slipped stitches and knit them together through the back loop. Slip the resulting stitch off your left needle.
It is important to note that decreases may be worked differently depending on the stitch pattern and the number of stitches being decreased. Always follow the instructions provided in your specific alpaca knit hat pattern to ensure accuracy and proper shaping.
By mastering decreases, you will be able to create beautifully shaped alpaca knit hats that fit snugly and comfortably. Experiment with different decreases and stitch patterns to add unique details and personal touches to your hats.
Finishing Off and Weaving in Ends
Once you have completed knitting your alpaca hat, it’s time to finish off and weave in the loose ends. This step is important to ensure that your hat looks neat and professional. Here are the steps to follow to properly finish off your hat:
1. Cut the yarn
Start by cutting the yarn, leaving a tail of about 6 inches. This tail will be used for weaving in the ends.
2. Secure the last stitch
Take the tail of yarn and thread it through a tapestry needle. Insert the needle into the last stitch on your knitting needle and pull the yarn through to secure it. This will prevent your stitches from unraveling.
3. Weave in the ends
Next, you need to weave in the loose ends of yarn to hide them and make your hat look tidy. Thread the tail of yarn onto the tapestry needle and insert the needle into the back of the nearest stitch. Move the needle back and forth under the stitches, following the row, for about an inch. Then, cut off the excess yarn close to the fabric.
Repeat the same process with any other loose ends that you have from changing colors or joining new yarn. Remember to weave in the ends on the inside of the hat so that they are not visible from the outside.
By properly finishing off and weaving in the ends, you can ensure that your alpaca knit hat looks polished and professional. Don’t rush this step, as it can make a big difference in the final appearance of your project. Take your time and follow these steps for a clean finish.
Blocking the Hat
Blocking is an essential step in finishing your alpaca knit hat. It helps to shape the hat and give it a polished and professional look. To block your hat, you will need a blocking mat or towel, rustproof pins, and a spray bottle filled with water.
Step 1: Wet the hat
Start by gently wetting the hat with water from the spray bottle. Make sure the hat is thoroughly damp but not soaking wet. This will allow the fibers to relax and stretch during the blocking process.
Step 2: Shape the hat
Next, place the hat on your blocking mat or towel. Gently stretch and shape the hat to your desired size and fit. Smooth out any wrinkles or bumps, making sure the brim is even. You can adjust the shape by pulling or pinching the edges of the hat.
Step 3: Secure with pins
Once you are happy with the shape of your hat, use rustproof pins to secure it in place. Start by pinning the brim, placing pins evenly around the edge. Then, pin the top of the hat, spreading the pins out to help maintain the shape while it dries.
Step 4: Let it dry
Allow the hat to dry completely before removing the pins. This may take several hours or overnight, depending on the humidity in your area. Avoid touching or disturbing the hat while it dries to prevent any alterations to the shape.
By following these steps, you can effectively block your alpaca knit hat and achieve a professional finish. Remember to take your time and be patient, as blocking is a crucial part of the knitting process that can greatly enhance the final appearance of your hat.
Personalizing Your Alpaca Knit Hat
Now that you have learned how to make your own alpaca knit hat using a knitting pattern, it’s time to personalize it and make it your own. Adding unique touches to your hat can make it even more special and reflect your personal style. Here are some ideas to help you get started:
Choose Your Color: Alpaca yarn comes in a wide range of colors, so pick a shade that suits your taste and complements your wardrobe. Whether you prefer a bold and vibrant color or a more subtle and neutral one, the choice is yours. You can also consider using different colors for the ribbing or adding stripes to make your hat even more visually interesting.
Add Embellishments: Get creative and add some embellishments to your alpaca knit hat. You can sew on buttons, beads, or even small pom poms to give it a personalized touch. Embroidery is another great way to add unique designs or patterns to your hat. Whether you want to add a simple monogram or a more intricate design, embroidery can make your hat truly one-of-a-kind.
Customize the Fit: Everyone’s head shape and size are different, so it’s important to customize the fit of your alpaca knit hat to ensure it’s comfortable and stays in place. You can achieve this by adjusting the number of stitches or rows in the pattern to fit your measurements. Remember to try on your hat as you go to ensure the perfect fit.
Experiment with Different Stitch Patterns: Knitting patterns often provide instructions for specific stitch patterns, but don’t be afraid to experiment and try out different ones. You can incorporate cables, lace, or even colorwork into your hat to add texture and visual interest. There are endless possibilities, so have fun and let your creativity run wild.
Care for Your Hat: Proper care and maintenance can help keep your alpaca knit hat looking great for years to come. Follow the yarn manufacturer’s recommendations for washing and drying your hat to ensure it retains its shape and softness. It’s also a good idea to store your hat in a clean, dry place when you’re not wearing it to prevent it from getting damaged.
By personalizing your alpaca knit hat, you can create a truly unique and special accessory that reflects your style and personality. Whether you choose to experiment with colors and stitch patterns or add embellishments, your hat will be a stylish and cozy addition to your winter wardrobe.