
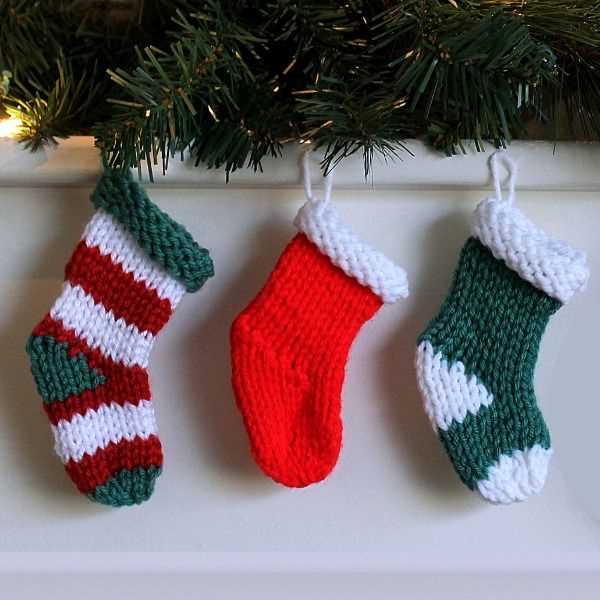
If you’re looking to add a touch of charm to your holiday decorations or if you’re in need of a small, quick knitting project, then this mini knit hat ornament pattern is perfect for you. These adorable mini hats are not only fun to make, but they also make a great addition to your Christmas tree or can be used as gift tags or stocking stuffers.
Materials Needed:
- Worsted weight yarn in various colors
- Size 6 knitting needles
- Tapestry needle
- Scissors
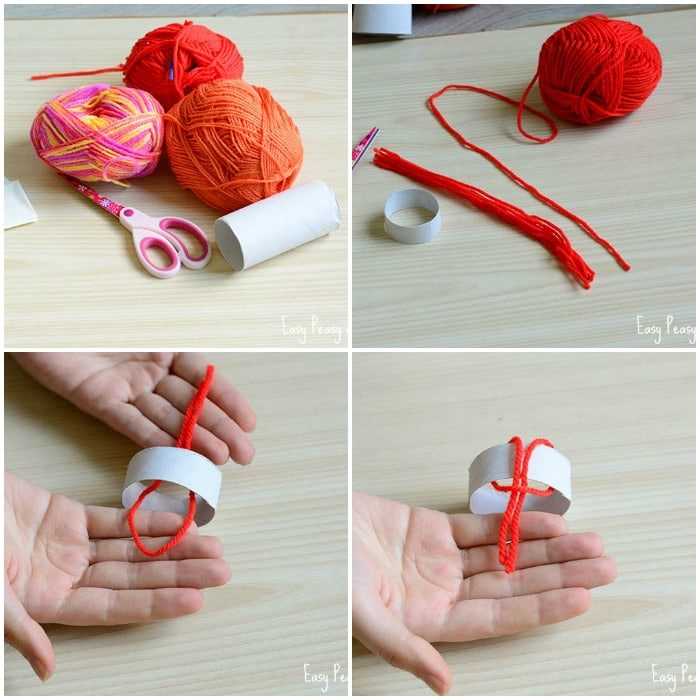
- Optional: small pom pom maker or a fork to make pom poms
Instructions:
- Cast on 24 stitches using the color of your choice.
- Row 1: Purl across.
- Row 2: Knit across.
- Repeat rows 1 and 2 until your work measures approximately 2 inches.
- Next row: Knit 2 together across the row. (12 stitches remaining)
- Cut yarn, leaving a long tail. Thread the tail through a tapestry needle and slip the stitches off the knitting needle onto the needle.
- Pull the tail tight to close the top of the hat and secure.
- Use the tapestry needle to weave in any loose ends.
- Optional: Attach a small pom pom to the top of the hat.
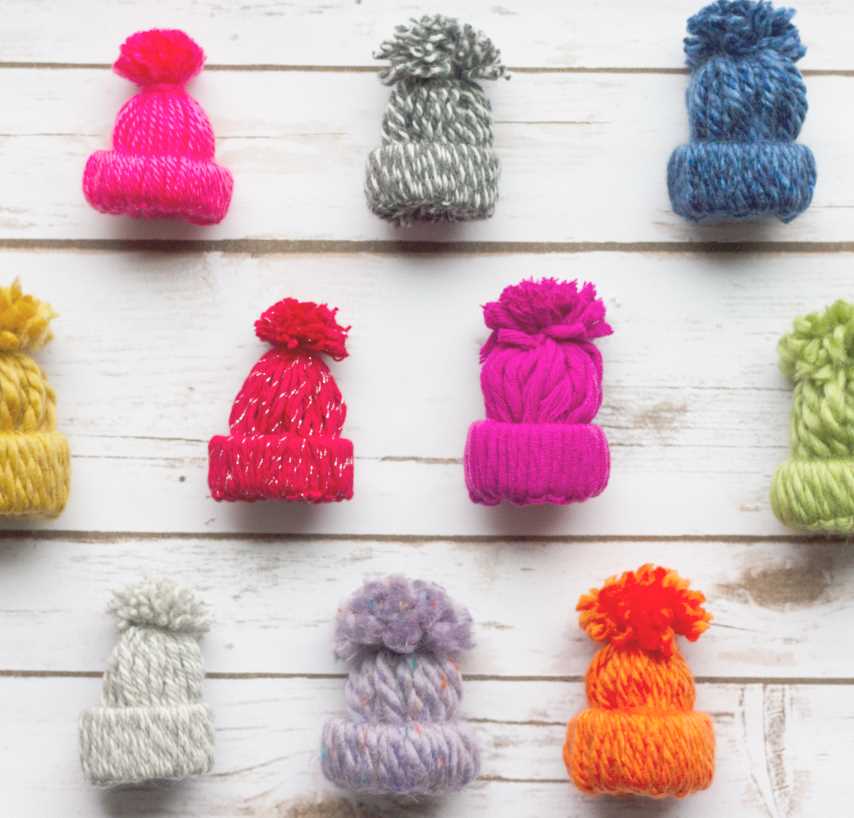
- Repeat steps 1-9 to make as many mini knit hats as desired in various colors.
Once you’ve finished knitting your mini hats, you can get creative with how you choose to use them. String them together to make a festive garland, attach them to a ribbon for a pretty gift wrapping accent, or simply hang them on your tree. This mini knit hat ornament pattern is versatile and customizable, allowing you to create unique and personalized decorations for the holiday season.
How to Make a Mini Knit Hat Ornament: Step-by-Step Guide
If you’re looking for a fun and festive craft project to add a touch of charm to your holiday decorations, making a mini knit hat ornament is the perfect choice. These adorable little hats can be customized with different colors and embellishments to suit your personal style. Plus, they make great handmade gifts for friends and family.
Materials You’ll Need:
- Worsted weight yarn in your choice of colors
- Size 5 double-pointed knitting needles
- Tapestry needle
- Scissors
- Optional: Pom-pom maker or small pompoms for embellishment
- Optional: Ribbon or string for hanging
Step 1: Cast On Stitches
Start by casting on 36 stitches onto your size 5 double-pointed knitting needles. Divide the stitches evenly onto 3 needles, with 12 stitches on each needle.
Step 2: Knit in the Round
Join your yarn in a contrasting color and knit in the round, using a knit stitch for each row. Continue knitting until your hat measures approximately 2 inches in length.
Step 3: Decrease Stitches
To shape the top of your hat, you’ll need to decrease stitches. Knit 2 stitches together every 3 stitches until you have 9 stitches remaining. Then, knit 2 stitches together across the next row.
Step 4: Finish Off
Using a tapestry needle, thread the yarn through the remaining stitches and pull tight to close the top of the hat. Weave in any loose ends with the tapestry needle.
Step 5: Embellish (optional)
If desired, you can add a pom-pom to the top of your hat using a pom-pom maker or by attaching small pompoms. You can also add a ribbon or string for hanging by threading it through the top of the hat with a tapestry needle.
Your mini knit hat ornament is now complete and ready to be displayed on your Christmas tree or hung around your home. Get creative and make a variety of hats in different colors and styles to add some whimsy to your holiday decor.
Materials You Will Need
Before you begin knitting your mini hat ornament, make sure you have the following materials:
- Knitting Needles: You will need a pair of small knitting needles, preferably in size 4 or 5 (3.5mm or 3.75mm).
- Yarn: Choose a lightweight yarn in the color of your choice. It’s best to use a yarn with a blend of wool or acrylic for a soft and durable finish.
- Tapestry Needle: This needle will be used for weaving in the loose ends of yarn and for seaming the hat.
- Scissors: Make sure to have a pair of sharp scissors handy for cutting the yarn.
- Measuring Tape: You will need a measuring tape to check your gauge and ensure that your mini hat ornament is the correct size.
- Stitch Marker: This will be useful for marking the beginning of each round when knitting in the round.
- Decorations: To add a festive touch to your mini hat ornament, gather some embellishments like beads, sequins, or ribbons.
Once you have all these materials, you’re ready to get started on your mini hat ornament. Gather them all together and find a comfortable spot to begin knitting!
Choosing the Right Yarn
When it comes to choosing the right yarn for your mini knit hat ornament, there are a few factors to consider. The first is the weight of the yarn. Typically, a mini knit hat ornament is made with lightweight yarn, such as fingering or sport weight. These thinner yarns allow for finer details in the knitting and result in a delicate and dainty ornament. However, you can also experiment with chunkier yarns, such as worsted or bulky weight, for a more substantial and cozy ornament.
Another important consideration is the fiber content of the yarn. Acrylic yarn is a popular choice for mini knit hat ornaments as it is affordable, easy to care for, and comes in a wide range of colors. Wool yarn, on the other hand, offers warmth and durability, but may require special care. You can also explore other natural fibers, such as cotton or bamboo, for a different texture and appearance.
Once you have chosen the weight and fiber content, you can also consider the color and texture of the yarn. Solid colors are a classic choice for mini knit hat ornaments, especially if you want to showcase any stitch patterns or designs. However, variegated or self-striping yarns can add a playful and whimsical touch to your ornaments. Additionally, you can experiment with different textures, like boucle or mohair, to add dimension and visual interest to your mini hats.
Overall, choosing the right yarn for your mini knit hat ornament is a personal decision based on your preferences and desired outcome. By considering the weight, fiber content, color, and texture of the yarn, you can create unique and beautiful ornaments that will add charm to your holiday decorations.
Basic Knitting Stitches You Need to Know
Knitting is a popular craft that involves using needles to create fabric from yarn or thread. Whether you’re a beginner or an experienced knitter, it’s important to have a good understanding of the basic knitting stitches. These stitches form the foundation for many knitting patterns and are essential for creating a wide range of projects.
Garter Stitch: The garter stitch is the most basic knitting stitch and is often the first one that beginners learn. It is created by knitting every row, resulting in a smooth, textured fabric. The garter stitch is commonly used for scarves, dishcloths, and blankets.
Stockinette Stitch: Another essential knitting stitch is the stockinette stitch. It is created by alternating between knitting one row and purling one row. This stitch creates a smooth, flat fabric with a distinct “V” pattern on the right side. The stockinette stitch is commonly used for sweaters, socks, and hats.
Ribbing: Ribbing is a versatile knitting stitch that is commonly used for cuffs, collars, and hems. It is created by alternating between knitting and purling in a specific pattern, such as knitting two stitches and purling two stitches. Ribbing creates a stretchy, textured fabric that is perfect for adding shape and elasticity to a project.
Seed Stitch: The seed stitch is a simple yet beautiful knitting stitch that creates a textured fabric with small, raised bumps. It is created by alternating between knitting and purling one stitch in a specific pattern, such as knitting one stitch and purling one stitch. The seed stitch is commonly used for scarves, baby blankets, and washcloths.
Cable Stitch: The cable stitch is a more advanced knitting technique that creates a twisted pattern resembling a cable. It is created by crossing stitches over each other, either to the left or to the right. The cable stitch adds depth and interest to knitted garments and accessories.
Lace Stitch: Lace stitches are intricate knitting patterns that create an open, airy fabric with beautiful lace-like details. They typically involve creating a combination of yarn overs and decreases to create decorative holes and motifs. Lace stitches are commonly used for shawls, scarves, and delicate sweaters.
These are just a few examples of the basic knitting stitches that every knitter should know. By mastering these stitches, you’ll have a solid foundation for creating a wide range of knitting projects and can start exploring more advanced techniques and patterns.
Step 1: Casting On
In order to make a mini knit hat ornament, you first need to cast on your stitches. The casting on process creates the first row of stitches on your needle, which will form the base of your hat.
To cast on, you can use the long-tail cast on method. Start by making a slipknot, which is a loop that can slide easily on your knitting needle. Place this slipknot on your needle, leaving a tail of yarn that is approximately three times the width of your finished hat ornament.
- Hold the needle with the slipknot in your right hand, and hold the working yarn in your left hand.
- Insert the needle into the slipknot, going from front to back.
- Bring the working yarn under the needle, then over the top of the needle.
- While holding the yarn in place, pull the needle back through the slipknot, bringing the yarn with it.
- Repeat these steps until you have cast on the desired number of stitches for your hat ornament. For a mini hat ornament, you may want to cast on around 20 stitches.
Once you have cast on all your stitches, you are ready to move on to the next step in creating your mini knit hat ornament.
Step 2: Knitting the Ribbing
Now that you have cast on the required number of stitches, it’s time to start knitting the ribbing for your mini knit hat ornament. The ribbing adds texture and stretch to the bottom band of the hat, giving it a snug fit and a stylish look.
To knit the ribbing, you will be using a combination of knit and purl stitches to create a ribbed pattern. This pattern is commonly used in hats, socks, and other knitwear to provide a stretchy and flexible fabric.
Here is how you can knit the ribbing:
- Begin by knitting the first stitch. Insert the right needle into the front of the first stitch on the left needle, and wrap the working yarn counterclockwise around the right needle.
- With the yarn in front of the needles, bring the right needle through the stitch, and slide the stitch off the left needle. This completes one knit stitch.
- Next, purl the next stitch. Insert the right needle into the front of the second stitch on the left needle, this time from right to left. Wrap the working yarn counterclockwise around the right needle, and bring the right needle through the stitch. Slide the stitch off the left needle, completing one purl stitch.
- Repeat the knit and purl stitches until you have reached the desired length for the ribbing. This can vary depending on your pattern, but a common length is about 1 inch.
Continue knitting in this ribbing pattern until you have completed the required number of rows or rounds. Once the ribbing is finished, you can move on to the next step of your mini knit hat ornament pattern.
Step 3: Shaping the Crown
Once you have completed the ribbing section, it’s time to start shaping the crown of the mini knit hat ornament. This step will give your hat its classic tapered shape.
To begin, you will need to decrease the number of stitches in each row to create the crown. This can be done by knitting two stitches together, also known as a knit-two-together (k2tog) decrease. To do this, insert your right needle into the next two stitches as if to knit, and then wrap the yarn around the needle and pull it through both stitches. This will create one stitch from two.
Here is a breakdown of how to shape the crown:
- Row 1: *K2tog, knit 4.* Repeat from * to * until the end of the row. (You will have decreased the total number of stitches by one-third).
- Row 2: Knit all stitches.
- Row 3: *K2tog, knit 3.* Repeat from * to * until the end of the row. (You will have decreased the total number of stitches by one-fourth).
- Row 4: Knit all stitches.
- Row 5: *K2tog, knit 2.* Repeat from * to * until the end of the row. (You will have decreased the total number of stitches by one-fifth).
- Row 6: Knit all stitches.
- Continue this pattern, decreasing the number of knit stitches in each row by one, until you have only 6 stitches remaining.
By following these shaping instructions, you will create a neat and tapered crown for your mini knit hat ornament. Once you have finished shaping the crown, you can move on to the final step of adding any embellishments or decorations to personalize your ornament.
Step 4: Decreasing Stitches
In this step, you will learn how to decrease stitches to shape the top of the mini knit hat ornament. Decreasing stitches will create a more tapered and rounded shape.
To decrease stitches, you will need to work two stitches together to form one stitch. This is commonly done using the knit two together (k2tog) or purl two together (p2tog) techniques.
Here are the instructions for decreasing stitches:
- Identify the two stitches that you want to decrease.
- If you are using the knit two together (k2tog) technique, insert your right-hand needle into the front of the next two stitches from left to right and knit them together as one stitch.
- If you are using the purl two together (p2tog) technique, insert your right-hand needle into the front of the next two stitches from right to left and purl them together as one stitch.
- Continue knitting or purling the remaining stitches in the row as directed by the pattern.
Repeat the process of decreasing stitches as instructed by the pattern until the desired number of stitches is reached. This will create the tapered shape of the mini knit hat ornament.
Step 5: Binding Off
Once you have finished knitting the desired length of your mini hat ornament, it is time to bind off. This step will ensure that the stitches do not unravel and give your hat a neat and finished edge. Follow the instructions below to bind off:
- Knit two stitches. Start by knitting the first two stitches on your left-hand needle.
- Insert left-hand needle into the first stitch. Insert the tip of your left-hand needle into the first stitch you knitted (the second stitch on your right-hand needle) as if you are going to knit it.
- Lift the first stitch over the second stitch. Use the tip of your left-hand needle to lift the first stitch on your right-hand needle over the second stitch and completely off the needle. This will create a new stitch on your right-hand needle.
- Knit next stitch. Knit the next stitch on your left-hand needle.
- Repeat steps 2-4. Continue to insert the left-hand needle into the first stitch you knitted, lift the first stitch over the second stitch, and knit the next stitch on your left-hand needle. Repeat these steps until you have one stitch remaining on your right-hand needle.
- Cut the yarn. Once you have only one stitch left on your needle, cut the yarn, leaving a tail of about 6 inches.
- Pull the tail through the loop. Thread the tail through the remaining stitch on your needle and gently pull it tight to secure the bind off.
Congratulations! You have successfully bound off your mini knit hat ornament. Now you can remove it from your knitting needles and continue with the next steps to finish your ornament.
Step 6: Sewing the Hat Together
Once you have completed all the knitting steps for the mini hat ornament, it’s time to sew the pieces together to give it its final shape.
Start by folding the knitted rectangle piece in half, with the wrong side facing out. Line up the edges and use a yarn needle to sew the two short sides together, creating a tube shape. Make sure to knot the yarn securely at the end to prevent any unraveling.
Next, turn the tube right side out so that the seam is hidden on the inside. This will give the hat a clean and finished look.
Now, it’s time to close off the top of the hat. Gather the remaining stitches from the cast-on edge onto a double-pointed needle or a spare knitting needle. Pull the yarn tight to close up the hole, making sure all the stitches are secure.
For an extra secure finish, you can use the yarn needle to weave the yarn through the top stitches a few times and then knot it off. This will ensure that the top of the hat stays closed and won’t unravel.
Finally, you can add any embellishments or decorations to your mini hat ornament. This could be a pom-pom, a small bow, or even some festive beads.
With the sewing complete and the finishing touches added, your mini knit hat ornament is now ready to be hung on the tree or used as a cute decoration. Enjoy your cozy and festive creation!
Step 7: Adding Embellishments

Once you have finished knitting your mini hat ornaments, you can add some embellishments to make them even more festive and unique. Here are a few ideas:
1. Pom Pom: Attach a small pom pom to the top of the hat using a hot glue gun or by sewing it on. This will add a playful touch to your ornament.
2. Ribbon: Tie a small ribbon or bow around the base of the hat to create a decorative accent. Choose a color that complements your yarn to enhance the overall look.
3. Beads: Using a needle and thread, sew small beads onto the hat to create a sparkling effect. You can either stitch them randomly or create a pattern, depending on your preference.
4. Sequins: Similar to beads, you can attach sequins to the hat using a needle and thread. This will give your ornament a glamorous touch.
To add any of these embellishments, make sure to secure them firmly so they won’t come off. You can also get creative and come up with your own embellishment ideas. Remember to have fun and make your mini hat ornaments unique!
Now that you’ve completed all the steps, your mini knit hat ornaments are ready to be displayed or given as gifts. These small and adorable decorations are perfect for the holiday season and will surely bring joy to anyone who receives them. Enjoy the process of knitting and embellishing these mini hats, and have a wonderful time celebrating!