
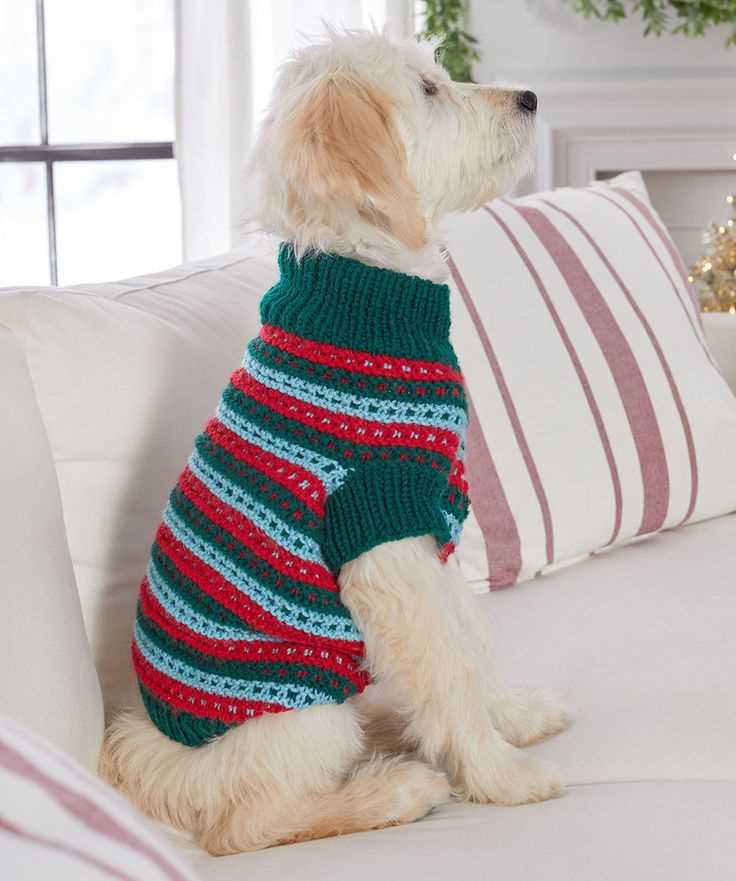
Keeping your canine companion warm during the chilly winter months is important, and what better way to do so than with a cozy and stylish dog coat? If you enjoy knitting and have a furry friend in need of some extra warmth, we have just the pattern for you! This free knitting pattern for a dog coat is the perfect project for both beginners and experienced knitters.
Materials and Measurements:
The materials needed for this dog coat pattern are minimal, making it a great project for using up leftover yarn. You will need approximately 200-300 yards of worsted weight yarn, size 8 knitting needles, stitch markers, and a tape measure. The pattern is designed for small to medium-sized dogs, with measurements of approximately 12-20 inches in length and 10-15 inches in girth.
The Pattern:
This dog coat pattern features a simple ribbed design for the body, accented with a contrasting color for the trim and straps. It is knit in one piece, starting with a ribbed section for the chest and back, followed by rows of stockinette stitch for the body. The straps are created with a simple garter stitch and are secured with buttons or snaps for easy on and off. The pattern also includes instructions for adding a slit for a leash if desired.
Customization Options:
Feel free to get creative with this dog coat pattern by adding your own personal touches. You can experiment with different color combinations, stitch patterns, or even add embellishments such as buttons, bows, or crochet flowers. The possibilities are endless!
So gather your knitting supplies, choose your favorite yarn, and get started on this free knitting pattern for a dog coat. Your furry friend will thank you for the extra warmth and style!
Free Knitting Pattern for Dog Coat
If you love knitting and have a furry friend, why not combine your hobbies and make a cozy coat for your dog? With this free knitting pattern, you can create a stylish and warm accessory that will keep your dog comfortable during the colder months.
To start, gather your materials. You’ll need a set of knitting needles, your preferred yarn, and a tape measure to ensure a proper fit. Once you have everything you need, it’s time to begin knitting!
The pattern includes detailed instructions for different sizes, so you can easily customize the coat to fit your dog perfectly. It also offers various stitch options, allowing you to create a unique design that suits your dog’s personality.
The coat can be knit in one piece or in separate sections that are later sewn together. This gives you the flexibility to choose the method that works best for you. The pattern also provides directions for adding additional features such as a collar or buttons.
Knitting a coat for your dog not only keeps them warm, but it also allows you to showcase your creativity and love for your furry friend. Your dog will appreciate the extra warmth and comfort, and you’ll enjoy the satisfaction of creating something special just for them.
Materials Needed
In order to complete this free knitting pattern for a dog coat, you will need the following materials:
Yarn:
- Approximately 200 grams of medium weight yarn (worsted or aran)
- Color of your choice
Knitting Needles:
- Size 8 (5mm) straight knitting needles
Notions:
- Tapestry needle
- Scissors
- Stitch markers
- Measuring tape
- Four buttons or toggles for closure (approximately 3/4 inch in diameter)
Gauge:
Using size 8 needles, in stockinette stitch, 18 stitches and 24 rows = 4 inches.
Make sure you have all the necessary materials before you start knitting the dog coat. Happy knitting!
Gauge
Gauge is an important factor to consider when working on a knitting project, including a dog coat. It refers to the number of stitches and rows in a specific measurement of knitted fabric. By following the recommended gauge, you can ensure that the finished project will have the correct size and fit.
To determine the gauge, you will need to knit a swatch using the recommended yarn and needles. The pattern will specify how many stitches and rows should be included in a certain measurement, usually 4 inches or 10 centimeters. Using a ruler or measuring tape, you can compare your swatch to the specified gauge to check if you are knitting at the same tension as the designer.
Keep in mind that everyone’s knitting tension may vary, so it is important to check your gauge before starting the project. If your stitches and rows are too tight compared to the recommended gauge, you will need to switch to larger needles to achieve a looser tension. On the other hand, if your stitches and rows are too loose, you will need to switch to smaller needles to achieve a tighter tension.
Not getting the correct gauge can result in a dog coat that is either too small or too large for your pet. It is worth taking the time to create a swatch and make any necessary needle adjustments to ensure that your dog’s coat fits them perfectly. Remember, a properly fitted coat will not only keep your furry friend warm, but it will also be comfortable for them to wear. Don’t skip this important step in your knitting process!
Size Guide
Choosing the correct size for your dog’s coat is essential to ensure a comfortable and proper fit. Measure your dog before selecting a pattern to ensure the best fit.
Here is a simple guide to help you determine the appropriate size for your dog:
- Small: Suitable for small breeds such as Chihuahuas or Yorkshire Terriers. Measure your dog’s back length from the base of the neck to the start of the tail. Sizes for small dogs typically range from 8 – 12 inches.
- Medium: Designed for medium-sized breeds like Beagles or Cocker Spaniels. Measure your dog’s back length and girth (the circumference of the widest part of their chest). Medium sizes usually range from 12 – 18 inches for back length and 16 – 24 inches for girth.
- Large: Ideal for larger breeds such as Golden Retrievers or German Shepherds. Measure your dog’s back length, chest girth, and neck girth. Back lengths for large dogs can vary from 18 – 24 inches, chest girths typically range from 24 – 30 inches, and neck girths range from 16 – 20 inches.
Remember to allow for some adjustability in the pattern, as dogs come in different shapes and sizes. It’s always better to go slightly larger than smaller, as you can make adjustments as needed.
Getting Started
Before you begin knitting the dog coat, there are a few things you need to gather and be familiar with. This section will provide you with all the information and materials needed to get started on this knitting project.
Materials:
- Knitting Needles – Size 8 (5mm)
- Yarn – Worsted weight (approximately 300-400 yards)
- Tape Measure
- Scissors
Choosing the right yarn:
When selecting the yarn for your dog coat, it is important to choose a material that is comfortable and suitable for your furry friend. Worsted weight yarn is usually a good option as it is durable, easy to work with, and provides the right amount of warmth. Additionally, consider the color and pattern of the yarn to ensure the dog coat matches your pet’s personality and style.
Knitting Needle Size:
The recommended knitting needle size for this dog coat pattern is size 8 (5mm). However, depending on your tension and desired gauge, you may need to adjust the needle size accordingly. It is always a good idea to make a small swatch before starting the project to check your gauge and make any necessary needle adjustments.
Measuring your dog:
In order to create a well-fitting dog coat, it is crucial to accurately measure your pet. Use a tape measure to measure the following key areas:
- Neck circumference
- Chest circumference
- Length from neck to tail
These measurements will help you determine the appropriate size and shape for the dog coat, ensuring a comfortable fit for your canine companion.
Back Panel

The back panel is the main piece of the dog coat and is created using basic knitting stitches. It is designed to fit the length of the dog’s back from the base of the neck to the base of the tail.
To begin, cast on the required number of stitches for the desired length of the coat. This can be determined by measuring the dog from the base of the neck to the base of the tail and multiplying it by the gauge.
Once the stitches are cast on, work in the specified stitch pattern for the back panel. This can vary depending on the desired design or the complexity of the pattern. Some common stitch patterns for a dog coat include stockinette stitch, garter stitch, or a simple ribbing pattern.
Continue knitting in the specified stitch pattern until the back panel reaches the desired length. This can be determined by measuring the progress against the dog’s back.
Once the back panel is the desired length, bind off the stitches and weave in any loose ends. The back panel can then be attached to the other pieces of the dog coat, such as the belly strap or chest panel, to complete the garment.
Leg Openings
When knitting a dog coat, one important aspect to consider is the leg openings. The leg openings will determine how easy it is for your dog to move around comfortably while wearing the coat.
To create the leg openings, you will need to make a few adjustments to the knitting pattern. Start by identifying the point where the dog’s legs will go through the coat. This will typically be around the stomach area.
Option 1: One common method is to leave a gap in the pattern where the leg openings will be. For example, if the pattern instructs you to knit in a continuous round, you can simply knit a few stitches, then skip a few, and continue knitting until you reach the other side of the leg opening. This creates an opening that allows the dog’s legs to go through.
Option 2: Another option is to create button or Velcro closures on the leg openings. This allows for a more adjustable fit and makes it easier to put the coat on and take it off your dog. To do this, you can knit the leg openings as instructed in the pattern, but leave a few stitches at each side of the leg opening without knitting them. Then, sew on buttons or attach strips of Velcro to those stitches to create closures.
Remember to measure your dog’s legs and adjust the leg openings accordingly to ensure a proper fit. Additionally, make sure the leg openings are not too tight or too loose, as this can restrict your dog’s movement or cause the coat to slip off. Take your time to adjust and test the leg openings until they are just right.
Front Panel
To create the front panel of the dog coat, you will need to cast on the required number of stitches using a set of double-pointed needles or a circular needle. The number of stitches will depend on the size of your dog and the desired width of the coat. Referencing the measurements provided in the pattern, you can calculate the number of stitches to cast on.
Once you have cast on the stitches, you can begin knitting the front panel in the desired stitch pattern. The pattern may include instructions for various stitch patterns such as garter stitch, stockinette stitch, or ribbing. Follow the instructions provided to create the desired texture or pattern on the front panel.
As you work on the front panel, you may also need to incorporate shaping techniques to create a proper fit for your dog. This can include increasing or decreasing stitches at specific points to accommodate the shape of your dog’s body. Refer to the pattern instructions for any shaping details and follow them accordingly.
Continue knitting the front panel until you reach the desired length, as indicated in the pattern. Once the front panel is complete, you can set it aside and move on to the next section of the dog coat pattern.
Note: Remember to always check your gauge before starting the front panel to ensure that your stitches and rows match the measurements indicated in the pattern. Adjust your needle size if necessary to achieve the correct gauge.
Collar
A collar is an essential part of a dog coat. It helps to keep the coat securely in place and ensures a comfortable fit for the dog. When choosing a collar for a dog coat, it is important to consider the size and breed of the dog, as well as the style and functionality desired.
The collar should be adjustable so that it can be snugly fitted around the dog’s neck without causing discomfort or restricting movement. It should also be durable and able to withstand the wear and tear of regular use. Some collars feature additional features such as a reflective strip for added visibility in low-light conditions, or a D-ring for attaching a leash.
Types of collars:
- Buckle collar – This type of collar has a buckle for easy adjustment and a secure fit. It is a popular choice for dog coats as it is reliable and easy to use.
- Velcro collar – These collars have a Velcro closure system, which allows for quick and easy adjustments. They are ideal for dogs who have difficulty with buckles.
- Clip collar – Clip collars have a quick-release clip for easy on and off. They are convenient and secure, making them a popular choice for dog coats.
- Martingale collar – Martingale collars are also known as “limited slip” collars. They are designed to tighten when the dog pulls on the leash, providing gentle control without choking the dog.
When attaching the collar to the dog coat, it is important to ensure that it is properly aligned and securely fastened. The collar should sit comfortably around the dog’s neck, allowing for easy movement and breathing. It should not be too tight or too loose, as this can cause discomfort or pose a safety risk. Regularly check the collar to ensure that it is still in good condition and adjust as needed.
Chest Strap

A chest strap is an essential component of a dog coat, as it helps secure the coat in place and ensures a snug fit. It is designed to wrap around the chest area of the dog, providing additional support and preventing the coat from sliding or shifting during movement.
The chest strap is typically made of a durable and adjustable material, such as nylon or polyester, to accommodate different sizes and breeds of dogs. It is often equipped with a buckle or a hook-and-loop fastener for easy and secure fastening. The strap should be snug but not too tight, allowing for comfortable movement and breathing for the dog.
To ensure a proper fit, it is important to measure the girth of the dog’s chest before making or purchasing a chest strap. This can be done by wrapping a tape measure around the widest part of the dog’s chest, just behind the front legs. The measurement should be taken snugly, but not too tight, to ensure the strap will fit properly without causing discomfort.
When attaching the chest strap to the dog coat, it should be positioned in a way that aligns with the coat’s closures, such as buttons or Velcro strips. This will help keep the coat securely in place and prevent any gaps or openings that could expose the dog to the cold or other elements.
Overall, a well-fitted and secure chest strap is an important feature of a dog coat, providing both comfort and functionality for your furry friend during those chilly winter months.
Finishing Touches
Once you have completed knitting the dog coat, it’s time to add the finishing touches to make it both functional and stylish. These final steps will ensure that the coat fits your dog perfectly and provides the necessary warmth and protection.
Adjustments and Modifications
Before finalizing the coat, make any necessary adjustments or modifications to ensure the perfect fit. Measure your dog’s neck, chest, and length to determine if any changes need to be made to the pattern. You can modify the pattern by adding or subtracting stitches or rows, or by altering the shaping to accommodate your dog’s unique measurements.
Additionally, you can add optional features such as a hood, pockets, or buttons to enhance the overall design and functionality of the coat. Be sure to consider your dog’s comfort and mobility when making any modifications.
Seaming and Blocking
Once you are satisfied with the fit and design of the coat, it’s time to seam the pieces together. Use a yarn needle and the mattress stitch to join the front and back panels, as well as the side seams. Take your time to ensure that the seams are secure and not too bulky.
After seaming, it’s important to block the coat to give it a professional finish and help the stitches relax and lay flat. Wet block the coat by soaking it in lukewarm water and gently squeezing out the excess moisture. Lay it flat on a blocking board or towel and use pins to shape it to the desired measurements. Allow it to dry completely before removing the pins.
Final Touches
The final touches of the dog coat include adding any necessary closures, such as buttons, snaps, or velcro strips to secure the coat around your dog. These closures will ensure that the coat stays in place during outdoor activities.
Finally, give the coat a thorough inspection to ensure there are no loose ends or unfinished seams. Trim any excess yarn or weave in loose ends for a neat and polished look. Your dog’s new coat is now ready to keep them warm and cozy!
Additional Tips
Here are some additional tips to help you successfully complete the dog coat knitting pattern:
- Measure your dog: Before you start knitting, make sure to measure your dog’s chest, neck, and length to ensure the perfect fit for the coat.
- Gauge swatch: Always knit a gauge swatch before starting the pattern to ensure that your tension matches the recommended gauge. This will help you achieve the correct size and fit for the coat.
- Choose the right yarn: Select a yarn that is suitable for your dog’s needs. Consider the warmth, durability, and ease of care when choosing your yarn.
- Color and design: Get creative with your color choices and incorporate different patterns or designs to make the coat unique and stylish for your furry friend.
- Row counter: Use a row counter or keep track of your rows to ensure that you don’t lose count and maintain a consistent pattern throughout the coat.
- Seaming and finishing: Take your time when seaming and finishing the coat. Neatly sew all the seams and weave in any loose ends for a polished final result.
- Try it on your dog: Once you finish knitting the coat, try it on your dog to check the fit and make any necessary adjustments before finalizing the coat.
With these additional tips, you’re well-equipped to start knitting a cozy and stylish coat for your beloved dog. Enjoy the process and make sure to personalize the design to suit your dog’s unique personality!