
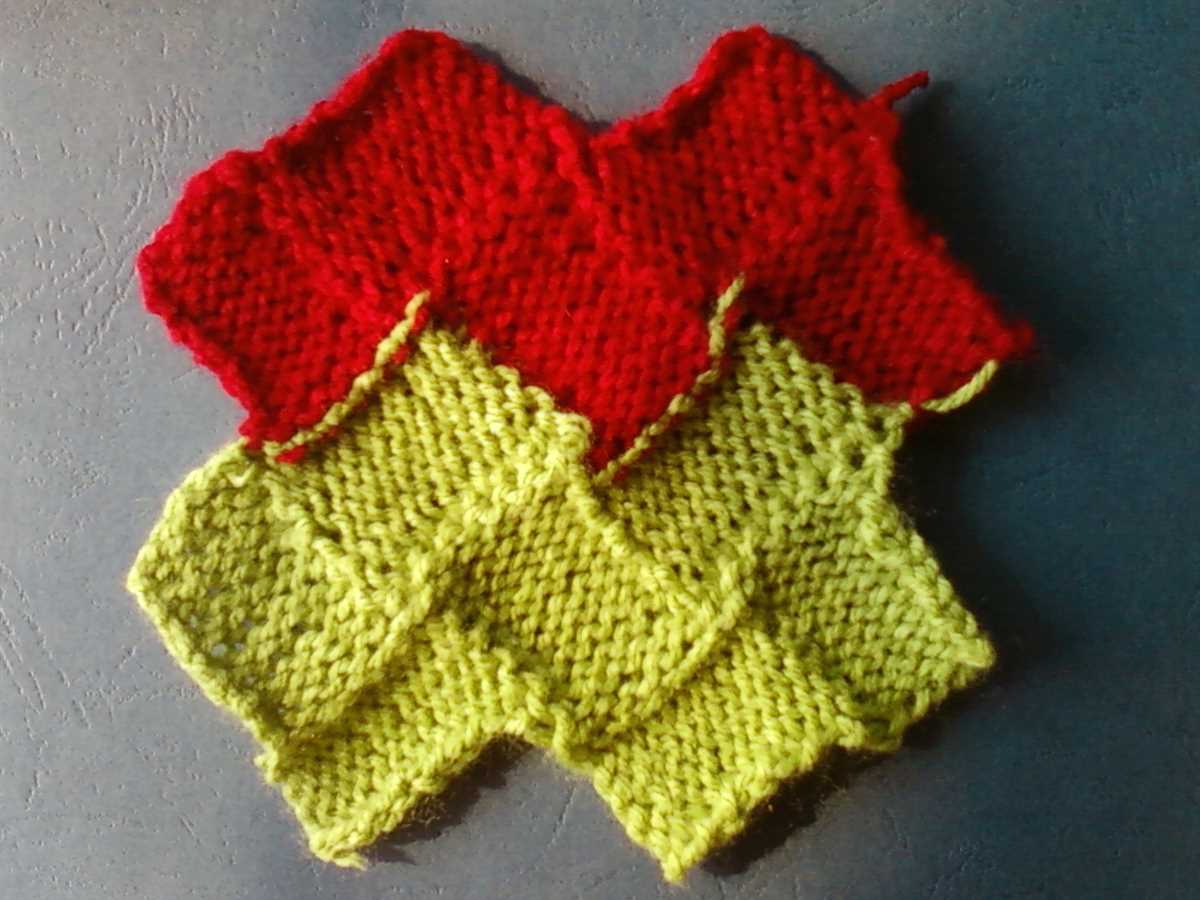
Knitting is not only a popular hobby, but also a great way to create beautiful and unique clothing and accessories. One popular knitting pattern that has gained a lot of attention in recent years is the mitered square pattern. This pattern involves knitting squares that are shaped like diamonds, giving them a unique and eye-catching look. They can be used to create a variety of items such as blankets, shawls, and even garments.
The mitered square pattern gets its name from the way it is constructed. Instead of knitting the squares as traditional squares, they are knit diagonally from one corner to the opposite corner. This creates a diamond shape and gives the squares a visually interesting appearance. The diagonal knitting also adds a bit of challenge to the pattern, making it a great project for knitters looking to expand their skills.
One of the great things about the mitered square pattern is its versatility. The squares can be made in any size, allowing knitters to create items of different sizes and shapes. By varying the number of squares and the way they are joined together, you can create endless variations and designs. This makes the mitered square pattern a great choice for those who like to customize their knitting projects.
If you’re interested in trying out the mitered square pattern, there are many resources available online that provide step-by-step instructions and patterns. Whether you’re a beginner knitter or an experienced one, the mitered square pattern is sure to provide plenty of enjoyment and satisfaction. So grab your knitting needles and give it a try!
Mitered Square Knitting Pattern: A Step-by-Step Guide
If you’re looking for a versatile and visually interesting knitting project, mitered squares are a great option. This knitting technique creates square shapes that are worked diagonally, resulting in a unique pattern with clean lines and crisp corners. In this step-by-step guide, we’ll walk you through the process of knitting a mitered square, from casting on to binding off.
Materials
- Yarn: Choose a yarn weight and color of your preference to create your mitered squares. Worsted weight yarn is commonly used.
- Knitting needles: Use a pair of needles that are appropriate for your chosen yarn weight.
- Scissors
- Tapestry needle
Step 1: Cast On
To begin your mitered square, start by casting on the desired number of stitches. The number of stitches you cast on will determine the size of your square. For a small square, you can cast on around 30 stitches, and for a larger square, cast on around 50 stitches.
Step 2: Increase Stitches
Next, you’ll start increasing stitches to create the diagonal shape of the square. You can use a basic increase method, such as knitting into the front and back of a stitch, or a double increase method, such as knitting into the front, back, and front again of a stitch. Repeat the increase method on every right-side row until you reach the desired width of your square.
Step 3: Decrease Stitches
Once you’ve reached the desired width, it’s time to start decreasing stitches to form the corners of the square. Similar to the increase method, you can use a basic decrease, such as knitting two stitches together, or a double decrease, such as slipping two stitches together knitwise, knitting the next stitch, and passing the slipped stitches over. Repeat the decrease method on every right-side row until you have only a few stitches left.
Step 4: Bind Off
When you have a small number of stitches remaining, it’s time to bind off. Use a standard knitting bind off method to secure your stitches and create a finished edge for your mitered square.
With these simple steps, you’ll be able to create unique mitered square patterns that can be used in various knitting projects. Whether you choose to make a single mitered square or join multiple squares together, this technique offers endless possibilities for creativity. So grab your yarn and needles, and start knitting your own mitered square masterpiece!
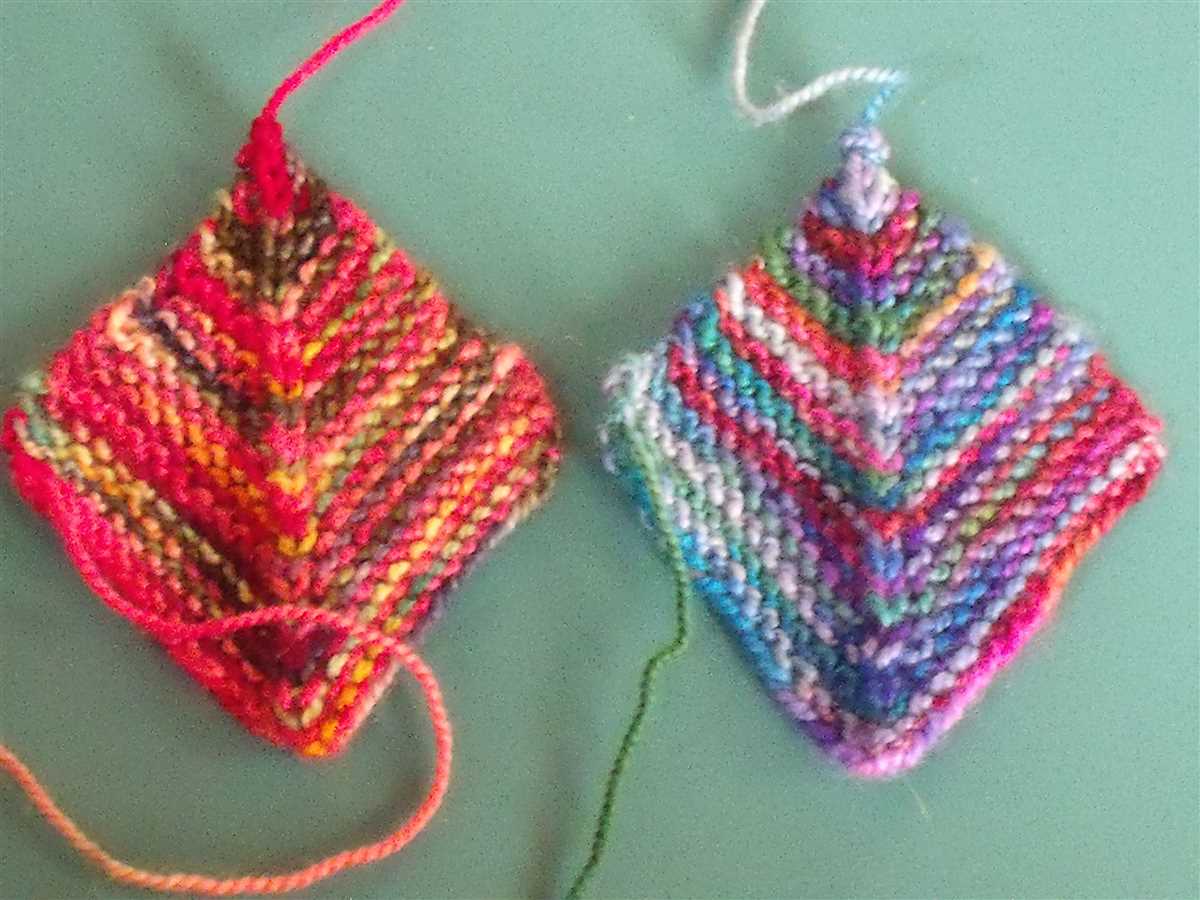
What is a Mitered Square?
A mitered square is a type of knitting pattern that creates a square shape with diagonal lines running from each corner towards the center. It is commonly used in projects such as blankets, scarves, and pillow covers. The unique construction of a mitered square adds texture and visual interest to the finished piece.
To knit a mitered square, you typically start with a small number of stitches and gradually increase on each row or round until reaching the desired size. The increases are made at the corners of the square, creating the distinctive diagonal lines. Once the square reaches the desired size, you can either continue knitting additional squares to join together, or finish the piece as is.
Mitered squares are versatile and can be used in a variety of projects. They can be knit in a single color or with multiple colors to create interesting patterns. The diagonal lines can be emphasized with contrasting colors or left subtle for a more understated look. Additionally, mitered squares can be combined in different ways to create larger geometric patterns or used as individual motifs within a larger design.
Choosing the Right Yarn and Needles
When it comes to knitting a mitered square, choosing the right yarn and needles is crucial for achieving the desired results. The yarn should be suitable for the project in terms of weight, fiber content, and texture.
Yarn Weight: The weight of the yarn will determine the size and thickness of the mitered square. If you want a smaller, denser square, opt for a heavier weight yarn, such as worsted or bulky. For a lighter, airier square, choose a lighter weight yarn, such as fingering or sport.
Fiber Content: The fiber content of the yarn will affect the drape and texture of the mitered square. Natural fibers like wool, cotton, and bamboo provide warmth and breathability, while synthetic fibers like acrylic or nylon offer durability and easy care.
Texture: The texture of the yarn can add visual interest to the mitered square. Smooth yarns create a clean, polished look, while yarns with texture, like boucle or tweed, can add depth and dimension to the square.
Needle Size: The size of the needles will determine the tension and size of the stitches. Choose a needle size that matches the recommended gauge for your chosen yarn. If you want a tighter, firmer fabric, use smaller needles, and for a looser, more relaxed fabric, use larger needles.
Experimentation: Ultimately, the choice of yarn and needles is a matter of personal preference. It’s a great idea to experiment with different combinations to achieve the desired look and feel of your mitered square. Don’t be afraid to try different yarn weights, fiber contents, and needle sizes to create unique and personalized squares.
Getting Started with the Basic Pattern

Mitered square knitting is a classic technique that creates beautiful patterns with clean lines and interesting angles. This pattern is perfect for those looking to add some texture and dimension to their knitted projects.
To get started with the basic mitered square pattern, you will need a set of knitting needles and your choice of yarn. It’s best to choose a yarn that is not too thick or too thin, so that the stitches are easy to work with and the pattern is clearly visible.
Step 1: Cast on stitches
Begin by casting on an odd number of stitches. The exact number of stitches will depend on the size of the square you want to create. For example, if you want to make a smaller square, you can cast on 21 stitches. If you want to make a larger square, you can cast on 41 stitches. Make sure to leave a long tail of yarn for weaving in later.
Step 2: Knit the first row
Once you have cast on your stitches, knit across the first row. This row will create the foundation for your mitered square. Knit each stitch as you normally would, making sure to maintain a consistent tension.
Step 3: Begin the decrease
After knitting the first row, it’s time to start decreasing. On the second row, knit the first two stitches together to create a decrease. Then, knit across the rest of the row. This decrease will create the first diagonal line of your mitered square.
Step 4: Continue the decrease
Repeat the decrease on every second row until you have reached the desired number of stitches for the width of your square. For example, if you cast on 21 stitches, you will decrease until you have 3 stitches remaining. Make sure to maintain a consistent tension throughout.
Step 5: Repeat on the other side
Once you have reached the desired width, it’s time to repeat the process on the other side of the square. Start by knitting across the row, then begin decreasing on every second row until you have 3 stitches remaining.
Step 6: Bind off
When you have reached 3 stitches on both sides, it’s time to bind off. Cut the yarn, leaving a long tail for weaving in later. Thread the tail through the last 3 stitches and pull tight to secure. Weave in any remaining ends.
By following these steps, you will be able to create a basic mitered square pattern. Once you have mastered the technique, you can experiment with different yarn colors and stitch patterns to create unique and personalized projects.
Increasing and Decreasing for Mitered Corners
When knitting a mitered square, it is important to understand how to increase and decrease stitches to create the distinctive diagonal lines that meet at the corner. These increases and decreases are what give the square its unique shape and allow it to lie flat when seamed together.
To create a mitered corner, you will typically be working with two increase techniques: the make one (M1) and the knit front and back (KFB). The M1 is commonly used to increase stitches in the middle of the row, while the KFB is used to increase stitches at the beginning or end of a row.
When working on the right side of the fabric, you can create a M1 increase by lifting the strand of yarn between the current stitch and the next stitch onto the left needle, and then knitting into the back of that lifted strand. This will create a new stitch. For a KFB increase, simply knit into the front of the stitch as usual, but before removing it from the left needle, knit into the back of the same stitch. This will also create a new stitch.
On the wrong side of the fabric, the M1 increase can be achieved by picking up the strand of yarn between the current stitch and the next stitch with the left needle, and then purling into the back loop of that lifted strand. This will create a new purl stitch. The KFB increase can be done by purling into the front of the stitch as usual, but before removing it from the left needle, purl into the back of the same stitch. This will create a new purl stitch.
When it comes to decreasing for the mitered corners, you will typically use the knit two together (K2tog) or the slip, slip, knit (SSK) techniques. The K2tog is used to decrease stitches at the beginning or end of a row, while the SSK is commonly used to decrease stitches in the middle of the row.
To perform a K2tog decrease, simply insert the right needle into the next two stitches on the left needle as if to knit them together, and then knit them together as one stitch. This will decrease one stitch. For an SSK decrease, slip the next two stitches individually from the left needle to the right needle as if to knit them, then insert the left needle into the front loops of these two slipped stitches from left to right, and knit them together through the back loop. This will also decrease one stitch.
By understanding and mastering these increase and decrease techniques, you will be able to confidently tackle mitered corners in your knitting projects and create beautifully shaped squares.
Colorwork Techniques for Mitered Squares
Colorwork techniques can add beautiful and intricate designs to mitered squares in knitting. By combining different colors of yarn, you can create stunning patterns and textures that bring your knitting project to life.
One popular colorwork technique for mitered squares is stranded knitting, also known as fair isle knitting. This technique involves carrying multiple colors of yarn across the row, working with one color at a time. The unused yarn is carried along the back of the work, creating floats or strands on the wrong side of the fabric. Stranded knitting allows you to create bold, geometric designs or subtle color gradients in your mitered squares.
Another colorwork technique that can be used for mitered squares is intarsia knitting. This technique involves using separate balls or bobbins of yarn for each color block in the design. When changing colors, the yarns are twisted around each other at the color change to prevent holes in the fabric. Intarsia is a great technique for creating larger color blocks or detailed images within your mitered squares.
When working with colorwork techniques in mitered squares, it is important to maintain an even tension throughout your knitting. Tension can greatly affect the appearance and fit of your finished squares, so take your time to practice and ensure an even tension with both hands. Additionally, weaving in or catching floats can help secure the carried yarns and prevent them from snagging or catching on other objects.
Overall, exploring colorwork techniques for mitered squares opens up a world of possibilities for adding unique and eye-catching designs to your knitting projects. With a little practice and experimentation, you can create beautiful squares that will impress and inspire others. So grab your favorite colors of yarn and start creating your own stunning mitered squares!
Adding Embellishments and Texture
When working on a mitered square knitting pattern, adding embellishments and texture can greatly enhance the visual interest of your finished project. There are several techniques you can use to achieve this effect.
Ribbing:
One simple way to add texture to your mitered square is to incorporate ribbing. This can be done by working knit and purl stitches in a pattern, such as K2, P2 or K1, P1. Ribbing creates a stretchy and visually appealing texture that can make your square stand out.
Cable knitting:
Add intricate twists and turns to your mitered square by incorporating cable knitting. This technique involves crossing stitches over each other to create a cable-like effect. You can choose from various cable patterns, such as simple rope cables or more complex braid patterns, to add depth and dimension to your square.
Lacework:
For a delicate and airy touch, consider incorporating lacework into your mitered square. Lace patterns typically involve yarn overs and decreases to create intricate and open patterns. By adding lace panels or borders to your square, you can achieve a beautiful and feminine look.
Colorwork:
Another way to add visual interest to your mitered square is through colorwork. This can be done by incorporating fair isle or intarsia techniques, where you work with multiple colors to create patterns or pictures. By choosing contrasting or complementary colors, you can create a stunning and eye-catching design.
Experimenting with different embellishments and textures can take your mitered square knitting pattern to the next level. Whether you incorporate ribbing, cable knitting, lacework, or colorwork, these techniques will add depth, dimension, and visual interest to your finished project.
Creating a Border for Your Mitered Square
Adding a border to your mitered square is a great way to enhance its appearance and make it stand out. There are various techniques you can use to create a border, depending on the desired effect and your knitting skills. Here are a few options to consider:
- Garter Stitch Border: One simple and popular option is to add a garter stitch border to your mitered square. This involves knitting every row or round for a certain number of stitches at the edges. This creates a textured border that lies flat and helps define the square shape.
- Ribbed Border: If you prefer a more stretchy and decorative border, you can try adding a ribbed border to your mitered square. This can be achieved by alternating knit and purl stitches in a specific pattern, such as a 2×2 rib or a 1×1 rib. This creates a flexible edge that can easily accommodate the square’s corners.
- Seed Stitch Border: For a more textured and intricate look, you can consider adding a seed stitch border to your mitered square. The seed stitch is created by alternating knit and purl stitches within the same row, creating a pattern of bumps and textures. This border option adds visual interest and depth to your square.
When choosing a border for your mitered square, it’s important to consider the overall design and purpose of your project. You may want to experiment with different border options and swatch to see which one complements your square the best. Additionally, you can also incorporate color changes or different yarn textures to further enhance the border and make it unique.
Finishing Touches and Blocking
After completing the mitered square knitting pattern, it’s time to add the finishing touches to ensure your project looks polished and professional. One important step is blocking your work, which helps to even out the stitches and give the project a neat and tidy appearance.
To block the mitered square, first, wet the project by soaking it in lukewarm water. Gently squeeze out the excess water, being careful not to wring or twist the fabric. Lay the square flat on a clean towel and shape it to the desired dimensions. Use pins to secure the edges and any corners that need shaping. Leave the square to dry completely, ensuring that it retains its blocked shape.
Finishing the edges:
To give the mitered square a polished edge, you can choose from several methods. One option is to knit an I-cord, a thin strip of knitting that provides a clean and finished look. Alternatively, you can use a crochet edging, adding a decorative touch to the square. Another option is to whipstitch the edges using a yarn needle, creating a secure and sturdy finish.
Adding a border:
If you’d like to frame your mitered square with a border, there are various techniques you can use. One option is to knit a contrasting border in garter stitch, providing a simple and clean frame. Another option is to add a lace border, which gives an elegant and feminine touch to the square. Or, you can use a ribbed border for a more textured and structured finish.
Embroidery and embellishments:
If you want to add some extra flair to your mitered square, consider incorporating embroidery or embellishments. You can embroider decorative stitches onto the fabric, such as flowers, leaves, or geometric patterns. Additionally, you can attach buttons, beads, or sequins to create a unique and eye-catching design. Be creative and experiment with different techniques to make your mitered square truly one-of-a-kind.
| Step | Description |
|---|---|
| 1 | Wet the mitered square by soaking it in lukewarm water. |
| 2 | Remove excess water by gently squeezing, avoiding wringing or twisting. |
| 3 | Lay the square flat on a clean towel and shape it to desired dimensions. |
| 4 | Use pins to secure edges and shape any corners. |
| 5 | Leave the square to dry completely, maintaining its blocked shape. |
Ideas for Using Mitered Squares in Projects
Mitered squares are a versatile and fun knitting technique that can be used in a variety of projects. Whether you’re a beginner or an experienced knitter, there are numerous ways to incorporate mitered squares into your knitting projects to add interest and create unique designs.
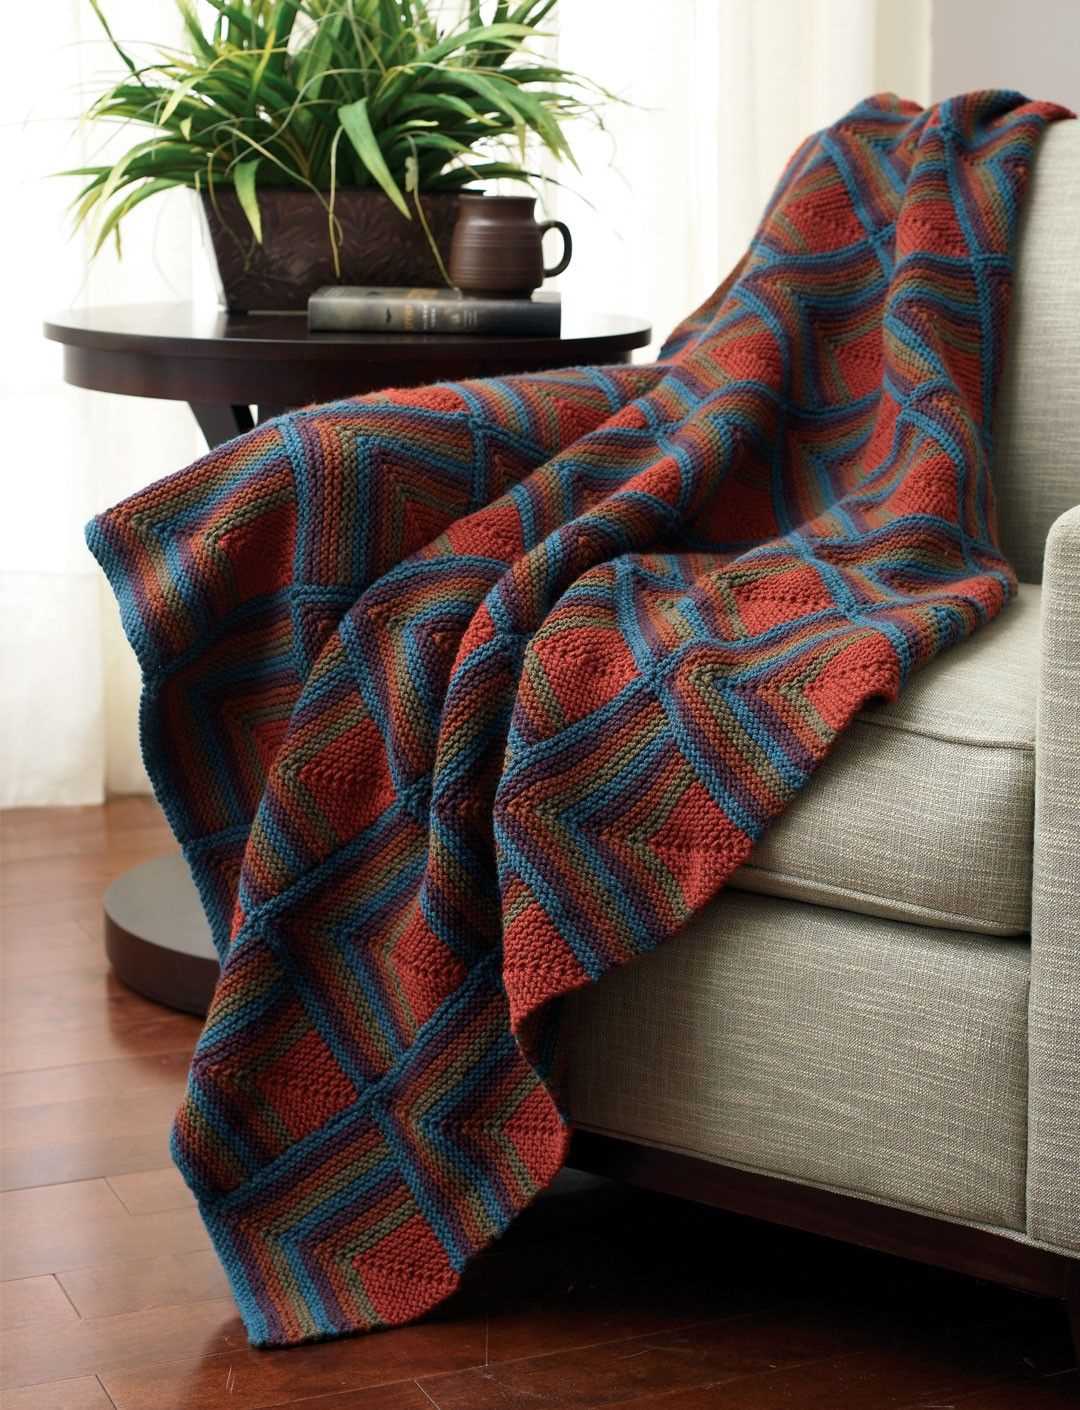
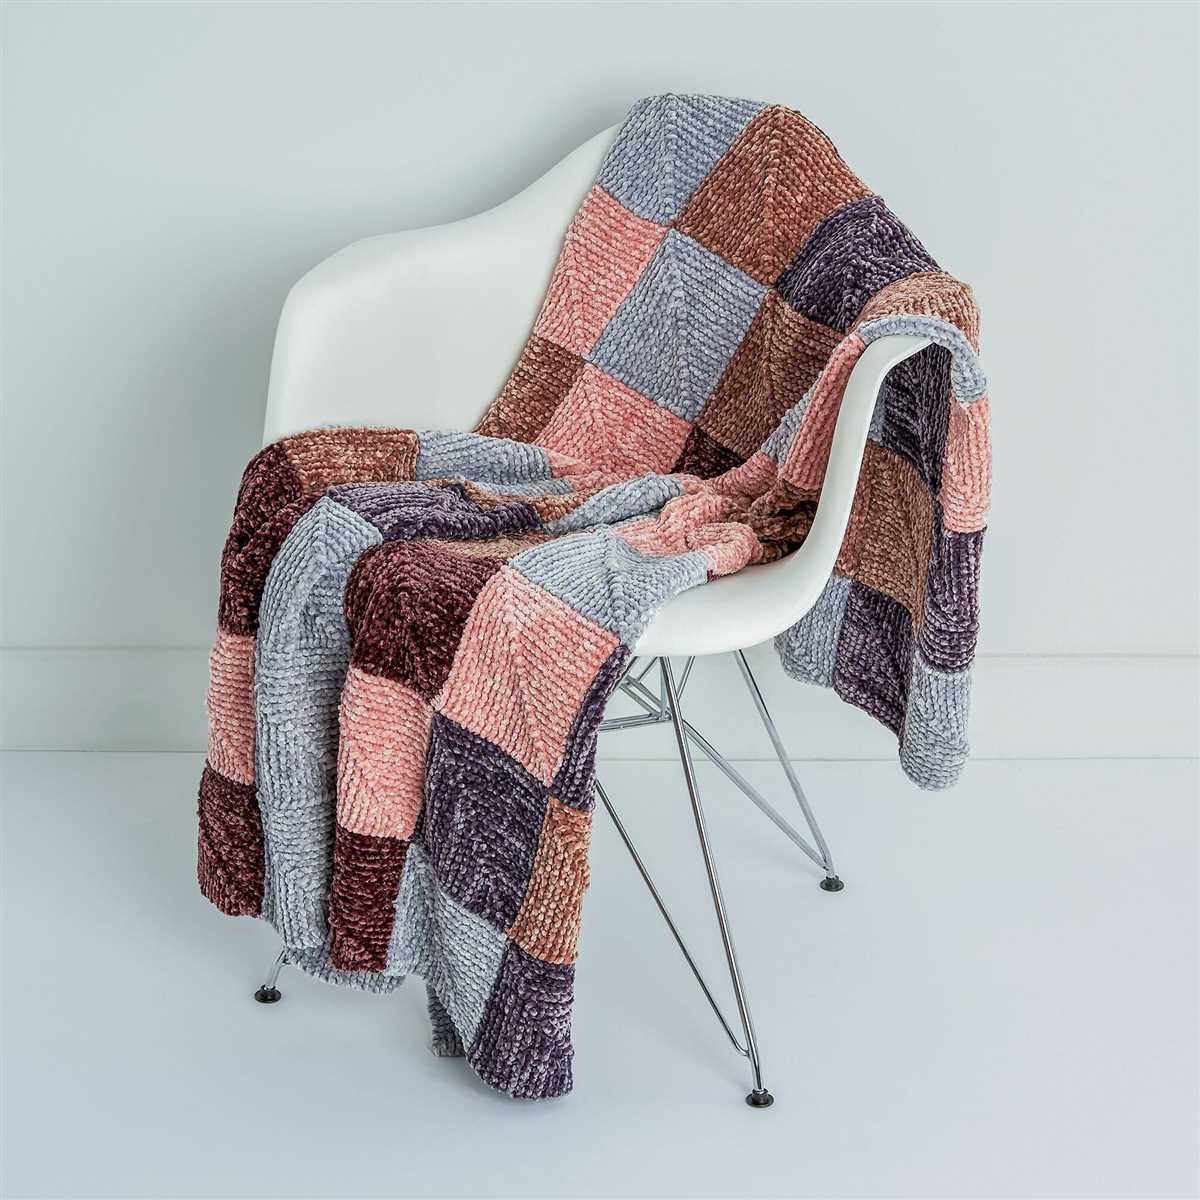
1. Blankets and Afghans
One of the most popular ways to use mitered squares is in blankets and afghans. By knitting multiple squares and then joining them together, you can create a stunning geometric pattern that is both visually appealing and cozy. Experiment with different colors and sizes to create a truly unique and personalized blanket.
2. Pillows and Cushion Covers
Mitered squares can also be used to make beautiful pillows and cushion covers. They can add a pop of color and texture to any room and can be easily customized to match your existing decor. Knit a set of mitered square pillows in coordinating colors or use contrasting shades for a bolder statement.
3. Scarves and Shawls
Scarves and shawls are another great project idea for mitered squares. By knitting squares of varying sizes and joining them together, you can create a unique and eye-catching accessory. Experiment with different yarn weights and colors to create scarves and shawls that are perfect for any season.
4. Bags and Totes
Mitered squares can also be used to create stylish and functional bags and totes. Whether you’re knitting a small clutch or a large tote, mitered squares can add an interesting touch to your project. Use different colors and sizes to create a mosaic-like effect or stick to a single color for a more classic look.
5. Coasters and Pot Holders
If you’re looking for a quick and small project, consider using mitered squares to make coasters or pot holders. They can be knit up in no time and are perfect for using up leftover yarn. Create a set of matching coasters or pot holders in coordinating colors or go for a mix and match look with different patterns and colors.
These are just a few ideas for using mitered squares in your knitting projects. Whether you’re a beginner or an experienced knitter, mitered squares can add a unique and interesting touch to any project. Let your creativity run wild and create something truly special with mitered squares.
Troubleshooting Common Issues
Knitting mitered squares can be a fun and rewarding project, but like any knitting pattern, it can come with its own set of challenges. Here are some common issues that knitters may encounter while working on mitered squares, along with solutions to help troubleshoot them.
1. Uneven or Sloppy Corners
If your corners are not coming out neat and crisp, it could be due to inconsistent tension or improper decrease stitches. Make sure you are maintaining a consistent tension throughout your work and carefully follow the decrease instructions for the pattern. Taking the time to adjust your tension and practice the decreases will help you achieve clean corners.
2. Gaps at the Corners
If you notice gaps forming at the corners of your mitered square, it’s likely due to not pulling your yarn tightly enough when changing directions. When you change directions and start your decrease stitches, make sure to tighten the yarn to eliminate any gaps. You can also try using a smaller needle size for the decrease rows to achieve a tighter fabric.
3. Uneven Square Shape
If your mitered square is coming out unevenly shaped, it could be due to inconsistent stitch counts or tension. Double-check that you are maintaining the correct stitch counts and tension throughout your work, especially when working the decrease rows. Blocking your square after completing it can also help even out any minor shape inconsistencies.
4. Difficulty Maintaining Pattern Repeat
If you’re struggling to keep track of the pattern repeat and constantly lose your place, try using stitch markers to mark the beginning and end of the repeat sections. This can make it easier to visually see where each repeat starts and ends, helping you stay on track and prevent mistakes. You can also use a row counter to keep track of the number of repeats completed if needed.
5. Yarn Tails Getting Tangled
As you switch yarn colors or join new skeins, you may find that the yarn tails become tangled or messy. To prevent this, make sure to weave in the ends of each color change or join as you go, instead of leaving them until the end. Weaving in the ends as you work can help keep your work tidy and prevent tangling.
In summary, troubleshooting common issues in mitered square knitting involves maintaining consistent tension, ensuring tight corners, checking stitch counts and tension for even shaping, using stitch markers for pattern repeats, and weaving in ends as you go. By following these tips, you’ll be well-equipped to overcome any challenges and create beautiful mitered squares.