
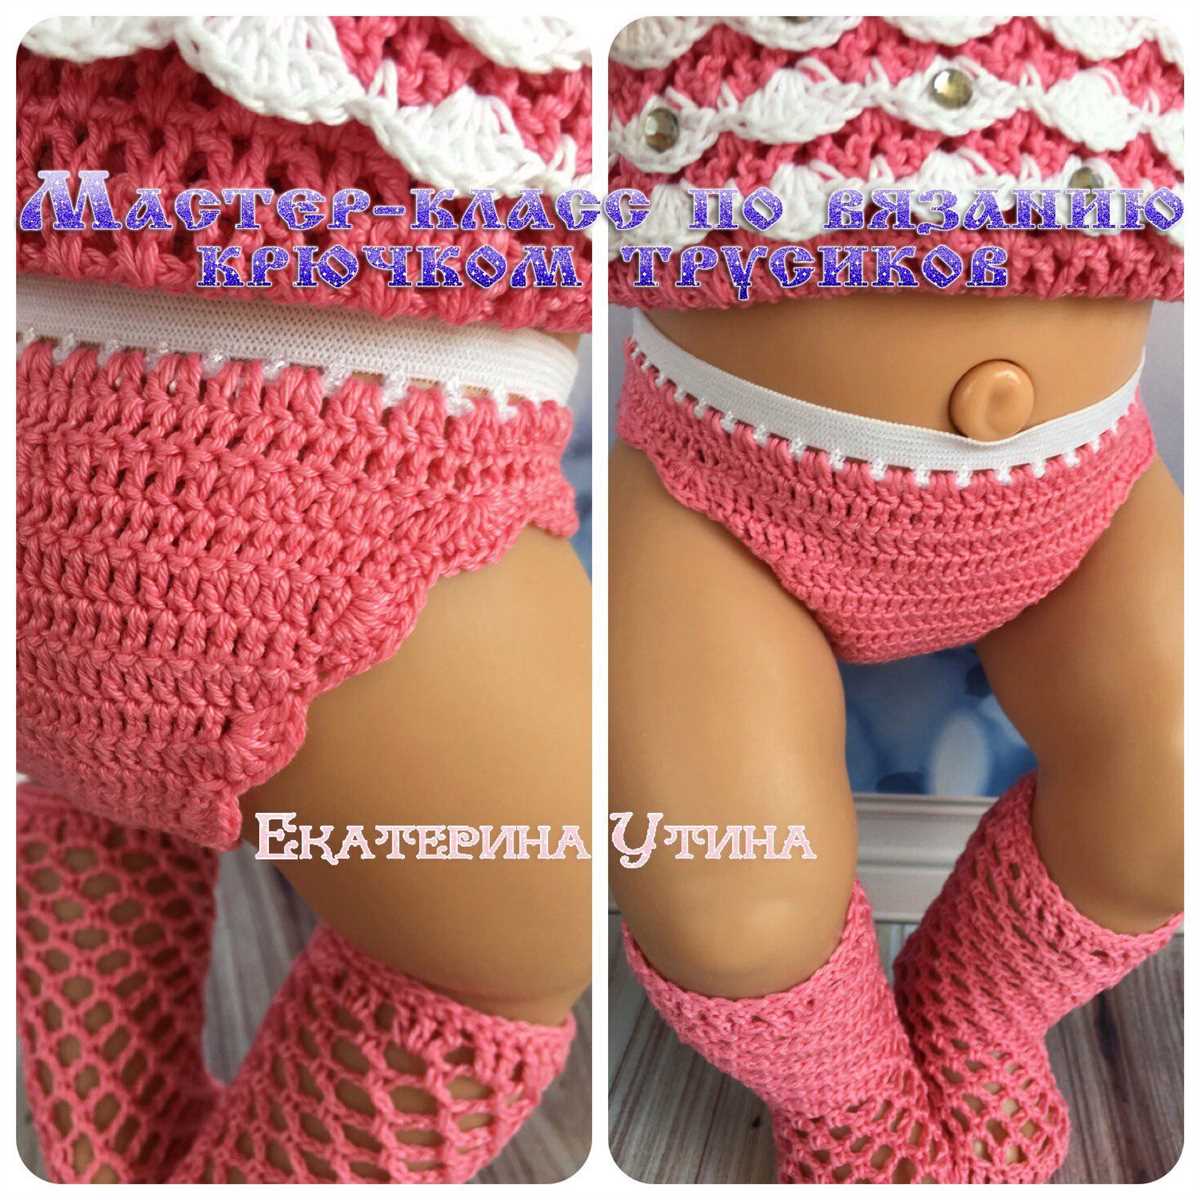
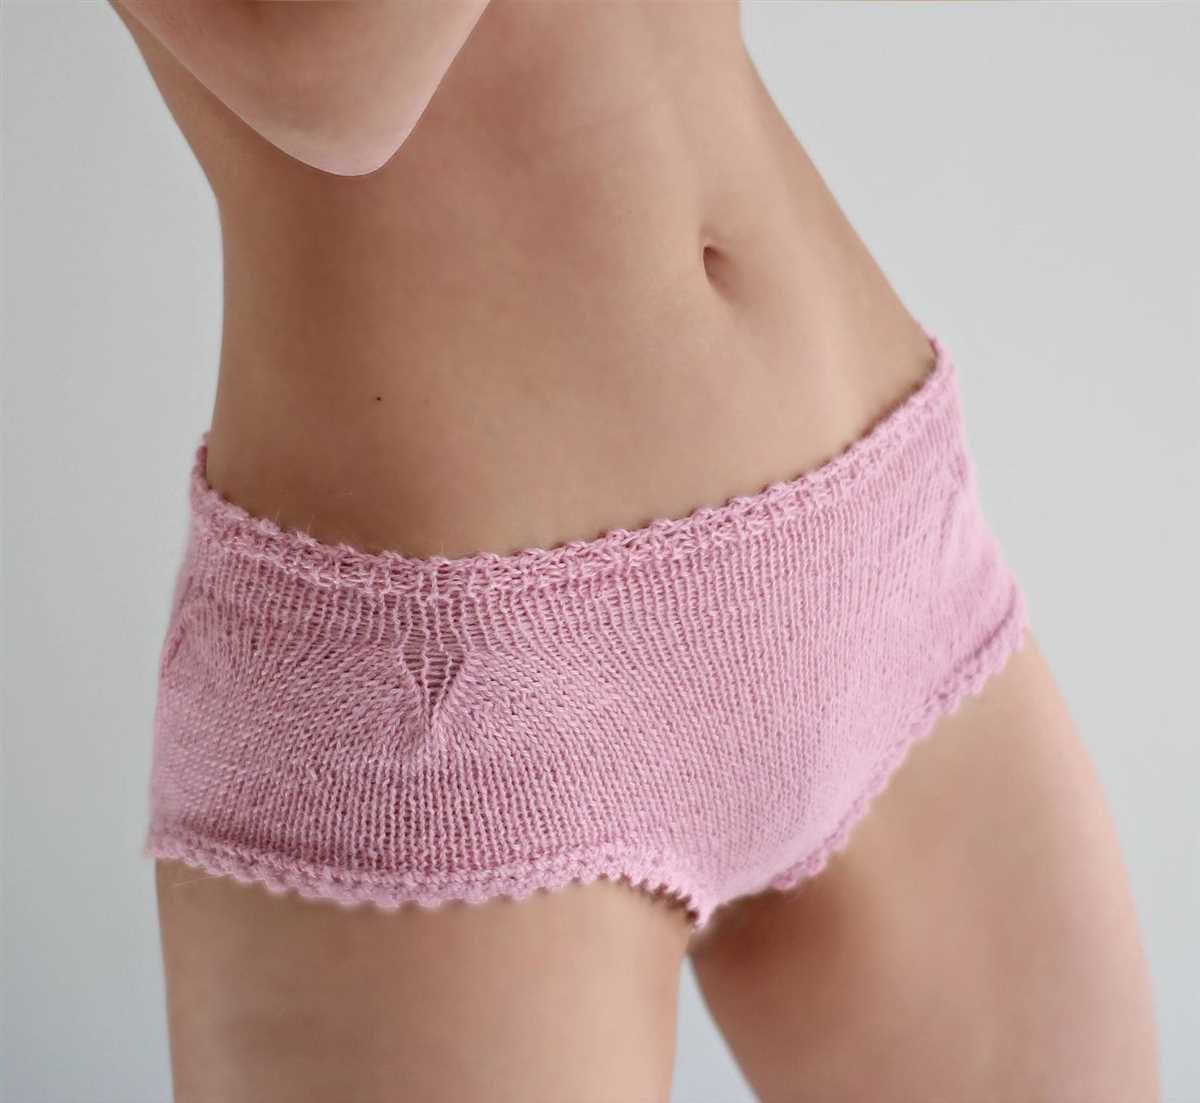
Knitting is not just for sweaters and scarves anymore. The craft has evolved and expanded to include all kinds of garments, even underwear. Knitted panties are comfortable, breathable, and stylish, making them a popular choice for many knitters. Whether you’re looking for a new project to challenge your knitting skills or you simply want to add a touch of handmade luxury to your wardrobe, this knitted panties pattern is perfect for you.
This pattern is designed for intermediate knitters who are comfortable with basic stitches and techniques, such as knitting in the round and increasing and decreasing stitches. The panties are worked from the top down and feature a ribbed waistband for a comfortable fit. The crotch is worked in a contrasting stitch pattern, adding both visual interest and functional reinforcement.
To complete this pattern, you will need a set of double-pointed needles or a circular needle in the appropriate size, and yarn of your choice. You can use a lightweight, breathable yarn such as cotton or bamboo for maximum comfort. The pattern provides instructions for multiple sizes, so you can easily customize the fit to suit your needs.
Why Knit Panties?
Knitting panties may seem like an unconventional choice, but there are actually several reasons why people choose to knit their own underwear.
Comfort and Fit

One of the main reasons for knitting panties is the comfort and fit they provide. By knitting your own panties, you have full control over the materials used and the size of the garment. This allows you to create underwear that is tailored to your specific body shape and preferences. You can choose soft, breathable yarns that feel comfortable against the skin and knit them to fit perfectly. This ensures that your panties fit well and do not ride up or cause discomfort throughout the day.
Personalization and Style
Knitting your own panties also offers the opportunity to personalize and add a unique touch to your lingerie collection. You can experiment with different patterns, colors, and designs to create panties that reflect your style and personality. Whether you prefer classic and elegant designs or bold and colorful patterns, knitting allows you to express yourself through your underwear.
Sustainability and Eco-Friendly

Making your own panties through knitting promotes sustainability and reduces waste. By using yarn from sustainable sources and reusing materials, you can create lingerie that aligns with your values regarding environmental consciousness. Additionally, knitting allows for easy repairs and alterations, prolonging the lifespan of the panties and reducing the need for new purchases.
Therapeutic and Mindful Activity
Knitting is known to have therapeutic benefits, providing a sense of relaxation and mindfulness. Knitting panties can serve as a creative outlet and a way to unwind and reduce stress. The repetitive movements and focus required in knitting can have a calming effect on the mind and body.
In conclusion, knitting panties offers comfort, personalization, sustainability, and therapeutic benefits. It allows for a custom fit, creative expression, and a sense of mindfulness. If you enjoy knitting and want to explore a new project, knitting panties could be a unique and rewarding endeavor.
Materials needed
To knit your own pair of panties, you will need the following materials:
- Knitting Needles: A set of US size 4 (3.5mm) double-pointed needles or a circular needle long enough for the magic loop method.
- Yarn: Approximately 200-250 yards of sport weight or light worsted weight yarn. Choose a soft, breathable yarn that is suitable for underwear.
- Tape Measure: A flexible tape measure or ruler to take measurements accurately.
- Tapestry Needle: A large-eyed needle for sewing in the ends of the yarn.
- Elastic: Some thin elastic to create a comfortable waistband. Choose elastic that is soft and stretchy but still holds its shape.
- Sewing Needle and Thread: A needle and thread that matches the color of your elastic.
- Stitch Markers: These can be optional but useful for keeping track of your stitches.
- Scissors: A pair of scissors for cutting the yarn and elastic.
Make sure to gather all of these materials before you start knitting your panties. Having everything prepared will make the process smoother and more enjoyable.
Measuring and sizing
When it comes to knitting your own panties, getting the right measurements is crucial to ensure a perfect fit. Whether you are knitting for yourself or someone else, taking accurate measurements is the first step in creating a comfortable and well-fitting garment.
Start by measuring the waist and hips using a flexible measuring tape. Wrap the tape around the narrowest part of the waist, usually located just above the belly button. For the hips, measure around the widest part of the buttocks. Make sure the tape is snug but not too tight, as this will affect the accuracy of the measurement.
Next, measure the desired height of the panties. This measurement will determine how high the panties sit on the waist. It’s important to consider personal preference and comfort when determining the height. Some people prefer low-rise panties that sit below the belly button, while others prefer high-rise panties that provide more coverage.
Once you have all the necessary measurements, refer to the sizing chart provided in the pattern. Compare your measurements to the chart to determine the appropriate size to knit. Keep in mind that knitting garments with negative ease, where the finished measurements are smaller than the body measurements, is common for stretchy items like panties. This allows for a snug fit that will stay in place during wear.
Remember, every body is unique, and customizing the pattern to fit your specific measurements will ensure a comfortable and flattering result. Don’t be afraid to make adjustments as needed, such as adding or subtracting stitches or rows, to achieve the perfect fit.
Choosing the right yarn
When it comes to knitting panties, choosing the right yarn is essential to ensure comfort, fit, and durability. The type of yarn you select will greatly impact the final product, so it’s important to consider a few factors before making a decision.
Fiber content: Look for yarns made from natural fibers like cotton, bamboo, or silk. These materials are breathable, soft, and hypoallergenic, making them ideal for intimate garments. Avoid synthetic fibers like acrylic or nylon, as they can cause irritation and discomfort.
Yarn weight: The weight of the yarn refers to its thickness. For knitted panties, a lightweight or fingering yarn is typically preferred as it creates a delicate and stretchy fabric. Bulky or chunky yarns may result in a thicker and less flexible garment.
Elasticity: Pay attention to the elasticity of the yarn. Knitted panties should have some stretch to ensure a snug and comfortable fit. Look for yarns with a good amount of elasticity or blends that include spandex or elastic fibers.
Color and dye: Consider the color and dye of the yarn. Opt for colorfast yarns that won’t bleed or fade when washed. It’s also important to choose colors that won’t show through clothing, especially if you plan on wearing the panties under light-colored garments.
Care instructions: Finally, check the care instructions for the yarn. Knitted panties will need to be washed frequently, so choose a yarn that is machine washable and durable. Avoid delicate or hand-wash only yarns that may not hold up well to regular wear and washing.
By taking these factors into consideration, you can select the perfect yarn for your knitted panties project, ensuring a comfortable and long-lasting garment.
Basic knitting stitches
Knitting is a craft that is enjoyed by many people around the world. Whether you are a beginner or an experienced knitter, it’s important to have a good understanding of the basic knitting stitches. These stitches form the foundation of any knitting project and knowing how to knit them correctly will ensure that your finished piece looks neat and professional.
Garter stitch: One of the most basic knitting stitches is the garter stitch. This stitch is created by knitting every row, resulting in a texture that is bumpy on both sides of the fabric. It is often used for scarves, blankets, and other items where you want a simple, textured look.
Stockinette stitch: The stockinette stitch is another essential knitting stitch. To create this stitch, you alternate between knitting one row and purling the next row. The front side of the fabric will have a smooth, “V” pattern, while the back side will have a bumpy texture. Stockinette stitch is commonly used for sweaters, hats, and other garments where you want a smooth, uniform look.
Seed stitch: The seed stitch is a variation of the garter stitch and creates a textured, grainy fabric. To knit the seed stitch, you alternate between knitting one stitch and purling the next stitch in the same row, and then switch the order in the next row. This stitch is often used for borders, edgings, and panels in knitting projects.
Ribbing: Ribbing is a common technique used to create stretchy, flexible fabrics, often seen in cuffs, collars, and waistbands. To create ribbing, you alternate between knitting and purling stitches in the same row, usually in a pattern of knit 2, purl 2 or knit 1, purl 1. This creates a ribbed effect that has a lot of elasticity.
Cable stitch: The cable stitch is a more advanced knitting technique that creates twisted, interlocking patterns. It involves crossing stitches over each other to create the appearance of cables. Cable stitches can add intricate, decorative details to your knitting projects, such as on sweaters, scarves, and blankets.
These are just a few examples of the basic knitting stitches that every knitter should know. By mastering these stitches, you’ll be able to create a variety of beautiful and functional knitted items.
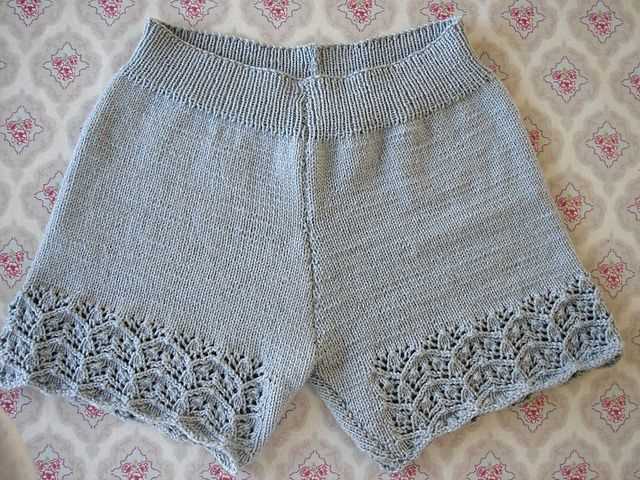
Knitting the waistband
When it comes to knitting the waistband of your knitted panties, there are a few different options to consider. The waistband is an important component of any garment, as it helps provide structure and support, as well as ensuring a comfortable fit.
One option for knitting the waistband is to use a ribbing stitch. Ribbing is a common technique that creates a stretchy, textured fabric. To create a ribbed waistband, you can alternate between knit and purl stitches to create vertical columns of raised and recessed stitches. This not only adds visual interest to the waistband but also allows it to stretch and fit snugly around the wearer’s waist.
Another option is to use an elastic waistband:
If you prefer a waistband with more elasticity and stretch, you can incorporate an elastic band into your knitted panties. This can be done by knitting a casing for the elastic band into the waistband. You’ll first need to measure the elastic to ensure it fits comfortably around the waist. Then, you can knit a few rows of ribbing or a simple stockinette stitch to create the top portion of the waistband. Fold this portion over to create a casing, leaving an opening through which you can insert the elastic. Once the elastic is inserted, you can sew the opening closed to secure it in place.
Finally, you could opt for a drawstring waistband:
For a more adjustable waistband, you might consider adding a drawstring to your knitted panties. This can be achieved by incorporating eyelets or buttonholes into the waistband during the knitting process. Once the main body of the panties is complete, you can thread a cord or ribbon through the eyelets or buttonholes to create a cinchable waistband. This allows the wearer to tighten or loosen the waistband as desired, providing a customizable fit.
The choice of waistband style ultimately depends on the wearer’s preferences and the intended use of the knitted panties. Whether you opt for a ribbed waistband, an elastic waistband, or a drawstring waistband, the important thing is to ensure a comfortable and secure fit for a confident wearing experience.
Creating the body of the panties
When creating knitted panties, it is important to start with the body. The body of the panties is essentially the main part of the garment that covers the hips and extends around the back. It is typically made up of a combination of knit and purl stitches to create a comfortable and stretchy fabric.
To begin, you will need to cast on the required number of stitches for the size of panties you are making. This can be determined based on your own measurements or by following a pattern. Once you have cast on the stitches, you can start working the body of the panties in your chosen stitch pattern.
One popular stitch pattern for knitted panties is the rib stitch. This stitch creates a stretchy fabric that conforms to the body and is comfortable to wear. To work the rib stitch, alternate between knitting and purling stitches across each row. This will create a ribbed effect that stretches and moves with the body.
Another option for the body of the panties is the stockinette stitch. This stitch creates a smooth and uniform fabric that is perfect for creating a sleek and seamless look. To work the stockinette stitch, knit one row, then purl one row, repeating these two rows until you have reached the desired length for the body of the panties.
Once you have completed the body of the panties, you can move on to shaping the leg openings and adding any desired embellishments or details. But the body is the foundation of the panties and it is important to create a fabric that is comfortable, stretchy, and fits well on the body.
Shaping the leg holes
When knitting panties, one of the most important steps is shaping the leg holes. This determines the fit and comfort of the finished garment. There are different techniques and patterns to achieve this, but one commonly used method is creating gradual decreases.
To start shaping the leg holes, you can knit a few rows in the main stitch pattern. Then, you can begin decreasing stitches on each side of the work. This can be done by knitting or purling two stitches together, or by using other decrease techniques, depending on the pattern you are following.
It’s important to maintain the stitch pattern as you decrease, so pay attention to the instructions provided in the pattern. For example, if you are working in a ribbing pattern, you may need to decrease in a way that doesn’t disrupt the ribbing sequence.
As you continue knitting, you will gradually decrease the number of stitches on each side of the leg holes. This creates a curved edge that fits snugly around the legs. It’s important to try the panties on as you go to ensure the correct fit. You can also refer to the measurements provided in the pattern to guide your shaping.
Once you have shaped the leg holes to your desired measurements, you can continue knitting the rest of the panties according to the pattern instructions. This may involve knitting straight for a certain number of rows or transitioning into a different stitch pattern for the body of the panties.
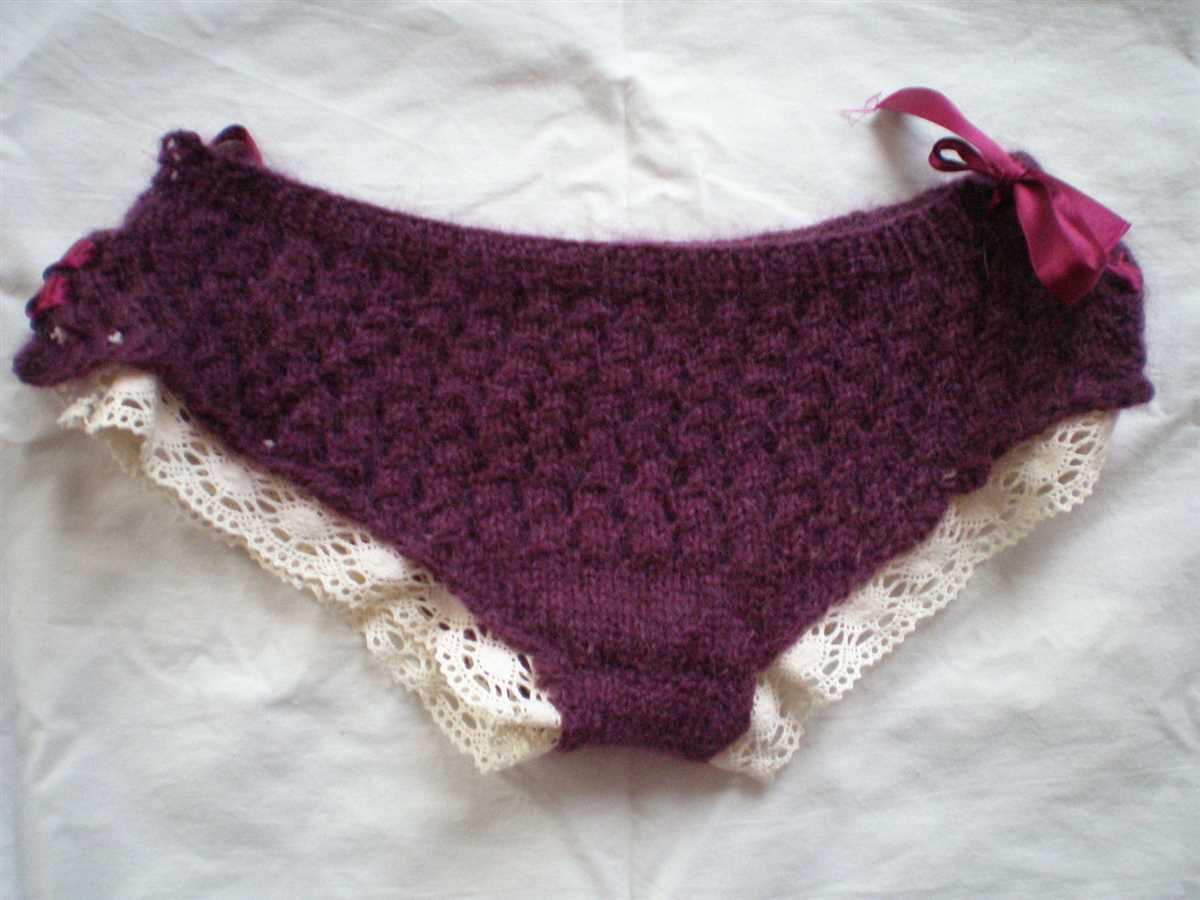
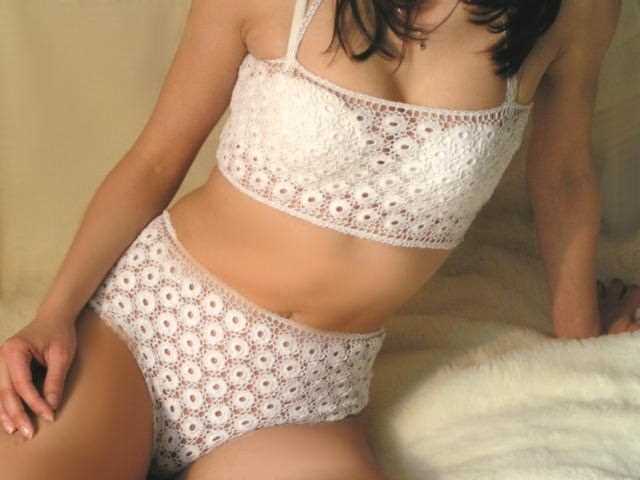
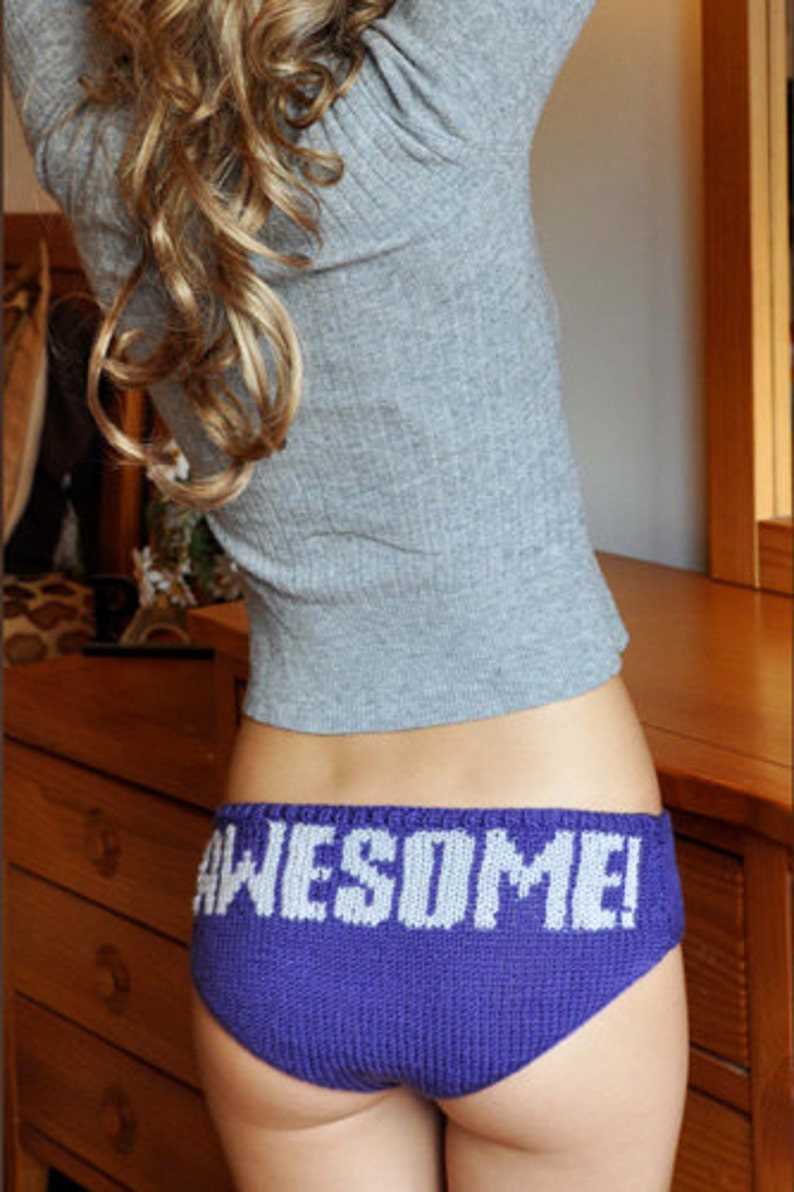
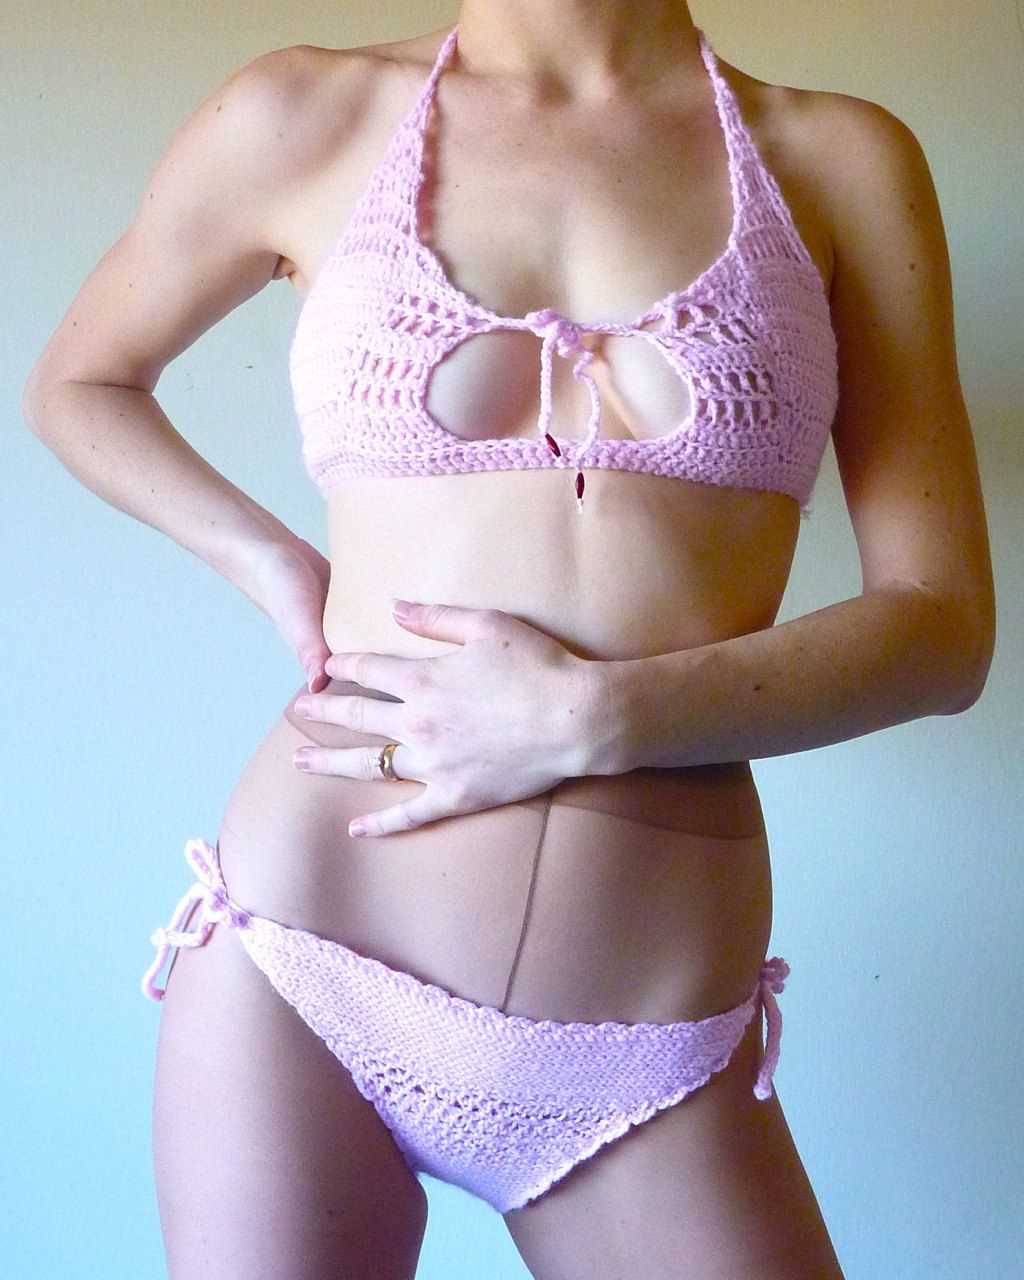
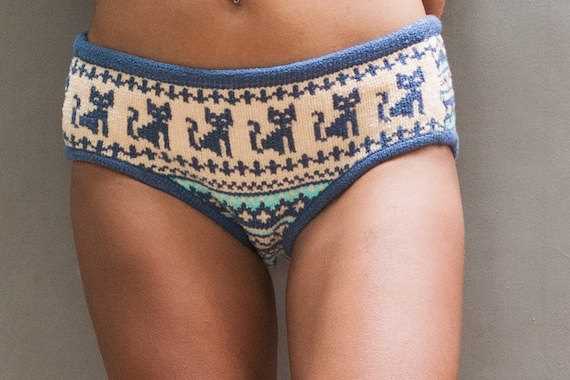
Adding decorative details
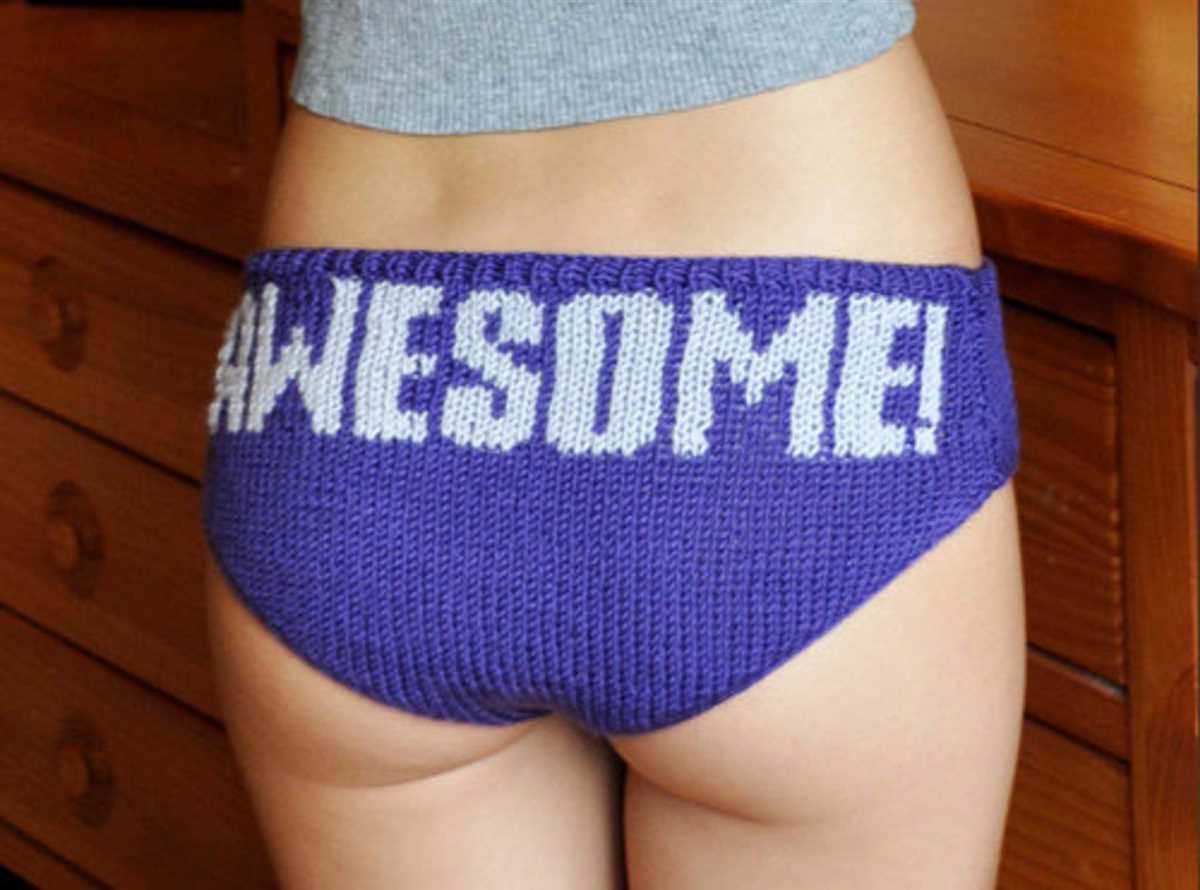
When it comes to knitted panties, adding decorative details can really elevate the design and make them stand out. From delicate lace to intricate patterns, there are plenty of options to choose from.
Lace trim: One of the most popular ways to add a decorative touch to knitted panties is by using lace trim. This can be sewn onto the edges of the panties, creating a feminine and delicate look. Lace trim comes in a variety of styles and widths, allowing you to customize the design to suit your preferences.
Intarsia patterns: If you’re feeling adventurous, you can incorporate intarsia knitting to create unique and eye-catching patterns on your knitted panties. This technique involves using different colored yarns to create a design or image within the fabric. Whether it’s geometric shapes or floral motifs, intarsia patterns can add a playful and artistic element to your underwear.
- Embroidery: Another way to add decorative details to knitted panties is through embroidery. You can use colorful threads to embellish the fabric with intricate stitches, creating beautiful and personalized designs. From simple floral motifs to more complex patterns, embroidery can add a touch of elegance to your underwear.
- Appliques: Appliques are fabric cutouts that are sewn or glued onto the surface of knitted panties. They can be made from a variety of materials, such as lace, sequins, or fabric, and can be shaped into flowers, butterflies, or any other design you desire. Appliques are a great way to add texture and dimension to your underwear.
In conclusion, adding decorative details to knitted panties allows you to personalize and elevate their design. Whether you choose lace trim, intarsia patterns, embroidery, or appliques, these decorative elements can add a touch of elegance, playfulness, or uniqueness to your underwear. So get creative and experiment with different techniques to create your own stunning knitted panties.
Finishing Touches
When it comes to finishing touches on your knitted panties, there are a few key steps to follow to ensure a polished and professional result.
1. Blocking:
Before adding any final details, it’s important to block your knitted panties. This involves gently wetting the fabric and then stretching it to shape while it dries. Blocking helps to even out any uneven stitches and gives your panties a smooth and professional finish.
2. Seam Sewing:
Next, you’ll need to sew the seams of your knitted panties together. This can be done using a tapestry needle and matching yarn. Start by pinning the seams together and then use a whip stitch or mattress stitch to sew them up. Be sure to sew with even tension to create a neat and sturdy seam.
3. Edgings:
Adding a decorative edging to your knitted panties can elevate their appearance and give them a finished look. You can use techniques such as a picot edge, ribbing, or lace to create a beautiful and delicate trim. Experiment with different edging options to find the one that suits your personal style.
4. Elastic Waistband:
To ensure a comfortable fit, you may want to add an elastic waistband to your knitted panties. Measure the desired length of elastic and sew it onto the waistband using a zigzag stitch. This will help the panties stay in place and provide extra support.
By following these finishing touches, you can take your knitted panties to the next level and create a beautiful and functional garment. Remember to take your time and pay attention to the small details, as they can make a big difference in the final result.
Care and Maintenance
Proper care and maintenance of your knitted panties will help ensure their longevity and keep them looking their best. Follow these guidelines to keep your knitted panties in great condition:
Hand Wash
It is recommended to hand wash your knitted panties to avoid any damage caused by machine agitation. Fill a basin or sink with cool water and add a small amount of mild detergent specifically designed for delicate fabrics. Gently agitate the panties in the soapy water, being careful not to stretch or twist the fabric. Rinse thoroughly in cool water to remove all traces of detergent.
Dry Flat
After washing, gently squeeze out any excess water from the panties. Lay them flat on a clean towel or drying rack, reshaping them if necessary. Avoid hanging or wringing out the panties, as this can cause them to lose their shape. Allow them to air dry completely before wearing or storing.
Storage

When storing your knitted panties, it is best to fold them neatly and place them in a clean drawer or storage container. Avoid storing them with heavy items or items that may snag the delicate fabric. If possible, separate your knitted panties from other garments to prevent any potential damage.
Steam or Iron Carefully
If your knitted panties become wrinkled, you can gently steam them or use a low heat setting on your iron. Place a thin cloth or pressing cloth between the panties and the iron to protect the fabric. Avoid pressing too hard or leaving the iron in one spot for too long to prevent damage to the delicate fibers.
By following these care and maintenance guidelines, your knitted panties will stay in excellent condition for years to come. With proper care, you can continue to enjoy the comfort and style of your knitted underwear.
Tips and tricks
Knitting your own panties can be a fun and rewarding project. To help you get the best results, here are some tips and tricks to keep in mind:
- Choose the right yarn: Opt for a yarn that is soft, breathable, and has a good amount of stretch. Look for yarns specifically labeled for underwear or lingerie projects.
- Select a suitable needle size: Use a needle size that will give you the desired gauge and ensure a comfortable fit. It’s best to swatch and make any necessary adjustments before starting the actual project.
- Pay attention to stitch markers: Using stitch markers can help you keep track of your pattern and ensure that you’re placing your increases and decreases correctly.
- Take accurate measurements: Before starting your panties, take accurate measurements of your hips, waist, and desired rise. This will help you choose the right size and make adjustments as needed.
- Try different stitch patterns: Don’t be afraid to experiment with different stitch patterns to add variety and texture to your panties. Just make sure that the stitch pattern is suitable for the intended use.
- Consider adding elastic: If you want extra support or comfort, consider adding a thin elastic band along the leg openings or waistband. This can help prevent the edges from rolling or stretching out over time.
- Practice proper care: When it comes to washing your knitted panties, follow the care instructions for the yarn you used. Hand washing is generally recommended to prolong the life of your handmade underwear.
With these tips and tricks in mind, you’ll be well-equipped to create your own beautiful and comfortable knitted panties. Remember to have fun and enjoy the process!