
Knitting is a popular and rewarding hobby that allows you to create beautiful and functional pieces of clothing for yourself and your loved ones. One versatile garment that you can create with your knitting skills is a wrap with sleeves. This type of wrap is perfect for cooler days when you want to stay warm and cozy, but still want the freedom to move your arms.
The knitting pattern for a wrap with sleeves is relatively simple and can be tailored to your own preferences. You can choose the yarn, color, and stitch pattern that you like, as well as customize the length and width of the wrap to fit your body shape. Whether you’re a beginner knitter or have years of experience, this project is a great way to practice your skills and create a unique and stylish garment.
A wrap with sleeves is a versatile addition to your wardrobe. It can be worn casually over a pair of jeans and a t-shirt, or dressed up with a dress or skirt for a more formal occasion. The sleeves provide extra warmth, while the open front allows for easy layering and adjustments. You can also experiment with different closure options, such as buttons or a belt, to add a personal touch to your wrap.
Why choose a knitting pattern wrap with sleeves?
A knitting pattern wrap with sleeves is a versatile and practical garment that offers several benefits for the wearer. With its unique design, it combines the comfort and warmth of a traditional wrap with the added functionality of sleeves, making it an excellent choice for colder weather.
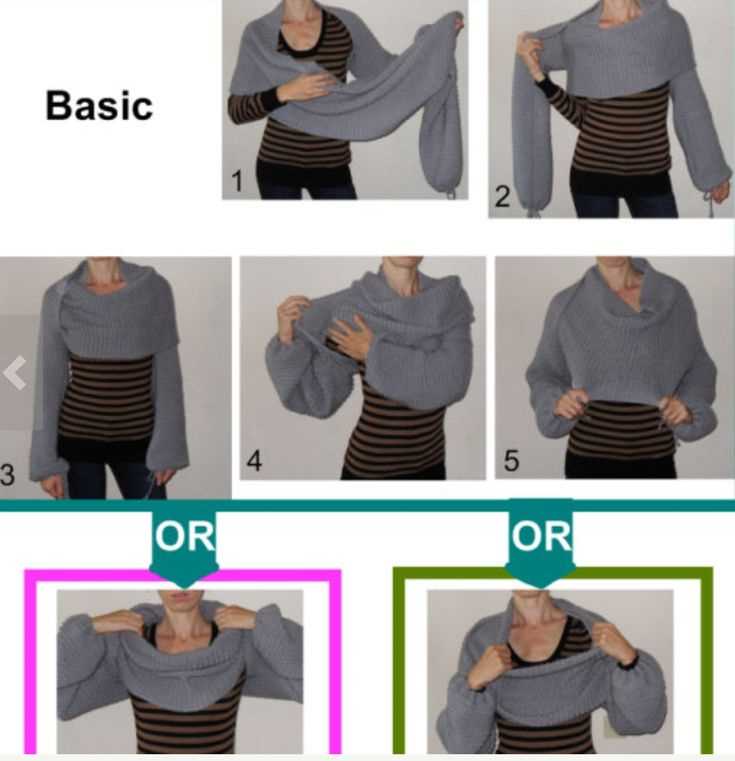
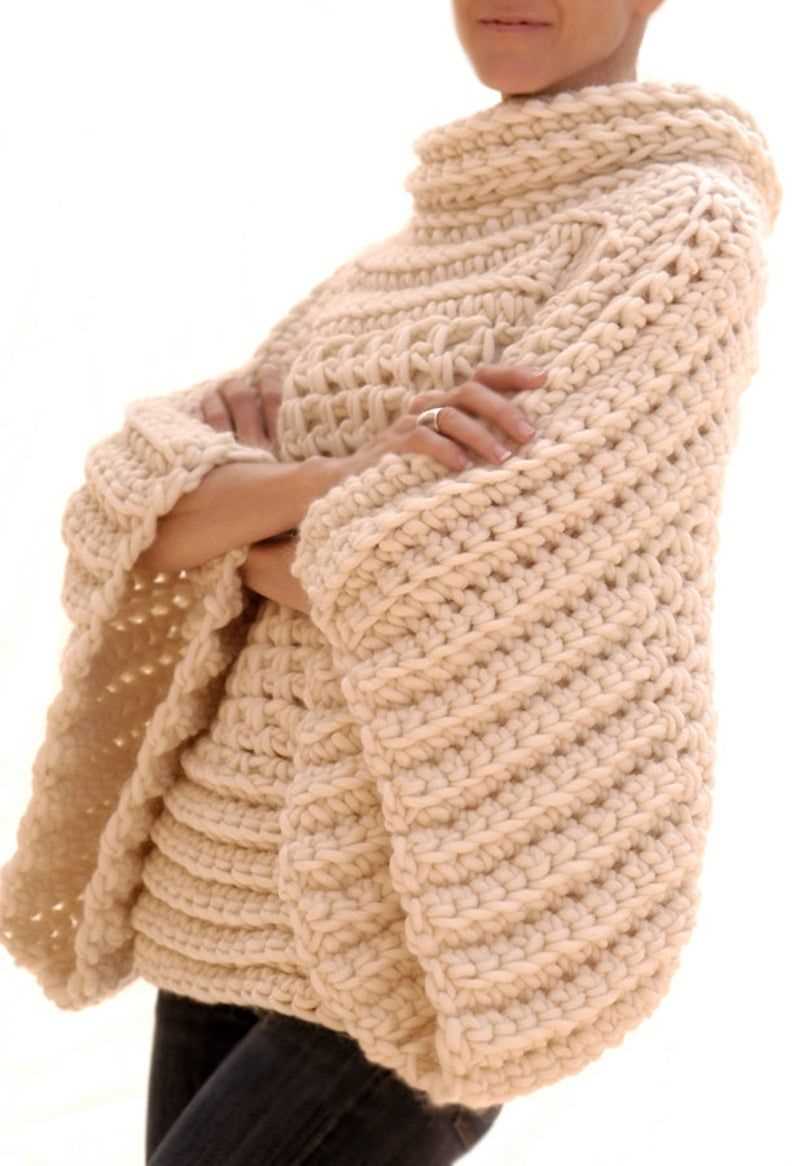
1. Versatility: Knitting pattern wraps with sleeves can be worn in various ways, allowing for multiple style options. They can be worn wrapped around the body like a shawl, or the sleeves can be pulled up for a more fitted look. The versatility of this garment makes it suitable for both casual and formal occasions.
2. Comfort: The soft and cozy nature of knitted fabric makes a knitting pattern wrap with sleeves incredibly comfortable to wear. It provides warmth and insulation, making it ideal for cooler temperatures. Additionally, the wrap design allows for easy adjustments, ensuring a comfortable fit for different body types.
3. Functionality: The addition of sleeves to a wrap design enhances its functionality. The sleeves provide extra coverage and allow for more freedom of movement, making it easier to perform daily tasks without sacrificing warmth. Whether you’re running errands or lounging at home, a knitting pattern wrap with sleeves is a practical choice.
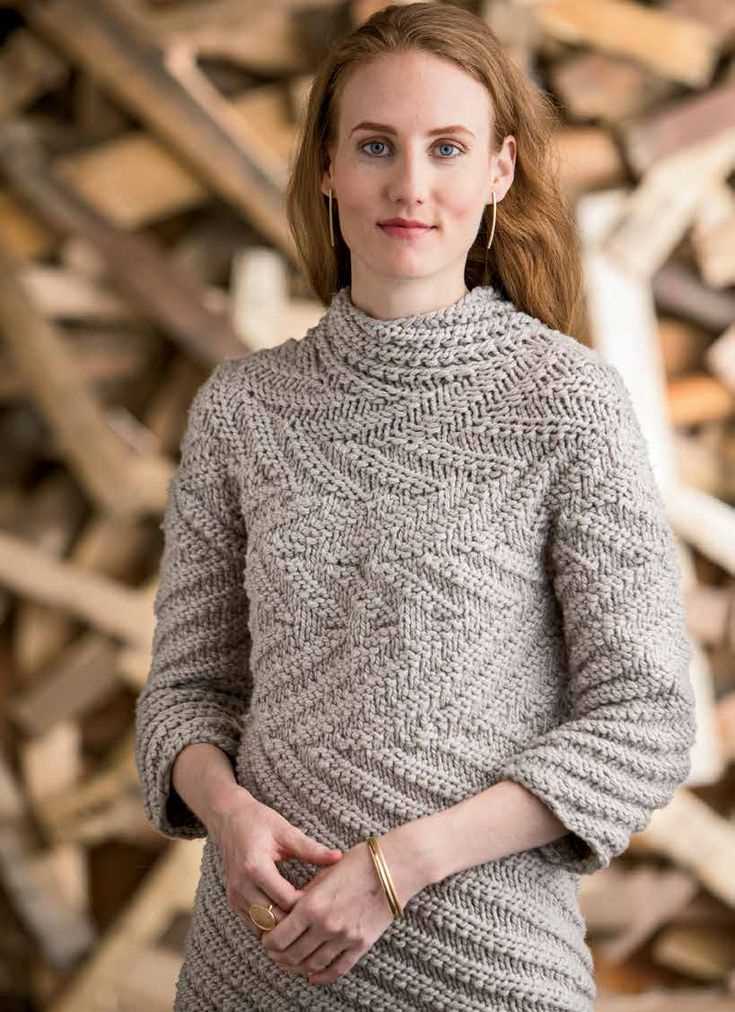
4. Style: Knitting pattern wraps with sleeves come in a variety of designs, patterns, and colors, allowing you to express your personal style. From neutral tones to vibrant hues, there is a wrap to suit every taste. The intricate knitting patterns add a touch of elegance and sophistication to any outfit.
Overall, a knitting pattern wrap with sleeves is a fashionable and functional garment that offers versatility, comfort, and style. Whether you’re a seasoned knitter or new to the craft, creating your own wrap with sleeves using a knitting pattern can be a rewarding and enjoyable project.
Materials and Tools Needed for the Knitting Pattern Wrap with Sleeves
In order to begin knitting the pattern for the wrap with sleeves, you will need to gather the necessary materials and tools. Here is a list of what you will need:
Materials
- Yarn: Choose a soft, medium-weight yarn in the color of your choice. Make sure to select enough yarn to complete the project.
- Knitting Needles: You will need a pair of knitting needles in the appropriate size for your chosen yarn. Check the yarn label or pattern instructions for the recommended needle size.
- Stitch Markers: These will be used to mark important points in the pattern, such as the beginning and end of the rows or specific stitch patterns.
Tools
- Tapestry Needle: This needle will be used for weaving in loose ends and finishing touches.
- Scissors: You will need a sharp pair of scissors to cut the yarn.
- Measuring Tape: This will be helpful for checking gauge and measuring your progress as you knit.
- Row Counter: This tool will help you keep track of the number of rows you have completed in the pattern.
With these materials and tools at hand, you will be ready to start knitting the pattern for the wrap with sleeves. Make sure to read through the pattern instructions before beginning and familiarize yourself with any special techniques or stitches required. Happy knitting!
Getting started with the knitting pattern wrap with sleeves
Knitting a wrap with sleeves can be an exciting and rewarding project for knitters of all skill levels. Whether you are a beginner looking for a simple, yet stylish project, or an experienced knitter looking for a new challenge, this knitting pattern will provide you with everything you need to create a beautiful and functional wrap.
Materials: To get started, you will need the following materials:
- Knitting needles
- Yarn
- Tape measure
- Scissors
- Yarn needle
Pattern: The knitting pattern for the wrap with sleeves is as follows:
| Size | Yarn | Needles |
|---|---|---|
| Small | 3 skeins of worsted weight yarn | US size 8 (5mm) |
| Medium | 4 skeins of worsted weight yarn | US size 10 (6mm) |
| Large | 5 skeins of worsted weight yarn | US size 11 (8mm) |
Instructions: Follow these step-by-step instructions to create your wrap with sleeves:
- Cast on the required number of stitches according to the size you are making.
- Work in the specified stitch pattern for the desired length.
- Shape the sleeves by binding off a certain number of stitches on each side, and continue working on the remaining stitches for the body of the wrap.
- When the desired length is reached, bind off all stitches and weave in any loose ends.
- Seam the sleeves and sides of the wrap together using a yarn needle.
Once you have completed these steps, you will have a beautiful wrap with sleeves that can be worn in various ways. Whether you choose to wear it as a cardigan, a shawl, or a wrap, this versatile garment will keep you warm and stylish.
Step-by-step instructions for knitting the body of the wrap
Knitting the body of the wrap is the main part of the project, where you will create the fabric that forms the wrap and sleeves. Follow these step-by-step instructions to successfully complete this section of the knitting pattern:
1. Cast on stitches

Start by casting on the required number of stitches onto your knitting needles. This will determine the width of the wrap. Make sure to follow the specific instructions provided in the pattern for the recommended yarn and needle size.
2. Work the stitch pattern
Once you have cast on the stitches, it’s time to work the stitch pattern for the body of the wrap. This could be a simple stockinette stitch, a rib pattern, or any other stitch pattern mentioned in the pattern instructions. Repeat the stitch pattern across each row until you achieve the desired length for the wrap.
3. Create the sleeve openings
As you continue knitting the body of the wrap, you’ll reach a point where you need to create the openings for the sleeves. This is usually done by binding off a certain number of stitches in the middle of the row, and then continuing to work each side of the wrap separately.
4. Shape the wrap
After creating the sleeve openings, you may need to shape the wrap by decreasing or increasing stitches. This is typically done at the beginning and end of rows, and it’s important to carefully follow the instructions in the pattern to ensure the wrap fits correctly.
5. Continue knitting the body
Once the sleeve openings are complete and any shaping has been done, you can continue knitting the body of the wrap until you reach the desired length. Make sure to periodically check your work against the measurements provided in the pattern to ensure it matches the intended size.
By following these step-by-step instructions, you will be able to successfully knit the body of the wrap and continue on to the next steps of the pattern.
Adding sleeves to the knitting pattern wrap
If you want to transform your knitting pattern wrap into a more versatile and cozy garment, adding sleeves is a great option. By incorporating sleeves, you can easily convert the wrap into a cardigan-style piece that can be worn in various weather conditions.
To begin, you will need to modify the original pattern slightly to accommodate the sleeves. Start by measuring your arm circumference and length from the shoulder to the wrist. This will help you determine the appropriate number of stitches and rows needed for the sleeves.
Once you have your measurements, cast on the required number of stitches for the sleeves using the same yarn and needle size as the wrap. It is essential to maintain the same gauge to ensure a consistent look and fit. To ensure a proper fit, you may want to consider adding a few extra stitches around the shoulder area for ease of movement.
As you work on the sleeves, you can either follow a basic stockinette stitch or incorporate a pattern stitch that complements the wrap’s design. Be sure to keep track of your rows, as you’ll need to match the length of the wrap’s body to create a seamless transition between the two parts.
Once you’ve completed the desired length for the sleeves, you can either bind them off and seam them to the wrap using a mattress stitch or opt for a more seamless approach by knitting the sleeves directly onto the wrap. Either method will provide you with a finished result that combines the style and warmth of a cardigan with the versatility of a wrap.
Remember to block your completed garment to ensure that the sleeves and the wrap maintain their shape and drape properly. This step is crucial, especially if you’ve used different stitch patterns for the wrap and sleeves, as it will help even out any tension and give your project a polished look.
Whether you choose to add short sleeves for a lightweight layer or cozy long sleeves for extra warmth, the addition of sleeves to your knitting pattern wrap will undoubtedly enhance its functionality and make it a go-to piece in your wardrobe for any season.
Creating the collar for the knitting pattern wrap with sleeves
The collar is an important feature of the knitting pattern wrap with sleeves, as it adds a touch of elegance and warmth to the garment. To create the collar, you will need to follow a few simple steps.
First, you will need to pick up stitches along the edge of the front of the wrap. This is done by inserting the needle into the stitch closest to the edge, wrapping the yarn around the needle, and pulling it through to create a new stitch. Repeat this process along the entire edge, making sure to space the stitches evenly.
Once you have picked up all the stitches, you can begin working the collar. To do this, you will need to use a combination of knitting and purling stitches. You can choose a simple rib stitch pattern, such as knit two, purl two, or get more creative with a lace or cable pattern.
After you have worked the desired length for the collar, you can bind off the stitches. This is done by knitting two stitches, then passing the first stitch over the second stitch and off the needle. Repeat this process until all the stitches have been bound off, and then cut the yarn, leaving a long tail for weaving in.
Finally, you can weave in any loose ends and block the collar to give it a neat and polished look. Blocking can be done by wetting the collar, gently stretching it to the desired shape, and then allowing it to dry flat. This will help to even out any uneven stitches and give the collar a professional finish.
Finishing touches for a polished look
When completing a knitting pattern wrap with sleeves, it’s important to pay attention to the finishing touches in order to achieve a polished and professional look. These small details can make a big difference in the final outcome of your project. Here are some tips on how to add those finishing touches:
1. Blocking
Before adding any final touches, it’s important to block your knitted wrap to ensure it maintains its shape and drapes well when worn. Blocking involves wetting your knitting and laying it flat to dry, allowing the fibers to relax and settle into their intended shape. This will give your wrap a professional finish and help to smooth out any uneven stitches.
2. Seam finishing
To create a neat and tidy look, take the time to properly finish the seams of your wrap. This can be done using a variety of techniques, such as mattress stitch or slip stitch crochet. Choose a seam finishing method that complements your pattern and yarn, and ensures that the seams are strong and secure.
3. Edging and trim
Add a touch of elegance to your wrap by adding edging or trim along the edges or sleeves. This can be in the form of a crochet border, picot edge, or even decorative buttons. The choice of edging or trim will depend on your personal taste and the overall style of your wrap, but it’s a great way to elevate the look and give it a polished finish.
4. Finishing details
Pay attention to any final details that can enhance the overall appearance of your wrap. This could include weaving in any loose ends, adding decorative stitch patterns, or incorporating small embellishments such as beads or embroidery. These finishing touches will add uniqueness and character to your wrap, making it truly one-of-a-kind.
By focusing on these finishing touches, you can elevate your knitting pattern wrap with sleeves to a whole new level of professionalism and style. Take the time to execute each step with care and precision, and you’ll be rewarded with a truly polished and beautiful finished product.
Sizing options and customization tips
When knitting a wrap with sleeves, it is important to consider the sizing options available and how to customize the garment to fit your body perfectly. With a few simple tips and tricks, you can create a wrap that is both comfortable and flattering.
1. Choosing the right size
Before starting your knitting project, it is crucial to determine the correct size for your wrap with sleeves. Most knitting patterns will provide a range of sizes to choose from, so take accurate measurements of your bust, waist, and hips to ensure a proper fit. Refer to the pattern’s sizing guide to select the size that corresponds to your measurements, keeping in mind any ease or desired fit.
2. Customizing the length
One of the great advantages of knitting is the ability to customize the length of your garments. If you prefer a longer or shorter wrap with sleeves, simply adjust the pattern accordingly. To make it longer, repeat the pattern rows or add extra rows before starting the sleeves. To make it shorter, knit fewer pattern rows or skip some rows before starting the sleeves. Remember to adjust the shaping of the sleeves if needed to maintain the proportions of the wrap.
3. Adding or modifying details
Another way to customize your wrap with sleeves is by adding or modifying details. You can experiment with different stitch patterns, incorporate cables or lace designs, or add decorative elements like buttons, ribbons, or pockets. These personalized touches can make your wrap truly unique and showcase your knitting skills.
- There are several resources available online and in knitting books that can provide guidance on how to modify knitting patterns to suit your preferences.
- Don’t be afraid to get creative and make the wrap with sleeves your own!
Frequently asked questions about knitting pattern wraps with sleeves
Knitting pattern wraps with sleeves are a popular choice for those looking for a versatile and stylish garment. However, beginners and even experienced knitters may have some questions about these types of patterns. Here are some frequently asked questions to help you get started:
1. How do I choose the right yarn for my knitting pattern wrap with sleeves?
When choosing yarn for your knitting pattern wrap with sleeves, it’s important to consider the desired drape, warmth, and texture of the final product. Worsted weight or DK weight yarns are typically a good choice for wraps with sleeves, as they provide a good balance between warmth and drape. Make sure to check the yarn requirements stated in the pattern and choose a yarn that matches the recommended gauge to ensure the right fit.
2. Can I adjust the sizing of a knitting pattern wrap with sleeves?
Yes, it’s possible to adjust the sizing of a knitting pattern wrap with sleeves to accommodate your body measurements. Most knitting patterns will include instructions or guidance on how to modify the size, such as adjusting the number of stitches cast on or the length of the sleeves. However, it’s important to keep in mind that making significant size modifications may require additional calculations and adjustments to maintain the overall design and fit.
3. How do I incorporate different stitch patterns into my knitting pattern wrap with sleeves?
If you want to add some variety to your knitting pattern wrap with sleeves by incorporating different stitch patterns, it’s important to carefully read the pattern instructions and make note of any pattern repeats or changes in stitch patterns. You can then follow the specific instructions provided in the pattern or consult a stitch dictionary for different stitch pattern options. Just make sure to maintain the correct stitch counts and pattern repeats to ensure a balanced and cohesive design.
4. Can I use circular needles for knitting pattern wraps with sleeves?
Yes, you can certainly use circular needles for knitting pattern wraps with sleeves. In fact, many knitters prefer using circular needles, especially for larger projects like wraps, as they can hold more stitches comfortably. You can use the magic loop method or switch to double-pointed needles or shorter circular needles when needed for the sleeves. Just make sure to check the pattern instructions for any specific needle recommendations or adjustments for using circular needles.
5. How do I seam the sleeves of a knitting pattern wrap with sleeves?
Seaming the sleeves of a knitting pattern wrap with sleeves is typically done using a mattress stitch or a whip stitch. These techniques create a nearly invisible seam that blends seamlessly with the rest of the garment. It’s important to line up the edges of the sleeves correctly and use a matching yarn to create a neat and tidy seam. You can follow the pattern instructions for specific guidance on seaming the sleeves or consult online tutorials for step-by-step instructions on different seaming techniques.
Troubleshooting common issues when knitting the wrap with sleeves
Knitting the wrap with sleeves can be a fun and rewarding project, but sometimes you may encounter some common issues along the way. Here are a few troubleshooting tips to help you overcome these challenges:
1. Gauge problems
One of the most common issues knitters face is getting the correct gauge. If you find that your wrap is coming out too large or too small, it could be due to a gauge problem. Make sure to check your gauge before starting the project and adjust your needle size accordingly. If your gauge swatch doesn’t match the pattern’s gauge, try using larger or smaller needles to achieve the correct tension.
2. Uneven edges
Another common issue when knitting the wrap with sleeves is ending up with uneven edges. To avoid this problem, it’s important to maintain consistent tension throughout your work. Pay attention to your stitches and make sure they are all the same size. Additionally, using a stitch marker at the beginning of each row can help you keep track of your stitches and ensure straight edges.
3. Miscounted stitches
Counting stitches accurately is crucial when knitting the wrap with sleeves. It’s easy to lose track, especially when working on a large project. To avoid miscounting stitches, it’s helpful to use stitch markers or place a marker every few inches to indicate where each section begins or ends. This can make it easier to identify any mistakes and fix them before they become more challenging to correct.
4. Twisted or dropped stitches
Twisted or dropped stitches can happen to even the most experienced knitters. If you notice a twisted stitch, it’s important to fix it as soon as possible to prevent further problems. Use a crochet hook or a knitting needle to carefully pick up the dropped stitch and place it back on the needle in the correct orientation. If the stitch has been dropped several rows down, you may need to ladder up the yarn using a crochet hook.
By being aware of these common issues and having some troubleshooting techniques in your knitting arsenal, you’ll be better equipped to tackle any challenges that may arise when knitting the wrap with sleeves. Remember, practice makes perfect, so don’t get discouraged if you encounter a problem – just keep knitting!
Variations and design ideas for the knitting pattern wrap with sleeves
The knitting pattern wrap with sleeves offers a versatile design that can be customized in various ways to suit individual preferences and styles. Here are some variations and design ideas to inspire your next knitting project:
- Change the stitch pattern: Experiment with different stitch patterns to add texture and visual interest to your wrap. Try using cables, lace, or even colorwork to create unique and eye-catching designs.
- Add embellishments: Consider adding embellishments such as beads, sequins, or buttons to enhance the overall look of your wrap. These small details can elevate the design and make it truly stand out.
- Create a longer or shorter wrap: The original knitting pattern wrap with sleeves may be designed to be a certain length, but you can easily modify it to be longer or shorter based on your preferences. This allows you to customize the wrap to your desired level of coverage.
- Experiment with different yarn weights: The knitting pattern wrap with sleeves can be worked with various yarn weights to achieve different effects. Try using a bulky yarn for a cozy and warm wrap, or opt for a lighter weight yarn for a more delicate and airy feel.
By exploring these variations and design ideas, you can create a knitting pattern wrap with sleeves that is unique to you and reflects your personal style. Whether you choose to incorporate different stitch patterns, add embellishments, or modify the length and yarn weight, the possibilities are endless and allow you to truly make the design your own.
Final thoughts on the knitting pattern wrap with sleeves
Creating a knitting pattern wrap with sleeves can be a fun and rewarding project for any knitter. Not only does it provide warmth and comfort, but it also allows for creative expression and customization. Whether you are a beginner or an experienced knitter, this versatile garment can be tailored to fit your style and preferences.
With a variety of stitches and techniques to choose from, the knitting pattern wrap with sleeves offers endless possibilities for customization. You can incorporate different colors, textures, and patterns to create a unique and personalized wrap that reflects your individuality. Additionally, the wrap can be easily adjusted to fit various sizes and body types, making it a great gift option for your loved ones.
Here are a few key takeaways when working on a knitting pattern wrap with sleeves:
- Choose a knitting pattern that matches your skill level and desired style.
- Experiment with different yarns and colors to achieve the desired look and feel.
- Take accurate measurements to ensure a proper fit.
- Follow the pattern instructions carefully and take your time to avoid mistakes.
- Add your personal touch by incorporating unique stitch patterns or embellishments.
- Take breaks when needed and enjoy the process of creating something beautiful with your own hands.
In conclusion, knitting a wrap with sleeves can be a wonderful and satisfying knitting project. It allows for creativity, customization, and the creation of a practical and stylish garment. Whether you are knitting for yourself or for someone else, this versatile piece will surely be cherished and appreciated.