
Knitting is a versatile craft that allows for endless creativity and customization. One technique that can add interest and elegance to your knitting projects is the mitered corner. A mitered corner involves decreasing stitches at certain points to create a neat and diagonal corner. This technique is commonly used in various knitting projects such as blankets, scarves, and shawls, and it adds a professional and polished look to your finished item.
The mitered corner knitting pattern is relatively straightforward, making it suitable for knitters of all skill levels. To create a mitered corner, you will need to work with two or more colors or stitch patterns. The corner is formed by decreasing stitches or changing patterns diagonally, resulting in a clean and angled edge.
One of the benefits of using a mitered corner in your knitting is that it adds visual interest and texture to your project. The diagonal lines created by the decreases draw the eye and create a unique and eye-catching design element. Additionally, mitered corners can help to create a more tailored and professional finish, especially when used in garments or home décor items.
Mitered Corner Knitting Pattern
A mitered corner is a knitting technique that is used to create neat and tidy corners in knitted projects such as blankets, scarves, and shawls. It involves decreasing or increasing stitches at the corner to create a diagonal line that forms a neat angle.
To create a mitered corner, you can follow a specific knitting pattern. One common pattern is to begin by knitting a few rows or rounds in a plain stitch, such as garter stitch or stockinette stitch. Then, when you reach the corner, you will start to decrease or increase stitches to create the diagonal line.
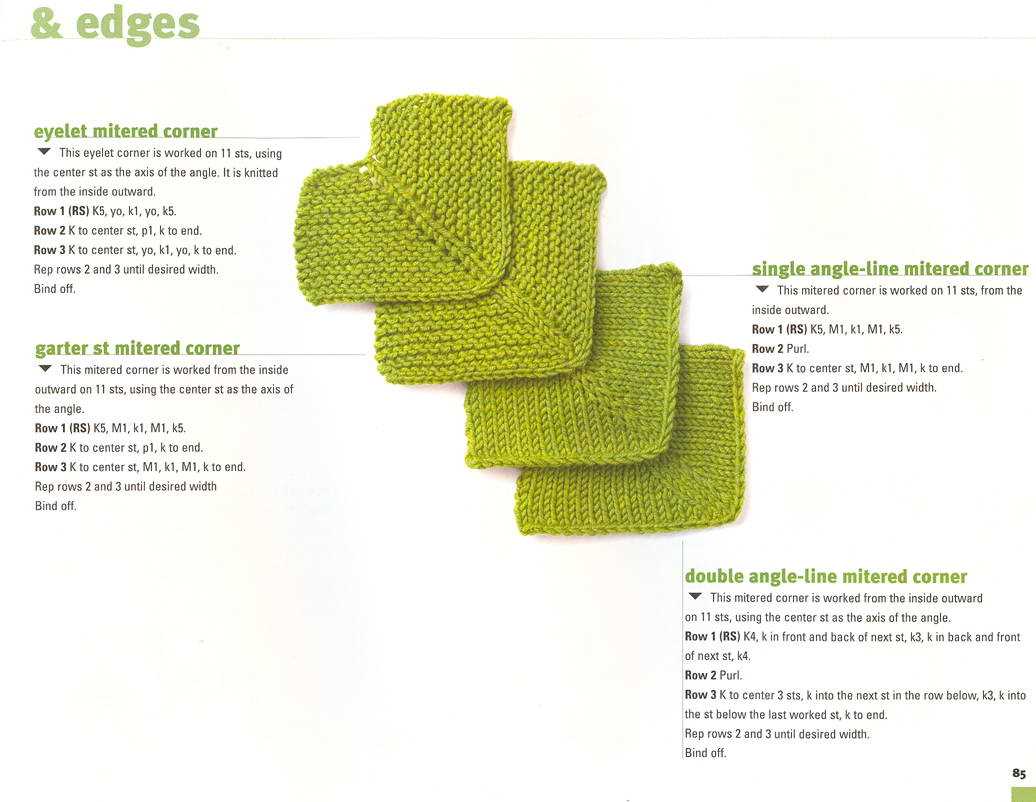
There are several ways to achieve a mitered corner. One method is to decrease or increase stitches at regular intervals along the corner. This creates a consistent diagonal line. Another method is to use a specific stitch pattern, such as a centered double decrease or a lifted increase, to create a decorative corner.
When knitting a mitered corner pattern, it is important to pay attention to your stitch count and to follow the instructions carefully. This will ensure that the corner is neat and symmetrical. As you become more experienced with mitered corners, you can experiment with different stitch patterns and techniques to create unique and beautiful corners in your knitting projects.
An Overview of Mitered Corner Knitting
In the world of knitting, mitered corners are a popular technique used to create clean and seamless edges in various projects. Whether you’re knitting blankets, shawls, or even garments, mitered corners can add a professional and polished look to your finished piece.
Mitered corners are achieved by decreasing stitches at the corner point, which creates a diagonal line that seamlessly merges with the adjacent sides. This technique is often used in square or rectangular-shaped projects where you want to avoid bulky or messy corners. It allows the fabric to maintain a neat and tidy appearance, giving your knitted item a more refined finish.
To create a mitered corner, you will typically work across the edge until you reach the desired corner. At this point, you will start decreasing stitches to form the diagonal line. This can be done using various decrease methods, such as knit two together (k2tog) or slip, knit, pass slipped stitch over (skpo). The choice of decrease method may depend on the pattern or your personal preference.
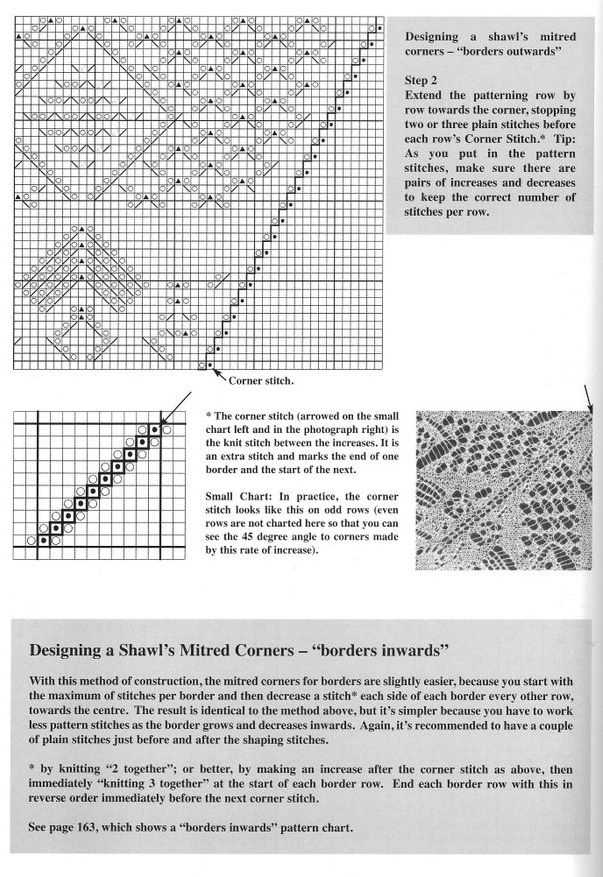
A common approach to mitered corners is to work the decreases on both sides of the corner simultaneously. This creates a symmetrical look and ensures that the fabric is evenly balanced. The number of stitches decreased on each side will depend on the desired angle of the corner and the gauge of your knitting. It’s important to carefully follow the pattern instructions or make a swatch to determine the appropriate number of decreases for your project.
If you’re new to mitered corner knitting, it’s recommended to start with a small project, such as a dishcloth or a baby blanket, to practice the technique. As you become more comfortable, you can explore different stitch patterns and incorporate mitered corners into larger and more complex designs.
Overall, mitered corner knitting is a valuable technique for creating clean and professional-looking corners in your knitted projects. With a bit of practice and experimentation, you can master this technique and add a touch of elegance to your knitting repertoire.
Selecting the Right Yarn and Needles
When it comes to knitting a mitered corner, selecting the right yarn and needles is crucial for achieving the desired outcome. The yarn thickness and fiber content can greatly affect the finished look and drape of the project, while the needle size determines the tension and overall size of the stitches.
Yarn: Choosing a yarn with the appropriate thickness is important for achieving the correct gauge and ensuring that the mitered corner lays flat. For a more structured and defined corner, a yarn with a higher percentage of wool or a blend with other natural fibers can be a good choice. On the other hand, if you prefer a softer and drapier corner, opt for a yarn with a higher percentage of silk, cotton, or other synthetic fibers. It’s also important to consider the color and pattern of the yarn, as this will contribute to the overall aesthetic of the project.
Needles: The needle size will determine the tension and size of the stitches, so it’s crucial to choose the right size for your project. For a mitered corner, using slightly larger needles than what is recommended for the yarn can result in a looser and more flexible fabric, which can be desirable for a softer look. Conversely, using smaller needles can create a tighter and more structured fabric, which is ideal for a sharper and crisper corner. It’s always a good idea to make a gauge swatch before starting the project to ensure that you’re using the right needle size to achieve the desired dimensions.
- Consider the yarn thickness and fiber content to determine the desired look and drape of the mitered corner.
- Choose a yarn with a higher percentage of wool or other natural fibers for a more structured corner, or opt for a yarn with silk, cotton, or synthetic fibers for a softer and drapier corner.
- Take into account the color and pattern of the yarn to achieve the desired aesthetic.
- Select the appropriate needle size to control the tension and size of the stitches.
- Using slightly larger needles can result in a looser and more flexible fabric, while smaller needles can create a tighter and more structured fabric.
- Make a gauge swatch to ensure that you’re using the right needle size to achieve the desired dimensions.
Casting On for a Mitered Corner
When starting a mitered corner in your knitting project, it’s important to cast on the correct number of stitches to ensure a seamless transition between sections. The number of stitches you cast on will depend on the pattern and the desired size and shape of the corner.
To begin, you can use a basic cast on method such as the long-tail cast on. This is a versatile technique that creates a neat and flexible edge. Make sure you leave a long tail of yarn, as you will need it later for seaming the corner.
After casting on, it’s helpful to place a marker to indicate the beginning of the round or row. This will aid in keeping track of your stitches and make it easier to maintain the correct stitch count as you work the mitered corner.
Tip: Before casting on, you may want to swatch and determine your gauge in order to calculate the number of stitches needed for the mitered corner. This will help ensure that the corner fits properly within the overall project.
Once you have cast on the necessary stitches and placed your marker, you can continue following the pattern instructions for working the mitered corner. This will typically involve decreases and increases at specific points to shape the corner. Pay close attention to the instructions and make sure to count your stitches regularly to maintain accuracy.
Remember: A well-executed mitered corner can add a professional and polished look to your knitting project. Taking the time to cast on correctly and follow the pattern instructions will result in a seamless transition and a beautifully finished corner.
Working the Mitered Decreases
In mitered corner knitting patterns, the mitered decreases are an essential technique for creating neat and crisp corners. These decreases help to taper the fabric towards the corner and create a clean finish.
1. Left-leaning decrease:
To work the left-leaning decrease, slip the first stitch knitwise, knit the next stitch, and then pass the slipped stitch over the knit stitch. This creates a left-leaning decrease that slants towards the left side of the fabric.
2. Right-leaning decrease:
For the right-leaning decrease, knit until two stitches before the center stitch. Slip the next stitch knitwise, knit the following stitch, and then pass the slipped stitch over the knit stitch. This creates a right-leaning decrease that slants towards the right side of the fabric.
3. Center decrease:
The center stitch is the stitch that sits directly in the middle of the corner. To work the center decrease, slip the first stitch knitwise, knit the next stitch, pass the slipped stitch over the knit stitch, and then pass the resulting stitch back to the left-hand needle. This decreases the stitch count by 2 and creates a centered decrease.
By incorporating these mitered decreases into your knitting, you can achieve sharp corners with clean lines. Experiment with different patterns and colors to create unique and beautiful designs.
Creating the Mitered Corner
The mitered corner knitting pattern is a technique that adds a polished and professional finish to your projects. It creates perfectly angled corners with no visible seams or gaps. This technique is commonly used in projects such as blankets, scarves, and dishcloths, but can be adapted to any knitting project.
To create a mitered corner, you will need to start by knitting an edging around your project. This edging can be done in any stitch pattern or color that you desire. Once the edging is complete, you will begin working the mitered corner.
Here are the steps to create a mitered corner:
- Step 1: Begin by picking up stitches along the side edge of your project.
- Step 2: Knit one row in your desired stitch pattern.
- Step 3: On the next row, knit to the last 2 stitches, then knit these 2 stitches together using the right-leaning decrease method.
- Step 4: Turn your work and repeat steps 2 and 3 until you have decreased all the stitches along the side edge.
- Step 5: Once all the stitches are decreased, you can bind off the remaining stitches.
To ensure a neat and clean mitered corner, it is important to pay attention to your tension and gauge throughout the knitting process. This will help to maintain consistent stitch sizes and prevent any puckering or stretching in the corner.
By following these steps, you can easily create a mitered corner that adds a professional touch to your knitting projects. Experiment with different stitch patterns and colors to create unique and eye-catching designs. Have fun and happy knitting!
Adding Borders to a Mitered Corner
When knitting a mitered corner, adding a border can provide a finishing touch and enhance the overall appearance of the project. The border can be an opportunity to play with different stitch patterns, colors, or textures, allowing you to customize your knitting project to your own taste and style.
Choosing the Border Stitch Pattern:
When selecting a stitch pattern for your border, consider the overall look you want to achieve. Do you prefer a simple and clean border or a more intricate and decorative one? Look for stitch patterns that complement the main fabric of your project and create a harmonious transition between the main fabric and the border. For example, if your main fabric has a lot of texture, you might want to choose a simpler border stitch pattern to balance it out.
Calculating the Number of Stitches:
Before starting the border, it is important to calculate the number of stitches needed to achieve the desired width. This will depend on the gauge of your main fabric and the stitch pattern you choose for the border. Divide the desired width of the border by the gauge stitches per inch to determine the number of stitches needed. Remember to take into account any pattern repeats or stitch multiples required by the border stitch pattern.
Knitting the Border:
- Join the yarn for the border at one of the corners of the mitered corner.
- Knit the first row or round of the border stitch pattern, keeping in mind any necessary stitch multiples.
- Continue knitting the border stitch pattern for the desired width, matching the number of stitches calculated in the previous step.
- Once the border is complete, bind off the stitches using a stretchy bind-off method to ensure a flexible and neat edge.
Finishing Touches:
After knitting the border, take the time to block your project to ensure the stitches are even and the border lays flat. Blocking can also help the border and main fabric blend together seamlessly. Weave in any loose ends and trim them neatly. Finally, admire your finished knitting project with its beautifully added border!
Customizing Your Mitered Corner Design
When it comes to mitered corner knitting patterns, there are endless possibilities for customization. Whether you’re creating a blanket, a sweater, or any other project that features mitered corners, you can easily personalize the design to suit your style and preferences.
One way to customize your mitered corner design is by choosing different colors for each section. You can create a bold and vibrant look by using contrasting colors, or opt for a more subtle and cohesive design by choosing shades from the same color family. Experiment with different color combinations to achieve the desired effect.
- Texture: Another way to customize your mitered corner design is by incorporating different textures. You can use different stitch patterns, such as cables or lace, to add depth and visual interest to your project. Consider how the texture will complement the chosen colors and overall style of your design.
- Size: The size of your mitered corner can also be customized to suit your needs. You can make larger or smaller corners depending on the scale of your project. Keep in mind that larger corners may require more stitches and rows, while smaller corners may require fewer stitches and rows.
- Pattern Placement: Consider how you want the mitered corner to be positioned within your project. You can choose to have the corner centered, or offset it to one side for an asymmetrical look. Experiment with different placement options to find the most visually appealing arrangement.
Remember, the key to customizing your mitered corner knitting pattern is to have fun and let your creativity shine. Don’t be afraid to try new color combinations, stitch patterns, and placement options to create a design that is uniquely yours. Happy knitting!
Using Mitered Corners in Different Knitting Projects
Mitered corners are commonly used in knitting projects to create neat and professional-looking finished edges. They are particularly popular in projects such as blankets, shawls, and scarves, where clean corners can add a polished touch to the overall design. By using the mitered corner technique, knitters can easily achieve a seamless transition between two sides of their work.
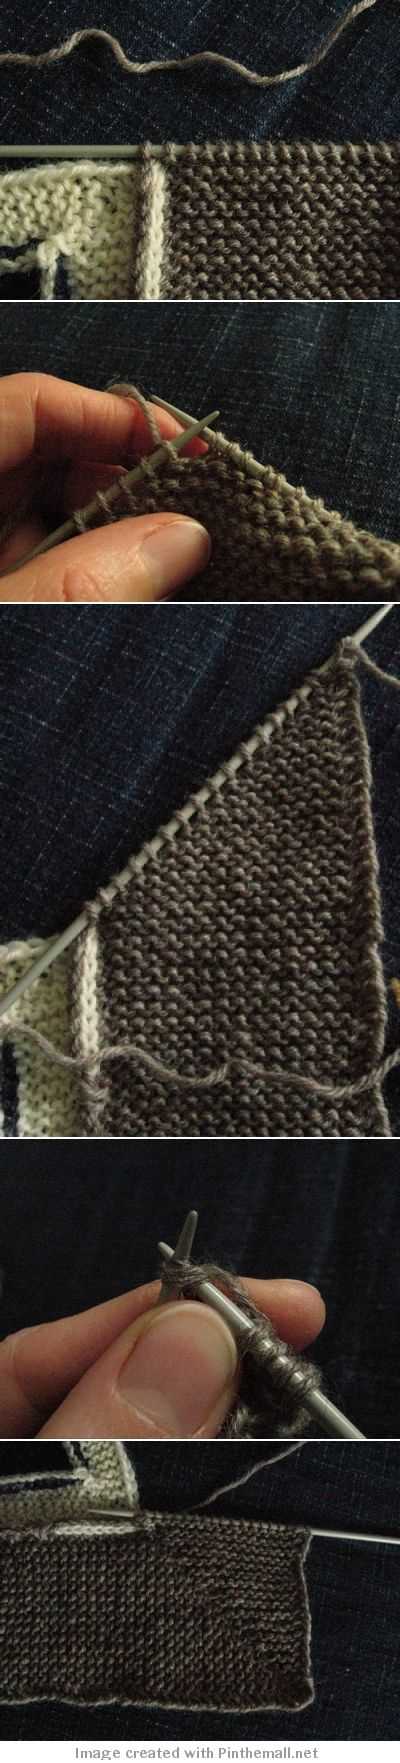
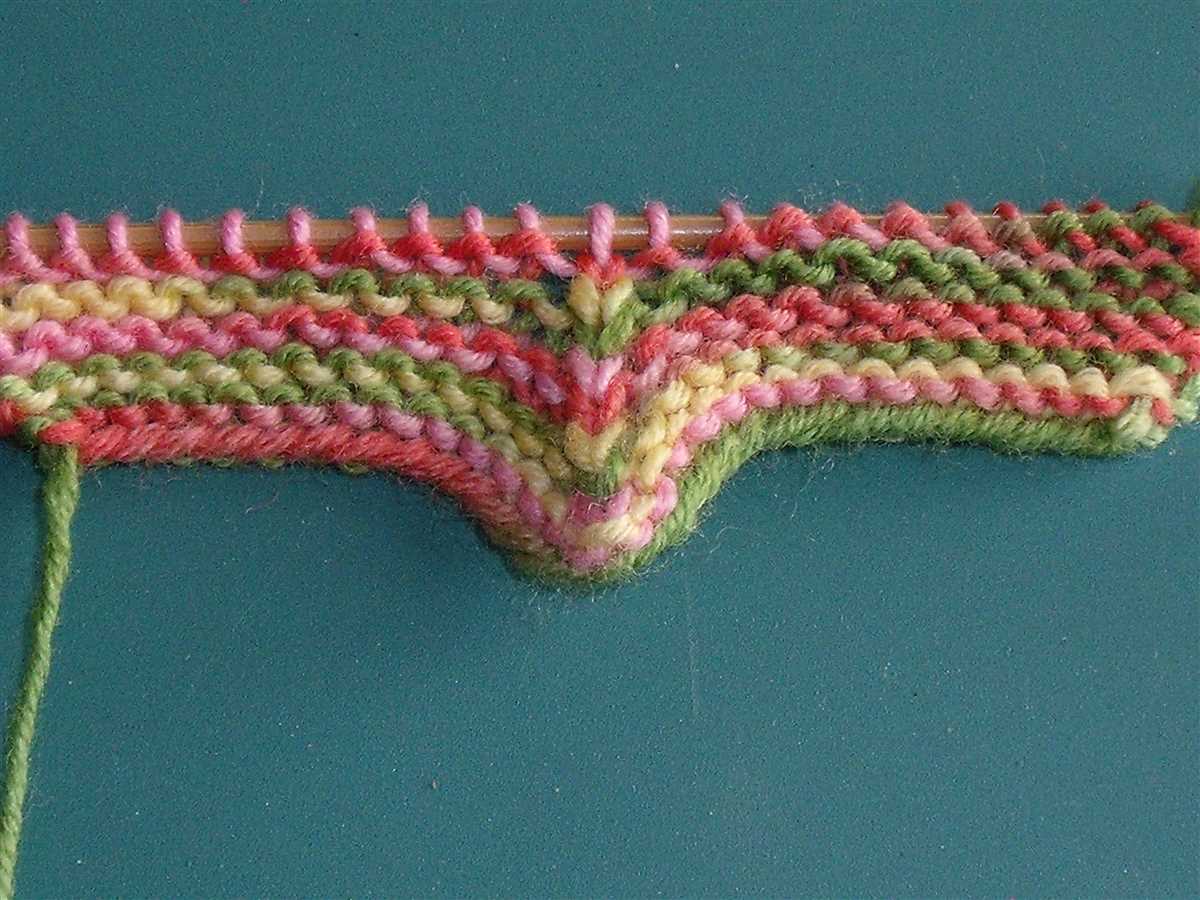
One common way to incorporate mitered corners into knitting projects is by working short rows. To do this, knitters can knit or purl to a specific point, and then turn their work and knit or purl back in the opposite direction. By repeating this process and decreasing the number of stitches on each row, a diagonal line is created, resulting in a mitered corner. This technique is often used in triangular shawls or scarves to create a pointed tip.
Another method for creating mitered corners is by using decreases. By strategically placing decreases at the corners of the work, knitters can create clean edges. For example, in a rectangular blanket, knitters can work to the corner, then decrease by knitting two stitches together, and continue working along the next side. This creates a diagonal line that seamlessly transitions from one side to the other.
The mitered corner technique can also be used in modular knitting projects, where individual pieces are knit separately and then joined together. In this case, knitters can use decreases or short rows to create mitered corners on each piece. When the pieces are seamed together, the corners will align perfectly, creating a cohesive and polished finished project.
Overall, mitered corners are a versatile technique that can be used in a wide range of knitting projects. Whether you’re working on a blanket, shawl, or modular project, incorporating mitered corners can elevate your knitting and give your finished piece a professional touch. Experiment with different methods and techniques to find the one that works best for your project and enjoy the clean and polished results of mitered corners in your knitting.
Fixing Common Mistakes in Mitered Corner Knitting
Knitting mitered corners can be a beautiful and elegant way to add shaping and interest to your knitting projects. However, like any knitting technique, mistakes can happen. Here are some common mistakes that can occur when knitting mitered corners and how to fix them.
1. Uneven or Gappy Corners
If you notice that your mitered corners are turning out uneven or have gaps, this is often an indication of tension issues. One possible solution is to adjust the tension of your knitting by either loosening or tightening your stitches. Experiment with different tension levels to find the one that gives you the desired result.
2. Holes at the Mitered Corners
Small holes can sometimes appear at the mitered corners due to inadvertently dropping or splitting stitches. To fix this, you can use a crochet hook or another knitting needle to pick up the dropped stitches and secure them properly. Take care to ensure that the stitches are not twisted when you pick them up, and tighten them gently to eliminate any gaps.
3. Decrease Mistakes
When making the decreases for the mitered corners, it is important to keep track of your stitches and their placement. Mismeasuring or missing a decrease can throw off the shape of the corner. To correct this, carefully examine your work and identify any missed or incorrect decreases. You can then rip back to the mistake and rework the decreases, ensuring that they are done correctly this time.
4. Uneven Edges

If you find that the edges of your mitered corners are not coming out even, this may be due to inconsistent tension or stitch count. To fix this issue, you can try blocking your work to even out the stitches and improve the overall shape. Additionally, paying close attention to your tension and stitch count as you work can help prevent this problem in the first place.
Overall, mitered corner knitting can be a rewarding and versatile technique, but it is important to be aware of common mistakes and know how to fix them. By understanding and addressing these issues, you can achieve beautifully shaped and polished mitered corners in your knitting projects.
Tips and Tricks for Perfect Mitered Corners
Mitered corners in knitting can add a professional and polished finish to your projects. Whether you are working on a blanket, a garment, or any other item that requires neat corners, here are some tips and tricks to help you achieve perfect mitered corners.
1. Start with the right stitch pattern: Choosing a stitch pattern that involves decreasing or increasing stitches at the edges will make it easier to create the mitered corner. Patterns like garter stitch, seed stitch, or ribbing can work well for this purpose.
2. Mark your corners: Before you start working on the corners, mark them with stitch markers or safety pins. This will help you keep track of where the corners should be and ensure that the decreases or increases are done at the right places.
3. Adjust stitch count: To create a mitered corner, you will need to adjust your stitch count. This usually involves decreasing or increasing stitches on the row before the corner and the row after the corner. By following the pattern instructions and adjusting the stitch count accordingly, you can achieve a nice and smooth corner.
4. Use the “slip, slip, knit” decrease: When working the decreases for the mitered corner, using a slip, slip, knit decrease (abbreviated as SSK) can create a more seamless and tidy corner. This decrease involves slipping two stitches knitwise, inserting the left needle into both slipped stitches, and knitting them together through the back loop.
5. Block your work: Once you have completed your project, blocking can help to further enhance the appearance of the mitered corners. Gently stretching and pinning the corners into shape while blocking can ensure that they lay flat and look even.
By following these tips and tricks, you can achieve perfect mitered corners in your knitting projects. With a bit of practice and attention to detail, your corners will look professional and add a beautiful touch to your finished creations.
Exploring Advanced Mitered Corner Techniques
When knitting mitered corners, there are several advanced techniques that can elevate your finished projects to the next level. Mitered corners provide a clean and professional finish to projects like blankets, scarves, and even garments. By learning these techniques, you’ll be able to create beautifully angled corners that add visual interest and refinement to your knitting.
1. Double decreases: One way to enhance the shape and precision of your mitered corners is by using double decreases. Instead of simply decreasing one stitch on each side of the corner, you can work a double decrease in the center. This creates a more pronounced angle and sharpens the point of the corner.
2. Slipped stitches: Another method to add texture and dimension to your mitered corners is by incorporating slipped stitches. By slipping stitches at the beginning or end of each row, you can create a raised ridge along the edge of the corner, adding a decorative touch to your project.
3. Shadow wraps: Shadow wraps are a technique often used in short row knitting, but they can also be applied to mitered corners. By wrapping the stitch before decreasing, you create a subtle shadow effect that adds depth and visual interest to the corner. This technique works particularly well when using contrasting colors or different stitch patterns.
4. Picot edging: To give your mitered corners a delicate and feminine touch, consider adding a picot edging. This involves casting on a few extra stitches at the corner and then binding them off in a decorative picot stitch. The picot edge adds a dainty and decorative detail to your corners, perfect for projects like baby blankets or shawls.
5. Decorative stitches: Finally, don’t be afraid to get creative with the stitches you use in your mitered corners. Experiment with lace patterns, cables, or colorwork to create unique and eye-catching corners. By choosing stitches that complement your overall project, you can make the corners a standout feature.
By exploring these advanced mitered corner techniques, you can take your knitting skills to the next level and create projects that are truly impressive. Whether you’re looking for added texture, decorative details, or unique shaping, these techniques will help you achieve your desired results.
Inspiration and Examples of Mitered Corner Patterns
Now that you have learned about mitered corner knitting patterns and how to create them, it’s time to explore some examples and find inspiration for your own projects. Whether you want to incorporate mitered corners into a garment, a blanket, or a smaller accessory, there are countless possibilities for adding this unique and elegant detail to your knitting.
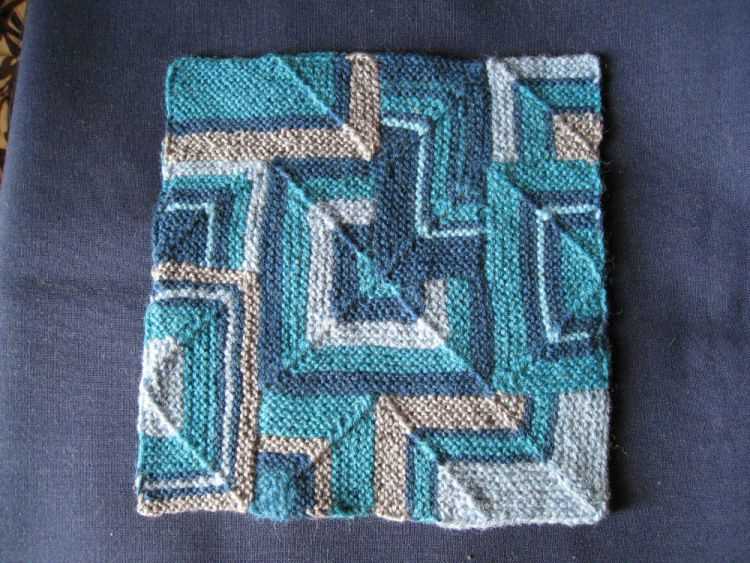
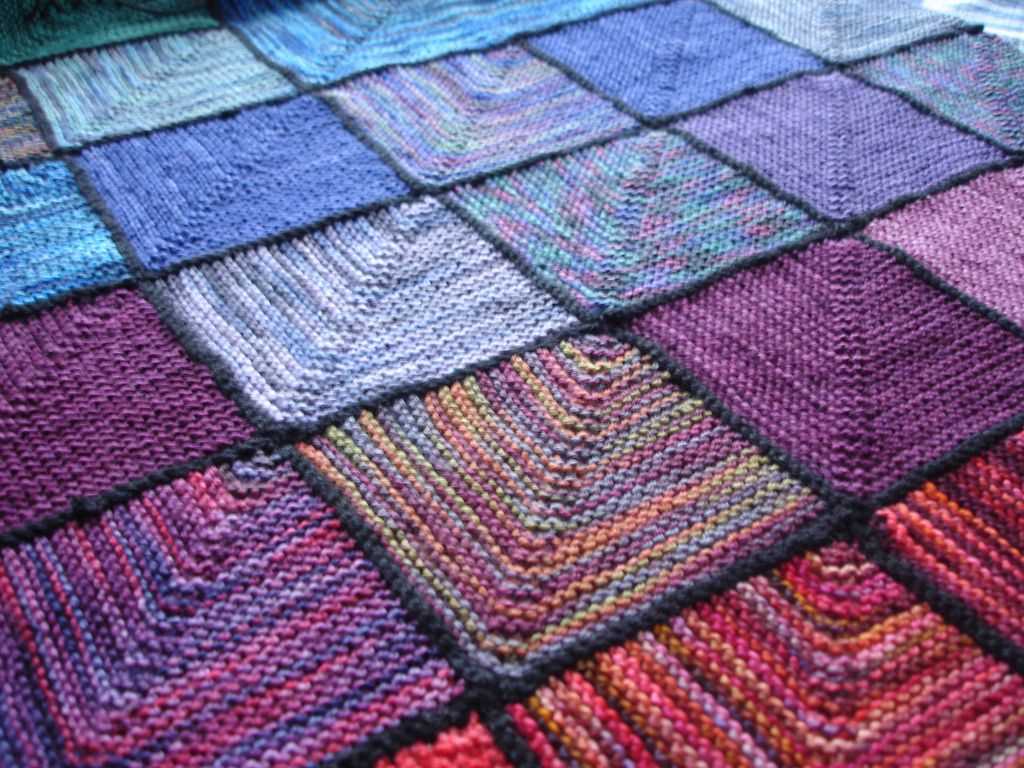
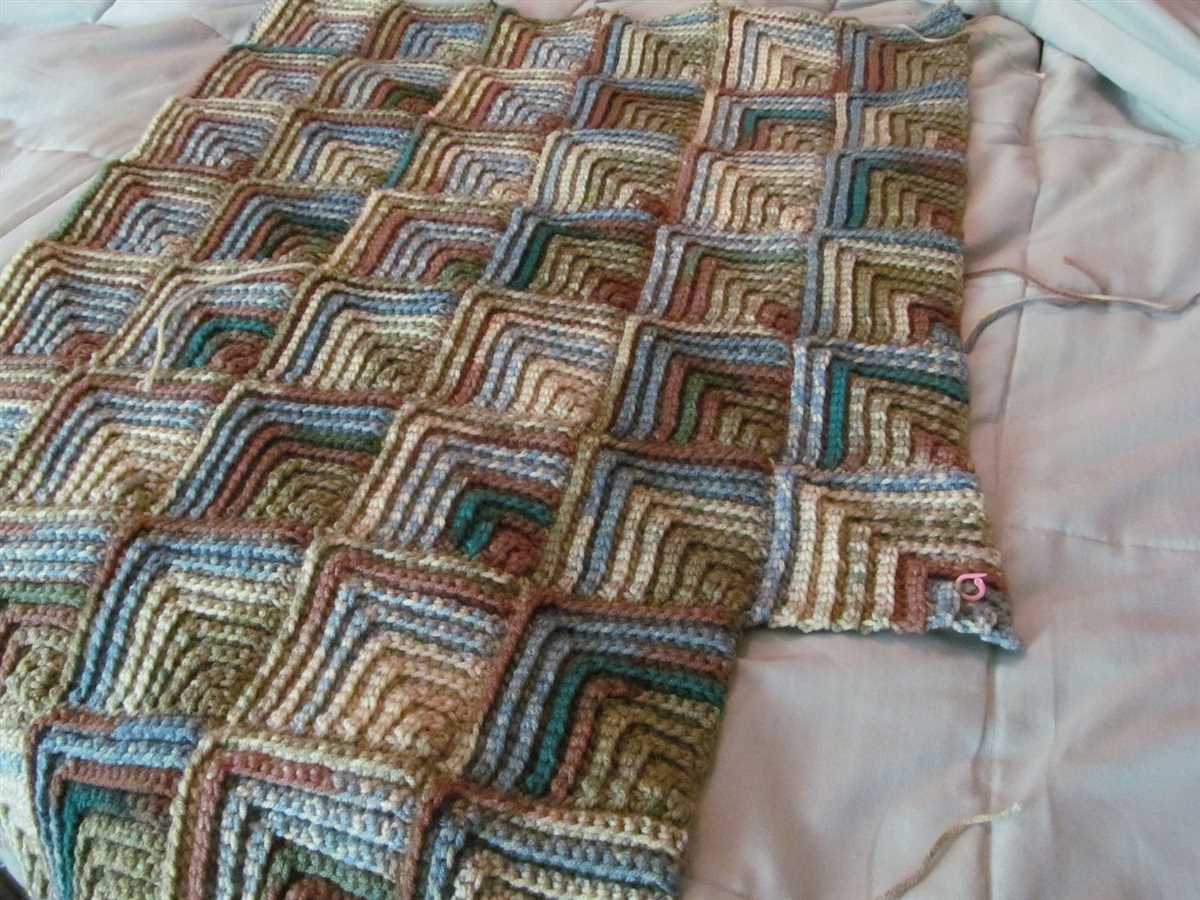
1. Mitered Corner Blanket: A mitered corner blanket is a classic way to showcase this knitting technique. You can create a stunning geometric design by alternating colors or using gradient yarn. The clean lines and crisp corners of a mitered corner blanket make it a beautiful addition to any home.
2. Mitered Corner Sweater: Incorporating mitered corners into a sweater adds a unique touch to your garment. You can use contrasting colors for the corners to make them stand out or choose a more subtle approach by using the same color yarn. Either way, a mitered corner sweater is sure to make a statement.
3. Mitered Corner Shawl: A mitered corner shawl is a versatile accessory that can be worn in multiple ways. You can experiment with different stitch patterns and color combinations to create a one-of-a-kind shawl. The mitered corners add visual interest and make the shawl drape beautifully.
4. Mitered Corner Bag: Give your tote bag or purse a modern and sophisticated look by adding mitered corners. You can create a structured bag with sharp corners or opt for a more slouchy design with rounded corners. The possibilities are endless when it comes to incorporating mitered corners into a bag.
With these examples and the knowledge of creating mitered corners, you can now unleash your creativity and experiment with different patterns and projects. Whether you choose to tackle a large blanket or a small accessory, mitered corner knitting patterns are sure to elevate your knitting projects to the next level.
Q&A:
What is a mitered corner in knitting?
A mitered corner in knitting is a technique used to create a neat and seamless corner in a knitted piece, such as a blanket or a shawl. It involves decreasing or increasing stitches in a diagonal manner to create a clean 45-degree angle at the corner.
How do you knit a mitered corner?
To knit a mitered corner, you start by working to the corner of your piece. Then, you decrease or increase stitches on either side of the corner to create a diagonal line. This is usually done by working a decrease or increase stitch at the beginning and end of each row, gradually shaping the corner to a 45-degree angle. Once the desired corner shape is achieved, you continue to work in pattern.
When would you use a mitered corner in knitting?
A mitered corner can be used in various knitting projects, such as blankets, shawls, or even garments. It is often used to create a clean and professional-looking corner without any bulky or awkward stitches. It can also be a decorative element to add visual interest to the knitted piece.
What are the advantages of using a mitered corner in knitting?
The advantages of using a mitered corner in knitting are that it creates a seamless and clean corner, without any bulky or awkward stitches. It also adds visual interest to the knitted piece and can be a decorative element. Additionally, the diagonal shaping of the corner adds structural stability to the knitted item.
Are there any variations of the mitered corner knitting pattern?
Yes, there are variations of the mitered corner knitting pattern. Some variations involve using different types of decrease or increase stitches to shape the corner. Others may include incorporating color changes or stitch patterns to create more intricate designs. The choice of variation depends on the desired outcome and the design of the knitted piece.
What is a mitered corner in knitting?
A mitered corner in knitting is a technique used to create neat and seamless corners in projects such as blankets, scarves, or other rectangular items. It involves decreasing the stitches at specific intervals to create a diagonal line, resulting in a clean and professional finish.